background image

Introduction

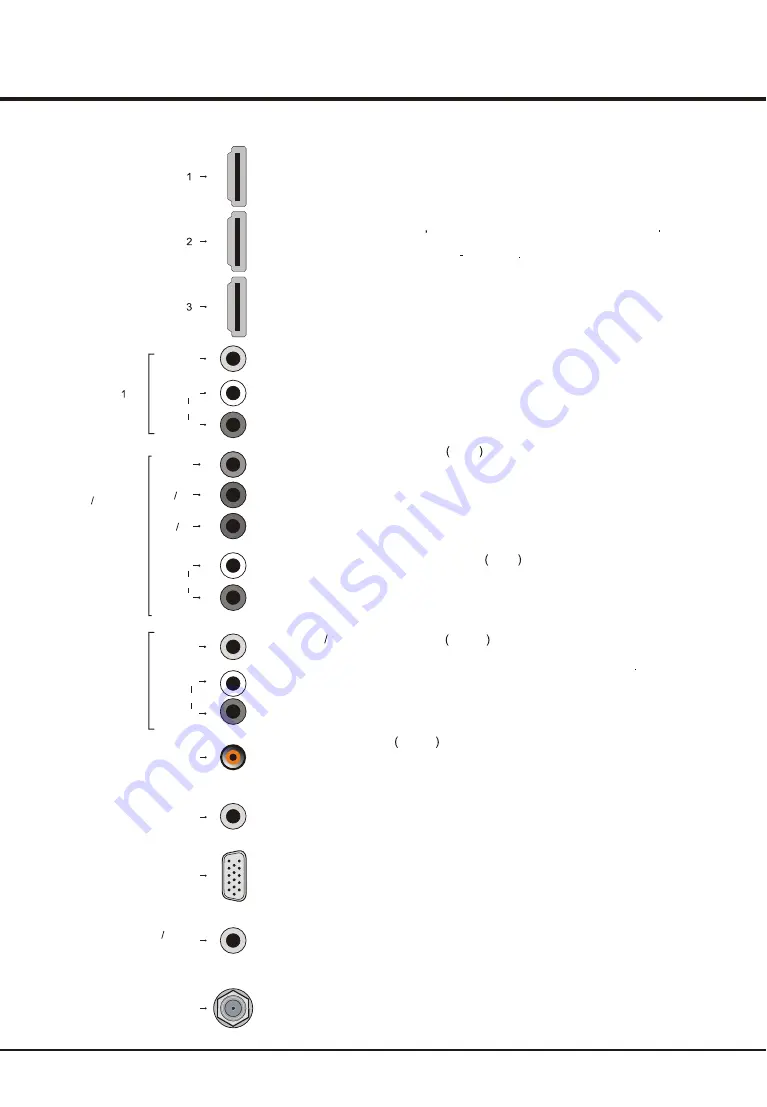
HDMI1 socket (input) at the side and HDMI2/HDMI3 sockets (input) at the back 

The HDMI (High-Definition Multimedia Interface) socket lets you connect a device,

p

such a

s a

 Blu Ray player

with a HD

MI output for best picture quality It also

rovides an uncompressed digital connection that carries both video and audio

data by way of an integrated mini plug cable

SERVICE ONLY socket (input) at the back 

This socket can be used to upgrade the software version for the TV. 

AUDIO VIDEO OUT sockets output at the back

the TV on the same channel you are recording. The VIDEO OUT socket provides  
composite video connection. 

These sockets can be used to connect a VCR to record programs You must leave


YPBPR component sockets input at the back

These can be used to connect a device that has component video sockets, such 
as a DVD player. The component sockets can recognize if the device you're 
connecting to is Y Pb Pr compatible or Y Cb Cr compatible. The component 
sockets provide

s


excellent picture quality because the video is separated into three 

separate parts.

YPBPR component audio sockets input at the back

The two sockets can be used to obtain sound when using the YPBPR component
sockets. 

AV1 RCA audio + video sockets (input) at the back

These sockets can be used to connect a range of equipment, including video 
recorders, camcorders, decoders, satellite receivers, DVD players, or games 
consoles. The VIDEO IN1 socket p


rovides composite video connection.

VGA/DVI AUDIO socket (input) at the back 

This socket provides audio connection when using the HDMI jack for DVI, or u

s

ed


to obtain sound when a PC is connected to the VGA INPUT. 

SPD

IF OUT socket output at the back

Use a digital coaxial cable to connect your TV to a digital amplifier. It always keeps 
output and keeps the same as the audio frequency of the current source.

ANTENNA IN socket (input) at the back

This socket can be used to connect to an external antenna.

HDMI

VGA

HDMI

VGA DVI

AUDIO IN

SPDIF OUT

ANTENNA IN

R

L

VIDEO

AUDIO

AV IN

Y

Pb Cb

Pr Cr

COMPONENT

AUDIO VIDEO IN

R

L

AUDIO

VIDEO

R

L

AV OUT

AUDIO

SERVICE ONLY

VGA socket (input) at the back 

This socket can be used to connect a computer. 

5

HDMI

Summary of Contents for L19M19

Page 1: ...L19M19 L22M19 L26E9B L32M19 L32P10F L32E9B L42E9BF L46P10F L46P10FZ L55P10FZ OPERATION MANUAL LCD TV...

Page 2: ...Signal Cable Use Environment Cleaning Hanging the TV Set on the Wall Side Panel Buttons Sockets Remote Control Functions Important Information Switching on Switching off Using Menu System Automatic Ch...

Page 3: ...able from being trampled Do not overload the power cord or the power outlet Do not expose the power cord and the signal cable to moisture Power Cord and Signal Cable Do not place the set on an unstabl...

Page 4: ...output at the side This socket can be used to connect headphones or stereo earphones Note When the Headphone socket connected the speakers will be muted AV2 RCA audio video sockets input at the side...

Page 5: ...excellent picture quality because the video is separated into three separate parts YPBPR component audio sockets input at the back The two sockets can be used to obtain sound when using the YPBPR comp...

Page 6: ...de Toggles the Electronic Programme Guide between on and off Only available for digital channels Return Returns you to the previous channel in USB function returns to the previous menu Subtitle Toggle...

Page 7: ...ternal aerial or other equipment fitted 4 Switch the TV on by pressing the AC power button located at the back Note If the power indicator lights up the TV set is in standby mode Press the button or t...

Page 8: ...your TV Each menu is outlined and detailed to help you get the most from your TV To access the menu system Press the Menu button to display the main menu to set functions or chan Use the OK button to...

Page 9: ...ss the up or down direction button to highlight Automatic update option 2 Press the OK or right direction button to start to update the channels To stop the update process press the Menu button 3 When...

Page 10: ...settings COOL for a more blue palette of picture colors NORMAL and WARM for a more red palette of picture colors the left or right button to s Auto format use direction elect On or Off when On selecte...

Page 11: ...ternal source you want to lock and press the OK button to lock To unlock use the same operation Change password this option allows you to change the password Press the OK or right direction button to...

Page 12: ...the digit keys Sleep timer sets a period of time after which the TV set goes into standby mode Use the left or right direction button to set the period 120 minutes maximum To disable this function se...

Page 13: ...Press the red green key to page up down in either main or sub file content browser in the same way as in picture display function 3 Select a video press OK to watch and an automatic playback begins f...

Page 14: ...the TV can not recognize the resolution set by the PC It is suggested to change to the best resolution or other standard resolutions of the Windows system Snowy dots and interference If the antenna is...

Page 15: ......

Page 16: ...72 LPMT62 E001A...

Reviews: