background image

12

13

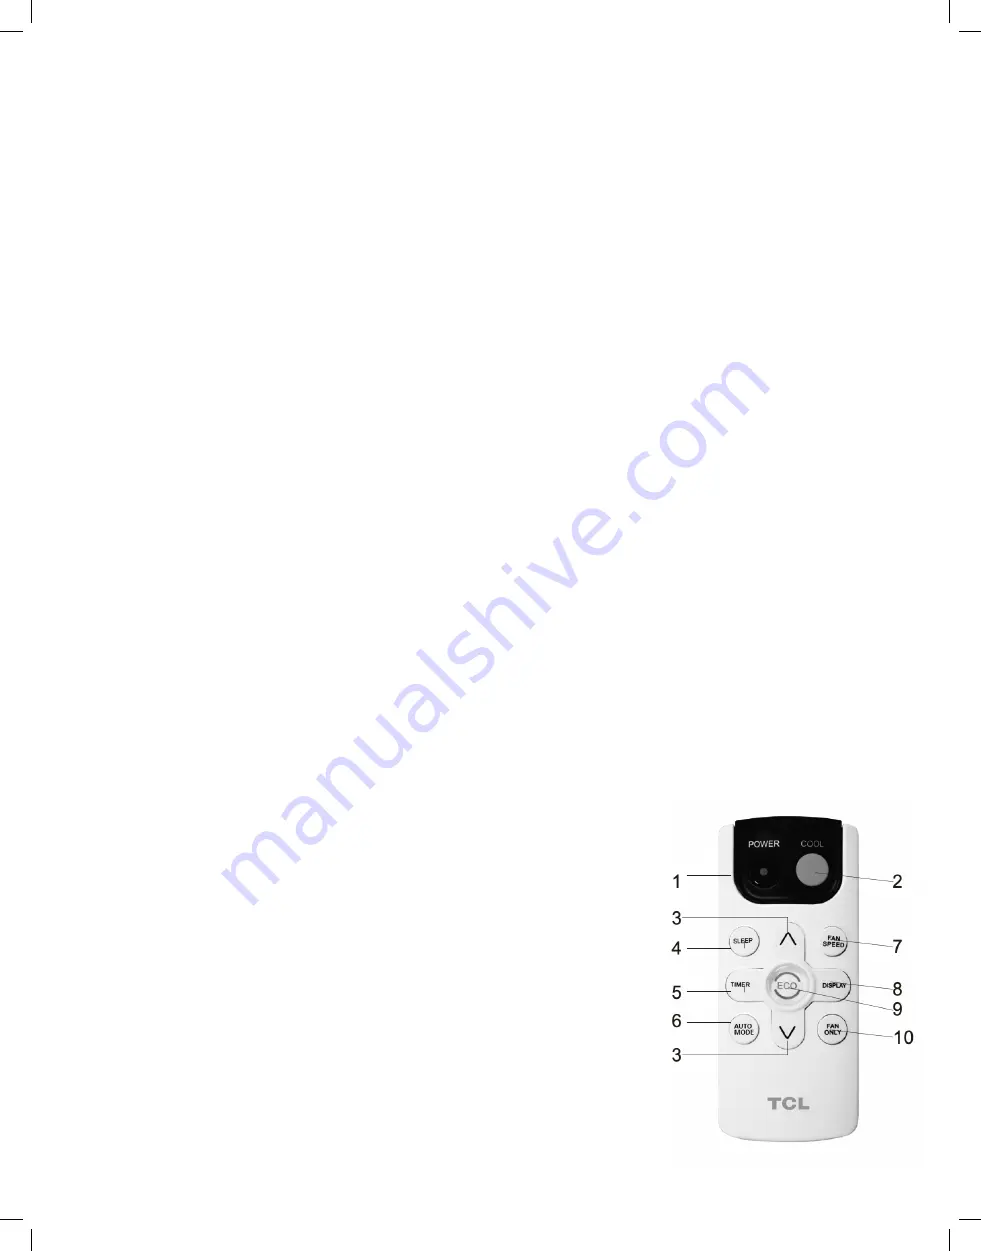
buttons will increase or decrease the timer. The Timer can be set in 0.5 hours increment below 10 

hours and 1 hour increment for 10 hours or above. The Set light will turn on while setting.

To cancel the Set function, press the TIMER button again.

the humidity is high. This design feature helps remove moisture and increase efficiency.

You may hear the thermostat click when the compressor cycles on and off. Water will collect in the 

base pan on rainy days, or high humidity days. The water may overflow and drip from the unit on the 

outside. The fan may run, even when the compressor is not on.

 6.


Eco Mode – 

In Eco mode, the unit will turn off once the room is cooled to the user-set 

temperature. The unit will turn back on when the room temperature rises above the user-set 

temperature. While in Eco mode, the fan will occasionally turn on for a few seconds in order to 

take an accurate temperature reading.

The unit will turn back on when the room temperature rises above the user set temperature. Before 

the compressor starts, the fan motor will  run for a while, then it will stop for a while. The process 

will continue to repeat to save energy while creating a comfortable environment.

 7.


Sleep Button –


In Sleep mode, all of the display lights will turn off after a while, but the Sleep 

light stays on. In Sleep mode, the air conditioner will automatically adjust the temperature 

and fan speed to make the room more comfortable during the night. The set temperature 

will automatically raise every 30-60 minutes, and at most change six times until the set 

temperature is 81 or 82 degrees.

 8.


Fan Speed – 

Press the Fan Speed button to choose the fan speed options. You can choose Hi, 

Med, Lo or auto speed in cool mode and choose Hi, Med, Lo in fan mode.

 9.


Filter Button –

 After the fan motor has run for 500 total hours, the Filter Check light will turn 

on to remind the user to clean the filter.  After you clean the filter, you can turn off the light by 

pressing the Filter button.  

 10.


Directional Louvers:

 To direct the airflow horizontal wheel to control the horizontal direction, 

air deflector to control the vertical direction.,

Operating Your Air Conditioner
Remote Control

 1.


POWER: 

Turn the air conditioner on and off.

 2.


COOL:

 Press the COOL button to COOL mode.

 3.


Up and Down: 

Use these buttons to increase or decrease 

the temperature.


The Set light will turn on after selecting the 

desired temperature. Decrease the Set Temperature or Timer. 

Temperature range: 61˚ ~88˚ Fahrenheit or 16˚ ~31˚ Celsius.

 4.


SLEEP: 

Press the Sleep button, all of the display lights will turn 

off after a while, but the sleep light is always on. In the mode, the 

air conditioner will automatically adjust the temperature and fan 

speed to make the room more comfortable during the night. The 

set temperature will automatically change every 30-60 minutes 

and at most change six times until the set temperature is 81˚ or 

82˚ Fahrenheit for cooling and 75˚ or 76˚ Fahrenheit  

for heating.

 5.


TIMER:

 Use these buttons on the control panel and remote to set 

Summary of Contents for 10T3E1

Page 1: ...1 Hi Let s Get Started TTW Window AC English ...

Page 2: ...e 3 English Important Safety Instructions 4 What s in the Box 5 Let s Get Started 6 Direct Unit Mounting 8 How to Control Your AC 11 Operating Your AC 12 Care and Cleaning 14 Troubleshooting 15 WiFi App Installation 31 Spanish French English Online QSG 33 ...

Page 3: ...your appliance Exclusive offers and promotions Verification of ownership Add a TCL Protection Plan when you register your product and be covered from life s mishaps Thank you for choosing TCL We want your ownership experience to bring you as much joy as the appliance you purchased does so we re offering you a special price on TCL Protection Plans when you purchase during registration Add a TCL Pro...

Page 4: ...W12T9E1 A 115V grounded wall outlet W10T9EX1 A W12T9EX1 A W14T9X1 A 230V grounded wall outlet RECOMMENDED GROUND METHOD For your personal safety this air conditioner must be grounded This air conditioner is equipped with a 3 prong power supply cord with a grounded plug To minimize the possibility of electrical shock the cord must be plugged into a 3 prong outlet and grounded in accordance with all...

Page 5: ... warranty What s in the box NO APPEARANCE PART NAME QUANTITY 2 Through The Wall Air Conditioner 1 3 Remote Control 1 4 Trim Frame 1 Left Right legs 2 5 Trim Frame 2 Top Bottom legs 2 6 Aluminum Grill 1 7 Rear Plastic Grill 1 8 1 2 Long Hex Head Screw 4 9 Grounding Wire with Tooth Washer 1 DIMENSION PART NAME QUANTITY 1 x3 4 x14 Seal sponge 2 1 x3 8 x14 Seal sponge 2 1 x3 8 x25 Seal sponge 3 1 x1 1...

Page 6: ...those in the chart below Type Wall sleeve Dimension Height Width Depth Standard Dimension 15 3 4 26 20 2 The wall sleeve used to mount the air conditioner must be in sound structural condition and have a rear grill that is securely attached to the sleeve or rear flange that serves as a stop for the air conditioner 3 Remove the old air conditioner from the wall sleeve 4 Clean the interior of the wa...

Page 7: ...e end of the ground wire out of the front of the sleeve and bend it away from the opening This will be attached to the air conditioner once installed 11 Install the new unit into the wall sleeve 12 To attach the ground wire to the new unit remove the screw from the left side on the front 13 Assemble and install the trim frame Existing Frigidaire sleeves may have older single sided intake grills as...

Page 8: ...leeve Attach the new grill by aligning the four mounting holes Re insert the self tapping screws into the nylon retainers Direct Unit Mounting In the event that the dual intake grill cannot be mounted directly to the sleeve it is recommended to attach the grill to the back of the through the wall unit with the hole pre drilled in the unit 1 Attach the 2 seals 1 x3 8 x14 as Fig 1 2 Position the gri...

Page 9: ... Take the 1 2 x3 1 2 x1 1 2 centering blocks one on each side wall Place in the center of side wall with the tapered end facing the opening Ground Wire Installation 1 Install screw end of the ground wire into the inside of the sleeve according to preparation instruction 2 Before sliding the unit all the way back remove the second screw from left side of unit 3 Remove plastic washer from screw 4 Sc...

Page 10: ...e wall sleeve and the unit A flat bladed screwdriver or putty knife is needed 2 Assemble the trim frame by inserting the top and bottom pieces into the side pieces and snapping them into place 3 Pull the cord through the trim frame and slide the trim over the unit until flush with the wall ...

Page 11: ...ng cooling cycles and air fan is activated Fan Mode Fan Mode helps to circulate air in your home but only works when the air conditioner is vented Auto Mode In Auto mode the unit automatically chooses the fan speed and the mode of operation Cool Dry or Fan In this mode the temperature is set automatically according to the room temperature tested by the temperature sensor which is incorporated in t...

Page 12: ...the room more comfortable during the night The set temperature will automatically raise every 30 60 minutes and at most change six times until the set temperature is 81 or 82 degrees 8 Fan Speed Press the Fan Speed button to choose the fan speed options You can choose Hi Med Lo or auto speed in cool mode and choose Hi Med Lo in fan mode 9 Filter Button After the fan motor has run for 500 total hou...

Page 13: ...ress the TIMER button again 6 Auto Mode In AUTO mode the unit automatically chooses the mode of operation COOL DRY or FAN In this mode the temperature will be set automatically according to the room temperature tested by the temperature sensor which is incorporated in the indoor unit 7 Fan Speed Press the Fan Speed button to choose the fan speed options You can choose Hi Med Lo or auto speed in Co...

Page 14: ...D TEAR To minimize wear and tear on the air conditioner always wait at least 3 minutes before changing modes This will help prevent the compressor from overheating and the circuit breaker from tripping CABINET CLEANING To clean the air conditioner cabinet Unplug the air conditioner to prevent shock or a fire hazard The cabinet and front panel of the air conditioner may be dusted with an oil free c...

Page 15: ...y Lower the set thermostat tempera ture The air filter is dirty Clean the filter See the Cleaning and Care Section of the manual The room may be too warm Please allow time for the room to cool down after turning on the air conditioner Cold air is escaping Check for open furnace registers and cold air returns The Cooling Coils are frozen See Air Conditioner Freezing Up below Air Conditioner is free...

Page 16: ...the latest App for your TCL branded air conditioner If your phone does not currently have a QR scanner installed you can download and install one from your App store tcl link homeconnectapp Note The TCL Home Comfort App is supported on 2 4 GHZ Wi Fi Channels only Please be sure your connection is using a Wireless channel broadcasting in 2 4GHZ 2 After navigating to the TCL Home Comfort App select ...

Page 17: ... to begin the registration process You can register with your email address OR with a mobile phone number Register with an email address Register with a mobile phone number Select or Register with Mobile number on the bottom of the screen You will be sent a verification code via text to complete the registration process ...

Page 18: ... or mobile phone number you registered with 2 For phone number login You will be requested each time to validate login with a login code sent via text Press the Sign In with SMS button to enter the login screen Type in your phone number and press Get to receive a verification code Once the verification code is received type it into the login screen and press Login ...

Page 19: ...uctions 1 Press the Forgot password button to enter the next page 2 Type in the registered phone number or email address and press the Next button to continue 3 You will receive a verification code to continue Type in the code received and set a new password Press the Confirm button to finish ...

Page 20: ...ion using the CF mode the AC unit being connected for Wi Fi operation will automatically search for an available wireless network and connects automatically when the setup directions are followed The unit and device will be synced together afterwards AP Mode If your AC unit does not connect to the mobile device through the wireless network using the setup instruction in CF mode you can connect the...

Page 21: ...s your will hear two beeps and the AC will display CF 2 Select the network you wish to connect to enter the router password and press Next to continue Note If having difficulties finding or joining your wireless network you may need to give the TCL Home Comfort App permission to enable Location This setting can typically be found by going to Settings Apps TCL Home Comfort and then select to enable...

Page 22: ...the AC unit to the network the page will display as below You can Rename the AC unit as you like share with family or press Done to start to controlling the device Note If at any time you need to start over pressing Display on the remote control 6 times will reset the wireless setup configuration on the AC unit back to CF mode Pressing the Display button an additional 6 times after CF mode appears...

Page 23: ...dicating CF mode click AP mode in the top right hand corner as illustrated 2 AP should show on the page as illustrated below Press Next Step to continue 3 To the switch the AC unit over to AP mode Press Display on the remote control 6 times within 6 seconds so the AC unit switches from CF mode to AP mode Allow the unit 10 15 seconds to switch modes and AP will flash on the AC unit display screen w...

Page 24: ...t to Wi Fi connections 6 TCLHOMECOMFORT XXXX should show as an available network connection option Connect to the TCLHOMECOMFORT XXXX network 7 After connecting to TCLHOMECOMFORT XXXX network using the AC unit s Wi Fi adapter return to the TCL Home Comfort App to resume setup Note You may need to manually navigate back to the TCL Home Comfort App ...

Page 25: ...onnection again or View help 11 Once connected you are ready to begin controlling your AC unit from your mobile device Once your unit cycles on and off after using the AC unit s Wi Fi adapter to connect the AC unit will automatically pair with the network your phone is connected to Note If at any time you need to start over pressing Display on the remote control 6 times will reset the wireless set...

Page 26: ...to adjust the settings 2 You can adjust the settings for the operating mode you want to use Cool Heat Dry Fan Auto Click the Mode button and choose the mode you would like to change Note Some units also have a heat function The Heat mode on the App will not be functional or change any settings on AC units that are cool only ...

Page 27: ...and choose the speed you want Low Med High Auto 4 Other unit controls can be changed by selecting the Function button By selecting the Function control you can select the Sleep or Eco modes In Sleep mode the fan speed will be set to low only ...

Page 28: ...you re finished setting the timer click the button to Cancel or Confirm Notes Dry Mode temperature is preset at and cannot be changed up or down Heat Mode does not apply to all units If your AC unit does not have a heat function the heat mode on the App will not change anything on the AC unit for cooling only models If your unit has a heater function you will be able to adjust the temperature up o...

Page 29: ...ice or Restore Defaults 8 Manage the information in your profile It includes a Account information b Scan QR code Opens a QR code reader within the App c Share Device Display user s device sharing information d Message Center Displays all messages that the system sent to the user e Feedback Where users could submit feedback online f About Displays the current App version information ...

Page 30: ... can only be shared through the primary device Shared accounts need to be setup for the same country 9 Tap Pattern unlock under the Profile section where you set your name You can then set up your App unlock pattern After it is enabled you need to draw the pattern to unlock the App ...

Page 31: ... find AC Network error Restart wireless router AC and restart mobile device with TCL Home Comfort App installed App AC are not on the same 2 4GHz channel Confirm your device is connected to the 2 4GHz channel Router blocking TCL Home Comfort App Verify App is not being blocked by router firewall Failed to connect using CF mode Unknown connectivity or network error Follow the instructions to Add th...

Page 32: ...d the TCL Logo are owned by TCL Corporation and under license to TTE Technology Inc Part No 70 43MS10 QSG9D 1 800 825 6747 Need more help www TCLUSA com support Copyright 2019 by TCL All rights reserved TCL and the TCL Logo are owned by TCL Corporation and under license to TTE Technology Inc Part No XXXXX ...

Page 33: ... QSG9D Using the camera function on your smartphone please scan the QR code below to be directed to the full QSG If your phone does not have a QR scanner download one from the app store or manually type in the URL below in your smartphone s web browser Spanish French English Online QSG For the full QSG in all three languages English Spanish and French please follow the instructions below tcl link ...

Reviews: