background image

26

Fault / Remedy

Fault / Remedy

The right-hand indicator light

flashes red and an acoustic

signal sounds.

Is the water tank empty?

Fill the water tank.

Press one of the coffee selection buttons. The pump will start. As soon as the pipes

are filled with water the pump will stop automatically. 

Once the coffee selection buttons remain permanently lit, the machine is ready for

use again.

Has the lever been raised during the brewing procedure?

This will immediately stop the brewing procedure. 

Push the lever down again.

Press one of the coffee selection buttons to switch off the acoustic signal.

m

m

WARNING

- risk of scalds

If the lever is raised during the brewing procedure, splashes of hot water

may escape.

m

m

m

No coffee or only a little coffee 

is coming out.

If the right-hand indicator light flashes red, the water tank is empty. Fill it and press a

coffee selection button to fill the pipes with water again.

Water is dripping out of the

coffee spout.

The water in the system expands as the machine heats up and as a result a little water

drips out of the coffee spout. 

During brewing, the water is pressed through the capsule at high pressure. If the lever

is moved at the end, the machine loses pressure and coffee escapes. This is a 

feature of the system and is not a fault. For this reason, you should not remove the

cup with the freshly brewed coffee from the drip grid until after you have fully pushed

back the lever. 

Summary of Contents for 280997

Page 1: ...Instructions for use and guarantee for Cafissimo COMPACT Find it only at Tchibo Welcome to ...

Page 2: ......

Page 3: ... to use capsule machine You can now enjoy your coffee whenever and however you like with perfect espresso caffè crema and filter coffee Just press a button and your Cafissimo COMPACT will take care of the rest Our team of experts have perfectly harmonised machine and capsules to bring out the full aroma of your coffee Thank you for choosing us Your Cafissimo team ...

Page 4: ...the spout 15 Brewing coffee 18 Standby mode 18 Releasing pressure 19 Adjusting the strength of the coffee 19 Adjusting the strength for the current brewing procedure without saving the setting 19 Setting the strength permanently saving the setting 19 Restoring factory settings 20 Cleaning 20 Cleaning the water tank 20 Cleaning the used capsule container and drip tray grid 20 Cleaning the casing 21...

Page 5: ...is prepared at the correct pressure Automatic capsule ejection and integrated used capsule container When you lift up the lever after brewing the capsule drops into the container automatically Individually programmable beverage size Adapt the strength of the coffee to your own personal taste Save energy with the standby mode and descaling reminder We are there for you To show you that we are compl...

Page 6: ... variety offered in our permanent range why not try our Grand Classés These limited exclusively selected espresso varieties are available several times a year The Cafissimo aroma capsules The unique three pressure level system The Cafissimo COMPACT has a unique three pressure level system making it perfect for brewing your favourite type of coffee Using an individual brewing pressure allows the re...

Page 7: ...er Control panel and indicator lights Drip grid Water tank Drip tray Capsule compartment Coffee spout Lever for opening and closing the capsule compartment At a glance 7 At a glance Hinged water tank opening On Off switch ...

Page 8: ...The machine is equipped with safety features Never theless read the safety warnings carefully and only use the product as described in these instructions to avoid accidental injury or damage Keep these instructions for future reference If you pass the machine on to someone else remember to give them these instructions Symbols in these instructions Signal words DANGER warns you of potential severe ...

Page 9: ...ne mains plug or mains cord in water as this could cause an electric shock Never touch the mains plug with wet hands Do not use the machine outdoors Never leave the machine to operate unattended Only connect the machine to a properly installed grounded wall socket The mains voltage must comply with the requirements stated in the machine s technical specifications The mains cord must not be kinked ...

Page 10: ...le compartment contains two capsule punchers These pierce both sides of the capsule when the lever is pressed down Never reach into the capsule compartment Keep your fingers and any objects away from the capsule compartment while pushing the lever down Do not lift the machine by the lever To move the machine hold it by the outer casing Place the machine on a solid level surface which is water and ...

Page 11: ...r Fill the water tank with fresh cold tap water or drinking water up to the MAX mark Either pour the water into the water tank through the hinged opening or pull the water tank upwards at an angle to remove it and then fill it with water When reinserting it press the water tank down slightly to ensure that the valve in the base connects with the casing 3 Pushing down the lever The lever must be do...

Page 12: ...uttons will flash and the right hand indicator light will flash red 6 Pressing the coffee selection button Press any coffee selection button The pump will start As soon as the pipes are filled with water the pump will stop automatically A small quantity of water will run into the cup beneath the spout The right hand indicator light will go off Only the three coffee selection buttons will continue ...

Page 13: ...achine by allowing two cups of water to flow through it without a capsule 1 Fill the water tank with fresh cold tap water or drinking water up to the MAX mark 2 Place an empty cup underneath the spout The lever must be down 3 As soon as the three coffee selection buttons remain permanently lit press the middle one The pump will flush water through the pipes which will then run into the cup underne...

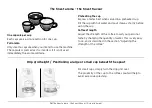
Page 14: ...to do and is described in the section Adjusting the strength of the coffee One capsule per cup Each capsule is a single portion for one cup Full aroma Only insert a capsule when you intend to use the machine The capsule is pierced as it is inserted If it is not used immediately the aroma will fade For small cups simply turn the drip grid over The proximity of the cup to the coffee spout will help ...

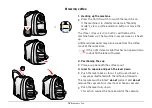
Page 15: ...e from the coffee spout at the same time If the right indicator light flashes a signal will also sound fill the tank with water 2 Positioning the cup Place a cup beneath the coffee spout 3 Insert a capsule and push the lever down Push the lever back as far as it will go and insert a capsule as illustrated with the lid facing forwards The capsule must be intact do not pierce it and do not remove th...

Page 16: ...ting the quantity of water Please refer to the section Adjusting the strength of the coffee for information on how to do this As with professional espresso machines when pre paring espresso and caffè crema a small amount of water is pre brewed to ensure that the coffee can develop its full aroma This pre brewing is indicated by a short interruption when the brewing process begins Filter coffee is ...

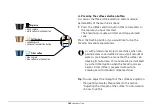
Page 17: ...le then falls into the used capsule con tainer 6 Emptying the used capsule container and drip tray After use pour away the water that is in the drip tray Due to the way the machine operates there will always be water and a small residue of coffee grounds collected inside the tray empty the used capsule container daily or whenever it is full It can hold approx 8 capsules m m m ...

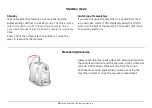
Page 18: ...e will fall out and the pressure in the system will subside A little more coffee will drip from the spout Push the lever down again when you are not using the machine in order to close the capsule compartment Standby mode Standby 15 minutes after the brewing procedure the machine automatically switches to standby mode The three coffee selection buttons go off The machine now uses only a very small...

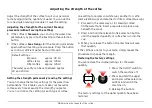
Page 19: ...e of coffee Default settings Espresso approx 40 ml Caffè crema approx 125 ml Filter coffee approx 125 ml The water quantity can be set between approx 30 and 300 ml m m one setting for espresso white cup another for caffè crema yellow cup and another for filter coffee blue cup 1 Proceed in the same way as for brewing coffee fill the water tank insert a capsule and place a cup beneath the spout 2 Pr...

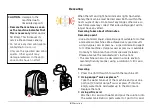
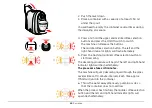
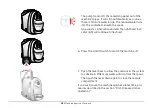
Page 20: ...astic parts are not dishwasher safe Only the drip grid can be cleaned in a dishwasher Cleaning the casing Wipe the casing with a soft damp cloth Also wipe the compartment for the used capsule container with a soft damp cloth as required m CAUTION Never use caustic chemicals or aggressive or abrasive products for cleaning m m m m m Cleaning the water tank The water tank should be cleaned once a wee...

Page 21: ... environ mentally friendly manner using a solution of citric acid and water Descaling 1 Press the On Off switch to switch the machine off Using durgol swiss espresso Take the water tank out of the machine and pour one portion 125 ml of durgol swiss espresso into the empty water tank Add water up to the MAX mark Replace the tank Using citric acid Mix the citric acid with water and pour the solution...

Page 22: ... lights will flash alternately 5 Press the flashing middle coffee selection button to start descaling The descaling procedure will begin The left and right hand indicator lights will flash alternately The procedure takes 45 minutes The machine will pump descaling liquid through the pipes several times at 10 minute intervals Each time approx 175 ml will run into the container 6 Throw the water away...

Page 23: ... Press the flashing middle coffee selection button to start rinsing The left and right hand indicator lights will each flash twice alternately 11 Approx 500 ml will be rinsed through Keep an eye on the container and empty it before it overflows When it has finished the middle coffee selection button and the left and right hand indicator lights will again flash alternately 12 Press the flashing mid...

Page 24: ...ch the machine off 2 Place a container beneath the coffee spout 3 Push the lever down if applicable 4 Empty the water container and reinsert it 5 Press and hold the three coffee selection buttons simultaneously and in addition press the On Off switch to switch the machine on Release the buttons again The right hand indicator light will flash red 250 ml 24 After a long period of non use After a lon...

Page 25: ...An acoustic signal will sound and the right hand indi cator light will continue to flash red 6 Press the On Off switch to switch the machine off 7 Push the lever back to allow the pressure in the system to subside A little more water will drip from the spout Then push the lever down again to close the capsule compartment If you wish to use the machine again at a later time pro ceed as described in...

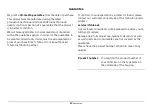
Page 26: ... scalds If the lever is raised during the brewing procedure splashes of hot water may escape m m m No coffee or only a little coffee is coming out If the right hand indicator light flashes red the water tank is empty Fill it and press a coffee selection button to fill the pipes with water again Water is dripping out of the coffee spout The water in the system expands as the machine heats up and as...

Page 27: ...ft and right hand indi cator lights flash alternately The machine needs to be descaled Do this within the next couple of days Do not wait any longer otherwise so much limescale may collect that a descaling agent will no longer have any effect A defect caused in this way will not be covered by the guarantee Proceed as described in the section Descaling It is not possible to push the lever down Chec...

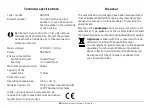
Page 28: ...es can be disposed of free of charge is available from your local authorities Technical specifications Type model 280 997 Product number You can find the product number of your Cafissimo on the type plate on the underside of the housing Mains voltage 220 240 V 50 Hz Power 950 Watt Energy consumption Switch setting off 0 watts hour Standby 0 5 watts hour Maximum pump pressure 15 bar Capacity of the...

Page 29: ...nship or materials within the guarantee period In order for the guarantee to be granted all warranty claims must be accompanied by proof of purchase from Tchibo or from an authorised Tchibo distribution partner If contrary to our expectations a defect is found please contact our customer care service at the following e mail address service tchibo de Our customer consultants will be pleased to advi...

Page 30: ...64232 GS4XMOHBIII EN004E ...

Reviews: