TC8619 Rev 1.1User Manual
4-1
Chapter 4
Tutorial
4.1
Introduction
It is highly recommended to conduct bench tests before actual installation. Bench
testing allows the user to become familiar with all the functions and features of the
TC8619 in a controlled environment. Knowledge of these functions and features
will ease installation and troubleshooting efforts later on.
Loopback tests assist troubleshooting by helping in pinpointing the source of errors
The TC8619 is a sophisticated product designed with multiple advanced
technologies. Loopback tests have been implemented to test independent
components of it.
4.2
Latched Alarm
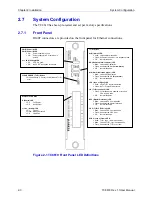
The front panel "ALM", "BPV", "CRC" and "SYNC" LEDs can display both
current and latched error conditions.
For example, if the "ALM" LED is on, and "SYNC" LED blinks twice, it indicates
that there are two "T1/E1 sync loss" after the last alarm reset.
To reset the alarm, press and hold the "CLEAR ERROR" button for 3 seconds until
the "ALM", "BPV", "CRC", and "SYNC" LEDs are flashing. The alarm will reset
after the "CLEAR ERROR" button is released.
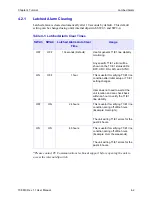
See the table below for latched alarm definitions.
Table 4-1 Latched Alarm Definitions
LED
Normal
Current Error
Latched Error Note
ALM
Off
Flashing
Continuously
On
BPV
Off
Flashing
Continuously
Blink
The number of blinks
indicates the number of
times the error condition
happens. (Max. 3 Blinks)
CRC
Off
Flashing
Continuously
Blink
The number of blinks
indicates the number of
times the error condition
happens. (Max. 3 Blinks)
SYNC
On
Flashing
Continuously
Blink
The number of blinks
indicates the number of
times the error condition
happens. (Max. 3 Blinks)


