background image

Page 

of 13


3.


STANDARDS  &  LICENCING 


All Installations must be completed in accordance with AS/ANZ 3500.1 and AS/ANZ 

3500.2


Irrigation Areas/Land Application Areas (LAA) must be installed as per AS1547 and 

all relevant State/Local Codes or Guidelines


Ensure the appointed Licensed trades only complete this work – 

Plumbers/Drainers/Electrical.


4.


PRE  SITE  INSPECTION 


A pre site inspection should be conducted the day prior to installation. During this 

inspection the following details should be checked.


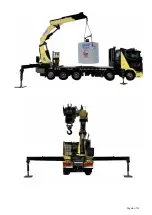
Access requirements for excavation, Crane Truck, Truck or Crane.


A Crane Truck requires the following: 

Access to site – 12m long x 4m wide x 4.5m 

high Level Pad at the hole – 12m long x 7m 

wide


Overhead obstructions


Slope of site


Soil moisture (for heavy equipment access)


Weather conditions


5.


MARK OUT 


To ensure the ABS5000 is installed in the position nominated by the Home Owner/ 

Builder, the location of the ABS5000 should be marked out prior to excavation. The 

installer at this stage should have a copy of the approved site plans showing the location 

of the ABS5000 as well as the required local authority approval. If not, it is advised to 

delay the installation until the plans have been received.


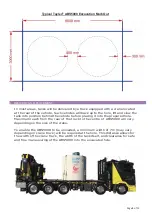
Mark out a 3000mm x 6000m with line marking paint


Place pegs on each of the corners as well as in the middle of the rectangle and 

spray it with white paint or a colour that it noticeable from a distance


Indicate on the centre peg or by spraying on the ground, the type of system 

that is to be installed as a reference for the installer.


Allow a minimum of 300mm between Tank and the edge of excavation.


There should be a minimum gap of 550mm between the tanks.


Summary of Contents for ABS5000

Page 1: ...Installation Manual ADVANCED BLOWER SYSTEM 5000 ABS5000 Standard...

Page 2: ...8 9 COMMISSIONING 8 10 EXCAVATION LIFTING INSTRUCTIONS 9 a ABS5000 Excavation Instructions 9 b ABS5000 Lifting Instructions 10 11 ELECTRICAL CONNECTION DIAGRAM 11 12 Note Do not act solely on the basi...

Page 3: ...ced if the ABS5000 is not immediately installed SLIPPERY WHEN WET During cleaning maintenance repair work the surrounding area may become extremely slippery due to spilt water Caution is to be taken w...

Page 4: ...moisture for heavy equipment access Weather conditions 5 MARK OUT To ensure the ABS5000 is installed in the position nominated by the Home Owner Builder the location of the ABS5000 should be marked o...

Page 5: ...n behind the vehicle before placing it into the prepared hole Maximum reach from the rear of the truck to the centre of ABS5000 will vary depending on the size of the crane To enable the ABS5000 to be...

Page 6: ...Page 6 of 13...

Page 7: ...n allows for the diversion of storm water and surface waters away from the system Width Height Inlet Height from bottom of tank Inlet Depth from ground level Required Base 5 7mm Drainage Gravel Sand H...

Page 8: ...inflow outflow direction 1 deviation Backfilling Use sand or excavated material spoil with maximum particle size of 300mm Backfilling of excavation to be completed in not more than 500mm equally dist...

Page 9: ...is completed prior to having the system commissioned Tanks is full of water 5 000lt each Effluent Disposal area is installed Effluent Disposal Area feed line is connected to ABS5000 Tank 2 Electrical...

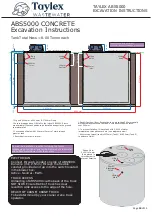
Page 10: ...13 NON TRAFFICABLE LOADS ONLY NON TRAFFICABLE LOADS ONLY 6000 mm 2425 mm 2425 mm 100mm of 5mm 7mm drainage gravel or sand 100mm of 5mm 7mm drainage gravel or sand 100mm Inlet Lifting Holes Lifting Ho...

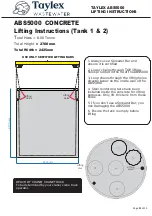
Page 11: ...ing Holes 1 Always use a Spreader Bar and ensure it is certified 2 Lower chains through TOP lifting holes provided in the lid of the ABS5000 3 Loop chains through the lifting holes directly below on t...

Page 12: ......

Page 13: ......
Reviews: