-Respect the legal provisions concerning safety
distances from other elements such as pipes,
electrical connections, etc.
-Ensure that the appliance is level with respect
to the floor.
-The appliance requires suitable ventilation in
order to work properly. Leave a space of 150
cm between walls or other obstacles..
-Do not cover or obstruct any of the openings of
the appliance.
-The plug must be easily accessible so it can be
disconnected in an emergency.
INSTRUCTIONS FOR USE
BEFORE USE:
-Remove the appliance’s protective film.
-Make sure that all the product’s packaging has
been removed.
-To eliminate the smell given off by the applian-
ce when used for the first time, it is recommen-
ded to have it on at full power for 2 hours in a
well-ventilated room.
-Prepare the appliance according to the function
you wish to use:
INSTALLING THE PRODUCT
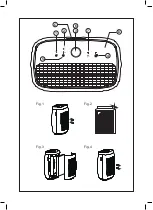
-Pull the rear cover handle to remove it (FIG1)
-Remove the plastic package from the filter.
(FIG2)
-Install the filter into the machine (FIG3)
-Fasten up the rear cover and connect to the
power source (FIG4)
USE:
-The appliance can be used directly connected
to the main.
-Extend the cable completely before plugging
it in.
-Attach the appliance to its base / connector
making sure that it is correctly fitted into place.
-Connect the appliance to the mains.
-Guide the appliance to direct the flow of air in
the desired direction.
-Turn the appliance on, by using the on/off
button.
-Select the appliance function desired.
-Select the desired speed.
TIMER FUNCTION:
-The appliance’s operating time can be control-
led.
-Press and hold button (6) for 5 seconds
to activate the Timer. The time will be di-
splayed on the screen and switch between
1h/2h/4h/8h/0(cancel timing), the required time
is set when stop pressing
FAN SPEED MODE
Cycles through fan speeds:
AUTO MODE
-Auto Mode uses the sensor inside the air puri-
fier to adjust the fan speed automatically based
on air quality.
-For example, if the air quality is bad, the fan will
automatically be set to highspeed.
SLEEP BUTTON
-Tap this button (1), to turn Sleep Mode on/off.
-Sleep Mode operates quietly by using the
lowest possible fan speed, all indicators except
sleep indicator will be off.
-Tapping any key, the display will resume for
30 seconds, and then tap sleep button or fan
button within 30 seconds to exit sleep mode
and enter the auto mode.
-After 30 seconds without button operation, the
display will be off.
LOCK/UV-C BUTTON
-The UV-C button is combined with child lock
button.
-Tap this button to turn the UV-C on/off. When
the UV-C is turned on, the status indicator
lights up, otherwise it turns off.
-For the safety use of UV, when the filter cover
is opened, the UV-C LED will shut off automa-
tically and the appliance stops working as well.
Please always use the appliance with the filter
inside.
-Press and hold this button for 5 seconds to ac-
tivate the child lock function, and the indicator
is displayed on the lower right corner of the
screen.
FILTER REPLACEMENT
-When the filter life expires (about 3000 hours
of life time) the filter replacement indicator will
blink red to remind you.
Summary of Contents for AP2050
Page 2: ...B A E F ...
Page 3: ...D 5 AUTO C 2 1 3 7 4 6 Fig 1 Fig 3 Fig 2 Fig 4 ...
Page 62: ......
Page 63: ......
Page 64: ...Avda Barcelona s n 25790 Oliana Spain Rev 03 08 20 ...

