background image

18

© COPYRIGHT 2006-2008 PRODEA SYSTEMS, INC.  ALL RIGHTS RESERVED.

19

© COPYRIGHT 2006-2008 PRODEA SYSTEMS, INC.  ALL RIGHTS RESERVED.

CONFIGURE MEDIA SERVICES

You can access RadioTime and YouTube without entering account information, but to see 

your favorites and saved channels, you will need to enter your account information. Once 

your account is created, complete the following procedure to validate and save your account 

information (user name and password) on the Home Center. 

Media Figure 2: Media Account

Media Figure 3: Media Pin

NOTE: 

If you change your user name 

and password on the services web site, 

you must make account changes on the 

Home Center as well.
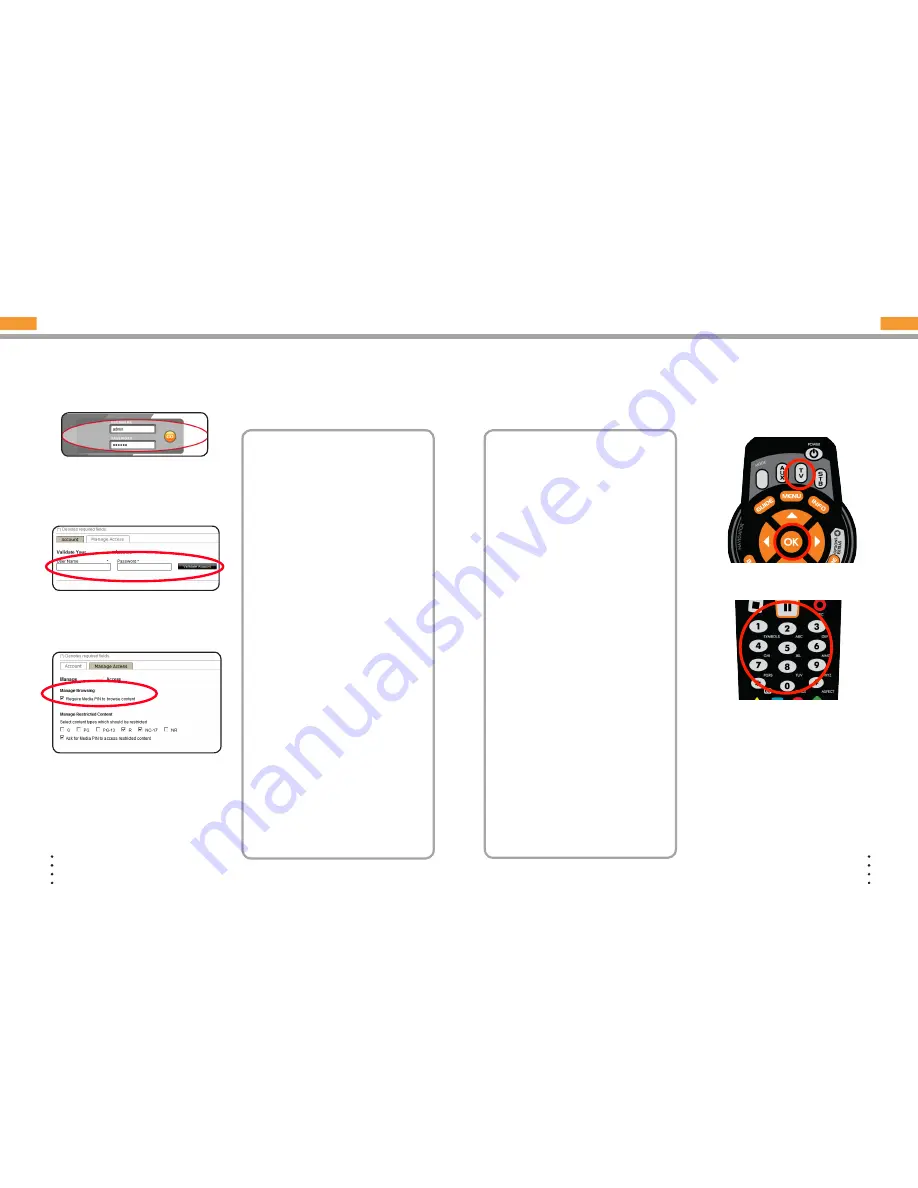
On your PC, log into the Home Center 

(Media Figure 1). 

Select a media service.

Enter your service user name and 

password and click 

SAVE

. The account 

information is validated. If the user name 

and password entered on the Home 

Center do not match those that on the 

service’s web site, an error message 

displays. Re-enter the user name and 

password and click Validate Account 

again. 

Follow the same procedure for each 

media service as needed. Note that 

if you log into any of your services 

web sites and change your user name 

or password, you must re-enter this 

information on the Home Center. 

By default the media access pin to 

restrict content is disabled. To enable 

the media access PIN, select the 

Manage Access

 tab and check the 

Require Media PIN to browse content 

check box (Media Figure 3).

To change the 4 digit media pin used to 

control access to media services, click 

Media Pin

 and enter four numbers. 

Click 

Save 

(Media Figure 4). 

Media Figure 1: ROS

sm

 Login

CONFIGURE TV Extender REMOTE WITH CODES

Refer to the Remote Control Codes 

starting in the back of this document 

and find your TV or device code (for 

newer televisions, start at the end of the 

list of codes for your brand and work 

backwards). If more than one code is 

available, use the first 4-digit code listed. 

If your device is newer, use the last code 

listed and work backward through the 

list.

Turn on your TV or device that you want 

to use with the TV Extender remote. For 

this procedure, we will use TV as an 

example but this same process will work 

with any supported device.

On the remote, press and hold the

 TV 

button and the 

OK

 button (Remote 

Figure 1).

Release both buttons. All four 

MODE


buttons (

ROS

sm

, AUX, TV

, and 

STB

blink twice

Enter the 4-digit code for your TV. The 

TV 

button blinks three times (Remote 

Figure 2). 

To make sure that this is the correct 

code, point the remote at your TV and 

press the 

Power

 button. If the TV turns 

off, you have successfully programmed 

the remote. If the TV does not turn off, 

repeat this procedure using the next 

code listed for your TV. If you can turn 

the TV on and off, but some of the 

remote buttons do not operate the TV 

as you would expect, try using the next 

code listed for your TV.

NOTE: 

For more information about your 

remote, see the back of this Install Guide.

Your ROS

sm

 TV Extender remote is automatically programmed to operate the TV Extender. 

You can program this remote to operate up to three additional devices like a DVD player, 

cable or satellite receiver, or television. This procedure describes how to program the 

remote control by entering a specific code for your device. The following steps describe 

how to program the remote for a TV, using the TV button. For other devices such as a cable 

or satellite receiver or DVD player, follow the same steps, but use the STB or AUX button 

instead of the TV button.

Remote Figure 1: Select the 

device and OK buttons

Remote Figure 2: Code Entry

To reset your remote: 

Press and hold the ROS

sm

 key. While 

holding down the ROS

sm

 key, press OK. 

Release both keys. The device keys blink 
twice. Press 9 - 0 - 0. The ROS

sm

 key 

blinks three times to indicate that the reset 

was successful.

Summary of Contents for ROS 1000

Page 1: ...Media Sharing Setup page 10 FAQ 22 Softphone Setup 16 FIND IT WATCH IT SHARE IT LOVE IT Getting Started page 4 Reference Guide Remote Control Setup 19 ...

Page 2: ...he apparatus the apparatus has been exposed to rain or moisture does not operate normally or has been dropped Getting Started 4 Hardware Description 4 Home Center Description 6 Home Center LED Description 7 TV Extender Description 8 TV Extender LED Description 9 Services Setup 10 Install Sharing Manager 10 Optional Configure Wireless Network 12 Access Your Wi Fi Network 13 Configure Home Monitorin...

Page 3: ...usic to sharing your digital stuff with your friends and family ROSsm brings peace of mind as well allowing you access to your media files home monitoring features and wireless camera feeds from any PC connected to the Internet using the same security most banks use Setup your Wireless network The Home Center provides Wi Fi access to the Internet for your computers and other network enabled device...

Page 4: ... a router manages your voice and media services and contains a hard drive to store your files Your Home Center connects all of your devices to your home network and the Internet both wirelessly and using Ethernet cabling delivering your ROSsm services and home media to all connected and enabled computers and devices The Home Center and TV Extender have status indication lights to let you know at a...

Page 5: ...your DVD players VCRs gaming consoles and or satellite cable boxes and the TV Extender INPUTS Connect DVD players VCRs gaming consoles and or satellite cable boxes Ethernet port Connect to your network using Ethernet cable Power port Plug the included AC power cord into the ROSsm TV Extender PRESS TO CONNECT Press to set up a connection between your Home Center and TV Extender USB Currently not av...

Page 6: ...displays 5 Click Close The Sharing Manager installer icon is now on your desktop SHM Figure 3 6 Run the Sharing Manager setup wizard by double clicking the SharingManagerSetup exe icon If you receive a security warning dialog box click Run The Sharing Manager setup wizard opens SHM Figure 4 7 Enter your Home Center ID listed on your Welcome Letter in the following format yourname yourservice com w...

Page 7: ...now connected to the Home Center wireless network NOTE Only change your default wireless information if you know what you are doing or are instructed by technical support as any changes to your network may affect your service 1 On your computer log into the ROSsm Wi Fi Figure 1 and select SETTINGS NETWORK WIRELESS 2 Check the Enable Wireless Connection check box Wi Fi Figure 2 3 In the Enter Wirel...

Page 8: ...still images complete the following 1 Log into the Home Center and click Monitoring Settings HM Figure 1 2 In the System tab set your Home Monitoring Mode either Away or Home and select the cameras to be monitored under each mode and then click Save HM Figure 3 3 In the Passcode tab set your 4 digit numeric passcode and click Save HM Figure 4 4 In the Phone Access tab click Phone SMS MMS and enter...

Page 9: ...LITE SOFT PHONE Softphone Figure 2 Add Extension Softphone Figure 3 Edit Extension Softphone Figure 7 X Lite Softphone Softphone Figure 4 Configure X Lite 6 Right click on the X Lite softphone and select SIP Account Settings Softphone Figure 4 and click Add Softphone Figure 5 7 Enter the following 1 extension number in the Display name User name and Authorization user name fields for example 6002 ...

Page 10: ...t at the end of the list of codes for your brand and work backwards If more than one code is available use the first 4 digit code listed If your device is newer use the last code listed and work backward through the list 2 Turn on your TV or device that you want to use with the TV Extender remote For this procedure we will use TV as an example but this same process will work with any supported dev...

Page 11: ... your device s code Remote Figure 3 Press the device and OK buttons Remote Figure 4 Enter 9 2 2 Remote Figure 5 Press and hold Play TV Extender REMOTE OVERRIDE INSTRUCTIONS 1 Using your ROSsm remote control press and hold the ROSsm and OK buttons 2 Release both the ROSsm and OK buttons The buttons blink twice 3 Enter the setup code for the function reassignment see below The ROSsm button blinks tw...

Page 12: ...VICE FAQ Question Answer The LED on the front of the Home Center is off What do I need to check On the Home Center verify that all of the cables are plugged in securely Make sure that the power adapter is plugged into a working electrical outlet When the Home Center is plugged in the LED quickly flashes several colors and then changes to solid red This indicates that the Home Center is starting up...

Page 13: ...the Home Center by powering it down and powering it back up My device shows up in the Settings Network and Device Devices list but has a No in the Usable column The LED on my Home Center is green If in the Settings Network and Device Devices list your device does not display or No is listed in the Usable column or you did not receive a test ring for voice services Power down the device Delete it f...

Page 14: ...09 2112 2118 2121 2122 2123 2152 2163 2198 2202 2232 2237 2288 2291 2305 2315 2317 2326 Realistic 2002 2013 2017 2018 2133 Runco 001 2002 2025 2026 2142 Sampo 2002 2017 2116 2123 2143 2144 Samsung 2002 2007 2017 2037 2047 2055 2057 TV Remote Codes If you have an older or less common TV not listed here try the general TV code 2363 Admiral 2010 2022 2119 2145 Advent 2045 2051 2058 2059 2067 Aiwa 230...

Page 15: ...62 2065 2122 2123 Zenith 2001 2009 2017 2022 2105 2119 2142 2151 2153 2192 2233 2268 2274 2303 2308 Codes for Satellite and Cable Box Alphastar 1027 Chaparral 1023 DIRECTV 1006 1007 1008 1010 1011 1014 1020 1021 1022 1029 1031 1032 1035 1036 1038 1039 1040 1041 1042 1045 1046 1049 1050 1051 1052 1055 1056 1057 1059 1061 1062 1064 1065 Dish Network 1002 1003 1004 1005 1009 1012 1034 1037 1054 Dishp...

Page 16: ...9 LG 3012 3029 3049 3163 3229 3329 Magnavox 3001 3007 3019 3024 3042 3079 3145 3181 Marantz 3007 3175 Memorex 3025 3080 3139 Microsoft 3003 Mitsubishi 3002 3089 3128 3154 3161 3185 Onkyo 3001 3014 3158 3293 3298 Oritron 3020 3100 Panasonic 3000 3001 3027 3083 3087 3088 3092 3106 3107 3116 3144 3147 3170 3171 3173 3182 3198 3218 3221 3251 3259 3264 3266 3267 3268 3273 3274 3277 3283 3284 3287 3290 ...

Page 17: ...itron 7039 Panasonic 7026 7033 7035 7055 7057 7063 7068 7069 7103 7104 7140 7155 7170 7189 7194 7197 7198 7199 7200 7202 7208 7209 7210 7211 7212 7215 Philips 7006 7018 7023 7024 7110 7167 7214 Pioneer 7000 7004 7007 7008 7013 7042 7081 7082 7099 7118 7119 7126 7127 7149 7150 7151 7160 7161 7188 7206 Polaroid 7079 Polk Audio 7006 7027 7192 RCA 7007 7013 7015 7021 7044 7053 7083 7094 7109 7213 RCA ...

Page 18: ...55 5095 5110 5132 5133 Philips Magnavox 5055 5064 Polaroid 5092 Polk Audio 5010 Presidian 5095 Proscan 5009 5025 5035 5075 Pulsar 5005 Quasar 5003 5011 5024 5041 5128 5137 RadioShack 5000 5007 5040 5117 RCA 5009 5019 5021 5024 5025 5035 5039 5041 5059 5087 5100 5119 5131 5144 5149 Realistic 5000 5003 5004 5007 5008 5038 5039 5040 5041 5043 Samsung 5006 5018 5023 5039 5042 5085 5089 5093 5099 5104 ...

Page 19: ...s Menu Handset Register 3 Enter passcode 0000 Do not change the passcode It must be 0000 to work with your ROSsm voice service 4 Select OK 5 Press and hold the blue button on the basestation for 5 seconds Voice Figure 1 Repeat pressing the blue button if it doesn t work the first time The Home Center will need to provision the handset in its device database You will receive a test ring on the phon...

Page 20: ...ermine the number of devices that may connect to a telephone line Excessive RENs on a telephone line may result in the devices not ringing in response to an incoming call In most but not all areas the sum of the RENs should not exceed five 5 0 To be certain of the number of devices that may be connected to a line as determined by the total RENs contact your local telephone company For product appr...

Page 21: ... blink 5 times UNIVERSAL REMOTE CONTROL Switch off device Display information about media Display options including Delete Station and Sharing Exit ROSsm menu to TV Go into ROSsm mode Display ROSsm menu with TV feed from other sources in background Return to previous screen and exit ROSsm Display widgets Select audio video inputs must be configured Control media feedback Display remote help menu C...

Reviews: