Powering the unit
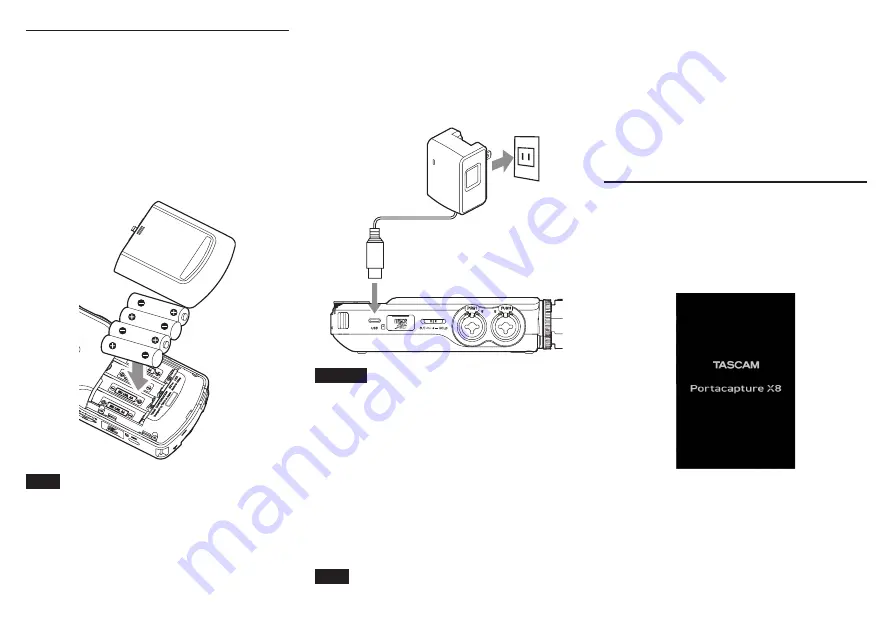
This unit can be powered in two ways: with AA batteries or
by external power using the USB port.
Using AA batteries
1.
Remove the battery compartment cover, and insert 4
AA batteries with their
¥
and
^
marks oriented as
shown.
2.
Reattach the battery compartment cover.
NOTE
i
This unit cannot recharge Ni-MH batteries. Use a
commercially available recharger.
i
The included alkaline batteries are for confirming opera-
tion of the unit and might not last very long.
Using external power
Connect the USB port on the unit to an external power
supply.
This illustration below is an example of connecting a PS-
P520U AC adapter (sold separately) to the unit.
AC outlet
USB-C plug
TASCAM PS-P520U (sold separately)
Type-A to Type-C cable included
with PS-P520U
CAUTION
We highly recommend using the AC adapter designed
for use with this unit (PS-P520U sold separately). When
using another external power supply, use one with the
following specifications.
o
Supplied voltage: 5 V
o
Supplied current: 1.5A or more
Using an external power supply with specifications other
than the above could cause malfunction, overheating, fire
or other problems.
If anything abnormal occurs, stop use and contact the
retailer where you purchased the unit or a TASCAM cus-
tomer support service to request repair.
NOTE
i
If an external power supply that provides current less
than 1.5 A is connected, the unit will automatically enable
the POWER SAVE MODE, restricting some functions.
i
When using the factory default setting, if an external
power supply is connected, power from it will be used
even if batteries are also installed.
Power supply settings can be changed with the GENER-
AL SETTINGS screen > POWER/DISPLAY page > POWER
SOURCE SELECT item.
i
See the Reference Manual for details.
Turning the power on and off
Turning the power on
Slide the
¤
/HOLD switch toward
¤
until the display is
activated. Then, release the switch.
When the unit starts up, the touchscreen display becomes
active.
The first time the unit is started, the LANGUAGE screen will
open. From the second time, the HOME screen of the app
selected on the LAUNCHER screen when the unit was last
turned off will reopen.
Turning the power off
Slide the
¤
/HOLD switch toward
¤
until the display is
deactivated. Then, release the switch.
10
TASCAM Portacapture X8
Summary of Contents for Portacapture X8
Page 42: ...42 TASCAM Portacapture X8...
Page 100: ...100 TASCAM Portacapture X8...
Page 101: ...1 2 3 4 5 6 7 8 9 10 11 TEAC TASCAM Portacapture X8 101...
Page 102: ...102 TASCAM Portacapture X8...
Page 109: ...1 2 MASTER 1 2 TASCAM Portacapture X8 109...
Page 110: ...112 e e e i i i i i i 114 1 1 2 1 REC 0 REC 2 110 TASCAM Portacapture X8...
Page 112: ...7 9 7 9 HOME 8 7 9 HOME 8 ASMR 112 TASCAM Portacapture X8...
Page 114: ...1 2 REC REC REC REC REC REC REC 114 TASCAM Portacapture X8...
Page 115: ...REC REC REC REC REC 1 2 REC 0 TASCAM Portacapture X8 115...
Page 120: ...120 TASCAM Portacapture X8...
Page 127: ...1 2 HOME MASTER 1 2 TASCAM Portacapture X8 127...
Page 128: ...130 HOME HOME e e e i i i i HOME i i 132 1 1 HOME 2 1 REC 0 REC 2 128 TASCAM Portacapture X8...
Page 130: ...7 9 7 9 HOME 8 7 9 HOME 8 MANUAL 6 VOICE PODCAST 4 MUSIC FIELD ASMR 130 TASCAM Portacapture X8...
Page 132: ...1 2 REC REC REC REC REC REC REC 132 TASCAM Portacapture X8...
Page 133: ...REC REC REC REC REC 1 2 REC 0 TASCAM Portacapture X8 133...
Page 138: ...V 2 Y 2 N O V 5 1 2 N Y V 138 TASCAM Portacapture X8...


