background image

28 

TASCAM  MD-02/MD-02B

2.   Press the 

EDIT

 key on the main unit or the remote 

control.

3.   Use the 

MULTI JOG

 dial on the main unit or the 

+/–


keys on the remote control to select “DIVIDE?”

4.   Start playing the track before the point when you 

want to divide it and, when you reach that point, 
press the 

MULTI JOG

 dial on the main unit or the 

ENTER

 key on the remote control. 

“Point> 0” appears on the display, and a short section 
of the track immediately after the divide point (when 
you pressed 

ENTER

) is played repeatedly to allow 

confirmation. 

TIP

Instead of steps 1 and 2 in the above procedures, you can 
pause playback at the point when you want to divide the 
track before selecting "DIVIDE?" from the EDIT menu. 
"Point>0" appears on the display in the same way, and 
a few seconds of the track immediately after the divide 
point (the point when you paused playback) are played 
repeatedly to allow confirmation.

5.   If necessary, use the 

MULTI JOG

 dial on the main 

unit or the 

+/–

 keys on the remote control to adjust 

the divide point. 

6.   After setting the point, press the 

MULTI JOG

 dial 

on the main unit or the 

ENTER

 key on the remote 

control. 

“Sure?” appears. 

7.   Press the 

MULTI JOG

 dial on the main unit or the 

ENTER

 key on the remote control to divide the track. 

After the track is divided, “Complete” is shown on 
the display. 

NOTE

If the track has a title, the same title is given to both 

• 

parts of the divided track.
The following tracks are renumbered with values 

• 

increased by one. 
This function cannot be applied to the beginning of 

• 

any track. 

Combining tracks (COMBINE)

Two continuous tracks can be combined into one track. 

Track 

No. 1

2

3

4

Track

No. 1

2

3

Song C

Combine

Song A

Song B

Song D

Combine

Songs B

and C

Number

of tracks

decreases

Song C

Song A

Song B

Song D

NOTE

Tracks that have been recorded using different modes 
cannot be combined together. 

1.   Play the latter of the two tracks to be combined or 

put it in playback standby.

For example, to combine tracks 2 and 3, play track 3 or 
put it into playback standby. 

2.   Press the 

EDIT

 key on the main unit or the remote 

control.

3.   Use the 

MULTI JOG

 dial on the main unit or the 

+/–


keys on the remote control to select “COMBINE?”

4.   Press the 

MULTI JOG

 dial on the main unit or the 

ENTER

 key on the remote control.

“Track OK?” is displayed, and the last three seconds of 
the first track and the first three seconds of the second 
track are played repeatedly to allow confirmation. 

5.   Press the 

MULTI JOG

 dial on the main unit or the 

ENTER

 key on the remote control. 

After the tracks are combined, “Complete” is shown on 
the display. 


To combine more than two consecutive tracks, repeat 
the above procedures as many times as necessary. 

NOTE

If both tracks have titles, the title of the first track 

• 

becomes the title of the combined track. 
The following tracks are renumbered with their 

• 

values decreased by one.
You cannot select the first track on the disc as the 

• 

latter of the two tracks at Step 1. “1st Track!” is 
displayed if you try to do so. 

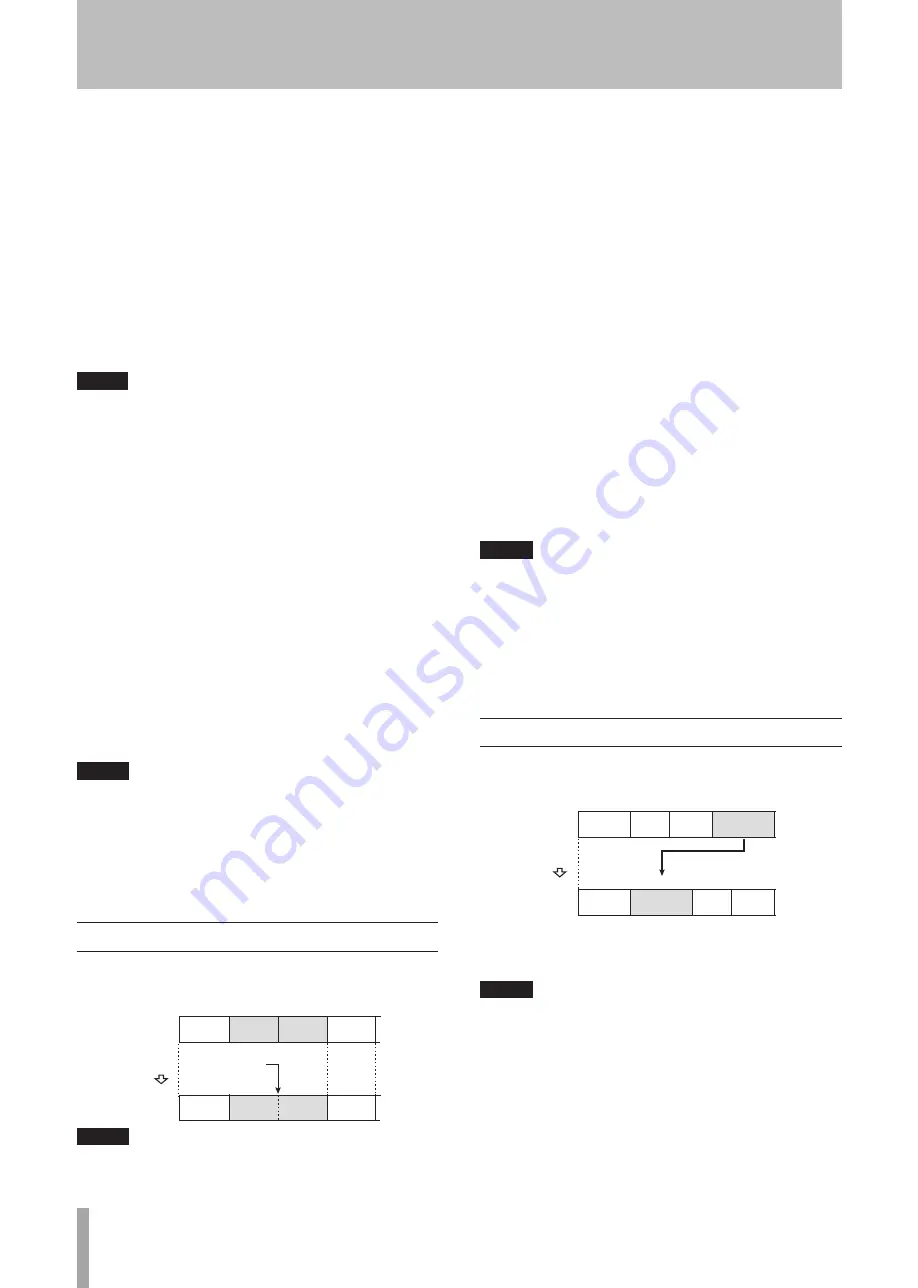
Moving tracks (MOVE)

Tracks can be moved, changing their order. 

Track 

No. 1

2

3

4

Track 

No. 1

2

3

4

Song C

Song A

Song B

Song D

Song C

Song A

Song B

Song D

Move Song D

to the 2nd track Song order is changed

Move

1.   Play the track to be moved or put it in playback 

standby. 

NOTE

If the above step is not performed, the last track on 
the disc is automatically selected for moving when the 
following step is conducted while the unit is in a stopped 
state. However, you can still change the selected track 
number after starting the procedure.

7 − MD Editing

Summary of Contents for MD-02

Page 1: ...MD 02 MD 02B MiniDisc Deck D01082620B OWNER S MANUAL...

Page 2: ...them for your records Model number Serial number CE Marking Information a Applicable electromagnetic environment E4 b Peak inrush current 5 5 A TO THE USER This equipment has been tested and found to...

Page 3: ...tructions 2 Keep these instructions 3 Heed all warnings 4 Follow all instructions 5 Do not use this apparatus near water 6 Clean only with dry cloth 7 Do not block any ventilation openings Install in...

Page 4: ...the polarity indications plus minus orientation and install them correctly in the battery compart ment as indicated Putting them in backward could make the batteries rupture or leak causing fire inju...

Page 5: ...information display 20 Group playback 21 6 Recording 22 Setting the recording mode 22 Selecting the input signal 22 Monitoring the input signal 22 Adjusting the recording level 23 Recording a track 2...

Page 6: ...ning time during recording RCA analog unbalanced input and output jacks XLR analog balanced input and output jacks MD 02B only Coaxial and optical digital input and output jacks Built in sampling rate...

Page 7: ...temperature range of this product is 5 35 C 41 95 F Install this unit so that it is level In order to promote the emission of heat do not place anything on top of this product Do not place this produ...

Page 8: ...ge 23 Independent adjustment of both left and right signals is possible e PHONES level knob Use to adjust the headphones output level POWER switch 11 Turns the power ON and OFF CAUTION Minimize the vo...

Page 9: ...mode use to move the cursor see Title input method on page 26 o STOP key Press to stop recording or playback When stopped in program playback mode press to erase the entire program see Play selected t...

Page 10: ...d that digital input is output unchanged DIGITAL IN OPTICAL This optical digital input jack conforms to IEC60958 3 S PDIF Since this deck has a sampling rate converter in addition to 44 1 kHz signals...

Page 11: ...ng or in recording standby 0 OPTICAL This indicator appears when the input source is set to OPTICAL digital q COAXIAL This indicator appears when the input source is set to COAXIAL digital w ANALOG Th...

Page 12: ...ear panel output jacks see Monitoring the input signal on page 22 0 SYNC Press to turn sync recording ON and OFF see Sync recording on page 25 q SEARCH During playback or when paused press the key to...

Page 13: ...items and set values see 4 Menu Operation on page 16 i TITLE Press to turn title input mode ON and OFF see 7 MD Editing on page 26 o EDIT Press to turn editing mode ON and OFF see 7 MD Editing on page...

Page 14: ...analog line input and output jacks NOTE Cables are not included with this unit Do not bundle RCA cables with power cords or speaker cables Doing so could cause reduced audio quality or noise Connectio...

Page 15: ...ensor 15 15 Operation distance Directly in front Within 7 meters 15 left or right Within 7 meters Setting remote control operation When using more than one of these units at the same time in order to...

Page 16: ...DE OUT Fade out operation time 1 10 seconds in one second units 3 seconds Fade in and fade out recording 24 GROUP Turn group mode ON and OFF ON OFF Group playback 21 KEYBOARD Set the connected keyboar...

Page 17: ...the remote control to confirm the setting The unit returns to information display mode NOTE Press the ESCAPE key on the main unit or the ESC CLR key on the remote control when a menu item and its set...

Page 18: ...in unit or the remote control Pausing playback Press the READY key on the main unit or the remote control lights on the display and the MD begins playback standby Press the PLAY key on the main unit o...

Page 19: ...egin playback at desired times 1 Connect the deck in advance so that it receives power from an external timer s power output 2 Insert an MD for playback 3 Set the POWER ON PLAY switch on the main unit...

Page 20: ...ion Program data is retained after program playback com pletes and when the STOP key is used to stop playback Program playback mode stays active even when the power is turned OFF but program data is e...

Page 21: ...ate and erase groups See Creating groups on page 29 and Deleting groups on page 30 for details Use the editing menu to give names to groups See Adding group titles on page 27 for details 1 Press the G...

Page 22: ...LP2 or LP4 as the recording mode 5 Press the MULTI JOG dial on the main unit or the ENTER key on the remote control Selecting the input signal Use the INPUT SELECT key on the main unit or the INPUT S...

Page 23: ...rd or moving the unit could prevent the recording from being correctly written to the disc Press the READY key to pause recording To eject the disc press the EJECT key on the main unit when the disc i...

Page 24: ...ting tracks incrementing track numbers When recording press the RECORD key whenever you want to create a new track increment the track number Creating track after recording Tracks can be created by di...

Page 25: ...already being input 3 Input the source signal Recording begins automatically when the input signal is detected If the input signal level becomes less than that indicated above for eight or more secon...

Page 26: ...ower case letters symbols no indicator on the display Upper case letters symbols CAPS indicator on the display Katakana katakana indicator on the display Inputting characters Use the MULTI JOG dial on...

Page 27: ...and the title editing mode is activated the cursor blinks NOTE If there is no title nothing is shown except for the blinking cursor 6 Enter a title following the guidelines in the Title input method s...

Page 28: ...Song B Song D Combine Songs B and C Number of tracks decreases Song C Song A Song B Song D NOTE Tracks that have been recorded using different modes cannot be combined together 1 Play the latter of t...

Page 29: ...he remote control to select the desired start track 5 Press the MULTI JOG dial on the main unit or the ENTER key on the remote control ED Trk is displayed Select the end track last track in the group...

Page 30: ...Sure appears 4 Press the MULTI JOG dial on the main unit or the ENTER key on the remote control After all tracks on the disc are completely erased Complete appears Erasing one track ERASE TRK Tracks...

Page 31: ...ow keys Erasing characters The DELETE key erases the character at the cursor position The BACKSPACE key erases the character before the cursor position Inserting characters Press the Insert key at the...

Page 32: ...cording time of the MD deck Restore settings to their defaults Various settings can be restored to their factory defaults 1 With no disc loaded press the MENU key on the main unit or the remote contro...

Page 33: ...s result in events that are treated as the equivalent to track divisions so Track Full might be displayed regardless of the total time or number of tracks Moreover if short tracks ST 9 seconds or less...

Page 34: ...signal input through the DIGITAL IN is not an audio signal PGM Empty No tracks have been added to the program PGM Full No more tracks can be added to the program W_Protected The MD is write protected...

Page 35: ...lume and the amplifier settings Cannot record to a disc If the MD is write protected slide the write protection tab Confirm connections with connected equipment again Adjust the recording level MDs th...

Page 36: ...put level 45 mW 45 mW Load impedance 32 Digital input COAXIAL Connector RCA Format IEC60958 3 S PDIF Digital input OPTICAL Connector Digital optical rectangular JEITA RC 5720C Format IEC60958 3 S PDIF...

Page 37: ...2 4 5 kg 9 92 lb MD 02B Operation temperature 5 35 C 41 95 F Inclination of installation 5 or less NOTE Speci cations and external appearance are subject to change without notice for product improveme...

Page 38: ...38 TASCAM MD 02 MD 02B Notes...

Page 39: ...TASCAM MD 02 MD 02B 39 Notes...

Page 40: ...90 9888 5939 Wallace Street Mississauga Ontario L4Z 1Z8 Canada TEAC MEXICO S A de C V www teacmexico net Phone 52 55 5010 6000 R o Churubusco 364 Colonia Del Carmen Delegaci n Coyoac n CP 04100 M xico...

Reviews: