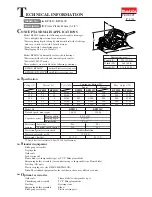
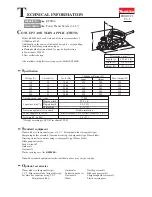
Emerson PD3811BL, Owner'S Manual
The Emerson PD3811BL owner's manual is a comprehensive guide for operating and maintaining your device. Available for free download at manualshive.com, this manual provides step-by-step instructions, troubleshooting tips, and essential information to ensure you maximize the potential of your Emerson PD3811BL.
Share
Download


Reviews:
No comments
Related manuals for PD3811BL

C7301U - Cd Rcvr W/ Custm Dsply
Brand: Panasonic Pages: 2

700
Brand: Nakamichi Pages: 16

N1923B
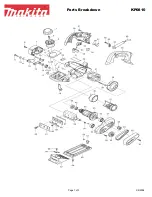
Brand: Makita Pages: 60
KP0810
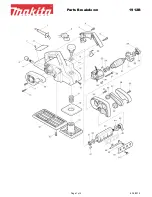
Brand: Makita Pages: 11
KP0810
Brand: Makita Pages: 3
KP0800
Brand: Makita Pages: 8
1912B
Brand: Makita Pages: 3
1911B
Brand: Makita Pages: 44
1900B
Brand: Makita Pages: 12
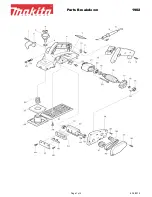
1902
Brand: Makita Pages: 2
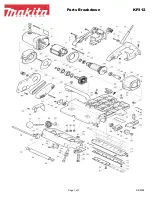
KP312
Brand: Makita Pages: 3

MWD200FG
Brand: Magnavox Pages: 38

SD-9500P
Brand: Daewoo Pages: 58

UNITISERVE-SSD -
Brand: NAIM Pages: 27

KW-118C
Brand: BASETech Pages: 8

DVD1050
Brand: Reflexion Pages: 24

PT330B
Brand: Lumber Jack Pages: 20

PX-16 SHEARTEC II
Brand: laguna Pages: 56


