background image

TASCAM  DR-60D


49

4 – Recording

Using the low-cut filter

The low cut filter can reduce noise such as offensive wind noise from 

air-conditioners and projectors.
1.  Press the MENU button to open the 

MENU

 screen. 

2.  Turn the DATA dial to select 

INPUT SETTING

, and press the 

DATA dial or 

/

 button to open the 

INPUT SETTING

 screen. 

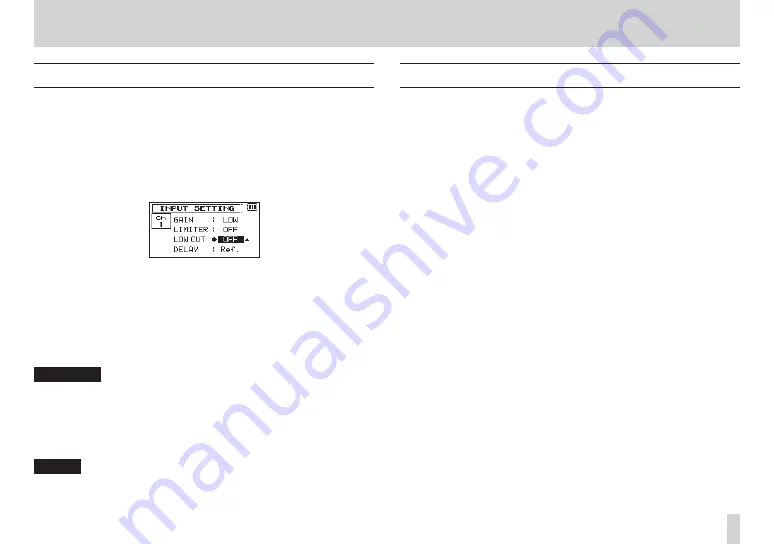
3.  Turn the DATA dial to select 

LOW CUT

 for a channel, and press 

the 

DATA

 dial or 

/

 button.

Ch1 INPUT SETTING screen

4.  Turn the DATA dial to select the cut off frequency of the low cut 

filter for mic input.

Options: 

OFF

 (default value), 

40Hz

80Hz

120Hz

5.  When finished making the setting, press the stop (

8

) [HOME

button to return to the Home Screen. 

CAUTION

• 

The low-cut filter cannot be used with line input.

• 

Use headphones to monitor when you are recording with a micro-

phone. If you use speakers to monitor, the sound output from the 

speakers may also be recorded, causing a poor recording and 

even feedback.

NOTE

The low-cut function can be set and changed even during 

recording standby and when recording.

Overview of recording modes

This recorder has five recording modes.
Use the 

REC MODE

 item on the 

REC MODE

 screen to set the 

recording mode.
The settings available are different for each recording mode.

MONO mode 

This is a mode for mono recording.

STEREO mode (default value) 

This is a mode for stereo recording of two independent left and 

right channels.

DUAL MONO mode 

This mode uses one input source to create files at two different 

input levels (set on 

INPUT SETTING

 screen). Two mono files will 

be recorded.

DUAL ST mode 

This mode uses one input source to create files that two different 

input levels (set on 

INPUT SETTING

 screen). Two stereo files 

will be recorded.

4CH mode 

This mode records 4 external inputs in two pairs as two stereo 

files.

Summary of Contents for DR-60D

Page 1: ...OWNER S MANUAL D01188720A DR 60D Linear PCM Recorder...

Page 2: ...ment and receiver c Connect the equipment into an outlet on a circuit different from that to which the receiver is connected d Consult the dealer or an experienced radio TV technician for help CAUTION...

Page 3: ...4 Refer all servicing to qualified service personnel Servicing is required when the apparatus has been damaged in any way such as power supply cord or plug is damaged liquid has been spilled or object...

Page 4: ...l of batteries and or accumulators a Waste batteries and or accumulators should be disposed of separately from the municipal waste stream via designated collection facilities appointed by the governme...

Page 5: ...s around them Do not carry or store batteries together with small metal objects The batteries could short causing leak rupture or other trouble Do not heat or disassemble batteries Do not put them in...

Page 6: ...rnal battery pack sold separately 33 Using USB bus power 34 Turning the power on and off putting it in standby 35 Starting up the unit 35 Shutting down putting the unit in standby 35 Resume function 3...

Page 7: ...a mark position 59 Recording the moment before pushing RECORD PRE REC 60 Delaying the start of recording REC DELAY 60 Self timer function 61 Using the auto tone function 61 Setting auto tone length 6...

Page 8: ...YSTEM 86 Setting the automatic power saving function 86 Setting the backlight 86 Adjusting the display contrast 86 Setting the type of AA batteries 86 Setting the phantom power voltage 86 Restoring th...

Page 9: ...Higher quality files can be produced by changing the recording format See Selecting file format sampling frequency and maximum file size on page 42 for details 1 Install batteries in the battery comp...

Page 10: ...Preparing an SD card for use on page 39 Press the DATA dial to format the card for use with this unit After formatting completes the Home Screen shown below appears Home Screen CAUTION Formatting eras...

Page 11: ...rt recording in the same file 11 Press the PLAY 7 button for playback To listen with headphones connect them to the PHONES jack on the right side of the unit To listen with an external monitoring syst...

Page 12: ...side of this unit with the audio output jack on the camera External mic input jack Audio output jack DSLR camera NOTE Refer to the camera s operation manual for information about the connector on the...

Page 13: ...de phantom power 24V 48V TRS mic line inputs 1 L and 2 R support 24dBU input when set to LINE Stereo mini jack input supports mics that require plug in power allowing the input of video mics and other...

Page 14: ...right sides protect the screen and can be used to attach a shoulder belt Included items This product includes the following items Take care when opening the package not to damage the items Keep the pa...

Page 15: ...uch data and or information shall be free from infringement of any third party s intellectual property rights or other proprietary rights and further assumes no liability of whatsoever nature in the e...

Page 16: ...water Do not place this unit on top of a power amplifier or other device that generates heat If this unit is placed near a power amplifier or other device with a large transformer it could cause that...

Page 17: ...ress the or button while pressing and holding this dial to move to the previous or next mark respectively See Moving to a mark position on page 59 4 MONITOR SELECT button When not playing back press t...

Page 18: ...e of the unit The 1 L PEAK indicator lights when the 1 L input level is about to cause distortion This also lights if distortion occurs in the analog circuitry during mic input but this does not light...

Page 19: ...O to a confirmation message i button When stopped or playing back press to skip to the next file Press and hold to search forward On the setting screens use this button to move the cursor right Press...

Page 20: ...evice and this unit could be damaged When using a condenser microphone before connecting to and disconnecting from a 1 L connector or 2 R connector confirm that the phantom power for that jack is OFF...

Page 21: ...operation manual to identify this connector on the camera See Camera connection and attachment on page 39 Right side panel l SD card slot Insert an SD card here button Press and hold this button to tu...

Page 22: ...ck Connect stereo headphones to this stereo mini jack Use the PHONES control to adjust the volume CAUTION Before connecting headphones lower the PHONES volume to the minimum level Failure to do so cou...

Page 23: ...ounting screws for example Bottom Panel Tripod mounting threads 1 4 inch Use to attach this unit to a tripod CAUTION Tighten the unit securely to the tripod or microphone stand to prevent it from fall...

Page 24: ...S Right channel of dual recording mode sub file CH3 Channel 3 sound input 3 M Left channel of dual recording mode main file 3 S Left channel of dual recording mode sub file CH4 Channel 4 sound input...

Page 25: ...Skipping backward 8 Level meter These show the levels of the input playback signals 9 Track status display This icon changes according to the recording mode Indicators examples Meaning Playing a file...

Page 26: ...r on t Peak value in decibels dB The maximum level that occurs in a fixed period of time is displayed digitally Recording Screen 1 Monitoring mode This shows what audio is being monitored now Indicato...

Page 27: ...time of the file appears as hours minutes seconds 6 Number of recording channels This shows the number of recording channels in the file ST or MONO 7 Auto tone function status This icon shows whether...

Page 28: ...icon appears if the limiter function setting for channel 1 2 or 3 4 is set to MONOor LINK See Using the limiter on page 48 Limiter off Limiter on t SLATE button setting This shows the SLATE button set...

Page 29: ...ired remote control both sold separately page 89 page 90 SYSTEM Various system settings page 86 CAUTION When in recording standby or recording only the INPUT SETTINGand AUTO RECscreens are shown When...

Page 30: ...ss this to return to the Home Screen Use this to answer NO to a confirmation message DATA dial Turn the DATA dial to select items and change values on setting screens You can also turn the DATA dial t...

Page 31: ...and playback EQ functions In recording standby Mic input gain setting function When recording Mic input gain setting function When the BROWSE screen is open File folder operations When the Mixer scree...

Page 32: ...amount of power remaining and allow the unit to accurately determine whether power is available for proper operation See Setting the type of AA batteries on page 86 CAUTION Manganese dry cell batteri...

Page 33: ...ophone if the unit is too close to the AC adaptor In such a case keep sufficient distance between the AC adaptor and the unit Using an external battery pack sold separately Connect a TASCAM BP 6AA ext...

Page 34: ...elect power supply from the USB port The Home Screen will appear NOTE Power is supplied from the USB port if the USB cable is connected to the unit that contains batteries USB bus power prioritized Th...

Page 35: ...played on the display The Home Screen appears when the unit starts up Start Up Screen Home Screen CAUTION When the unit is started up for the first time or when the built in clock is reset after being...

Page 36: ...previously starts to be played from the position time where the unit left off when shut down NOTE The required data are stored in the SD card The resume function does not work if the card is exchanged...

Page 37: ...format of file names on page 88 CAUTION The date and time setting can only be maintained for a few minutes if the battery power becomes low and the unit is not powered by a TASCAM PS P515U AC adaptor...

Page 38: ...B SD cards that meet SD or SDHC standards can be used with this unit A list of SD cards that have been confirmed to work with this unit can be found on our website http tascam com SD card write protec...

Page 39: ...is unit to a DSLR camera and monitor sound from the camera with this unit you must connect them with commercially available 3 5mm stereo mini plug cables 1 If you want to record audio from this unit w...

Page 40: ...the unit is stopped using headphones for example Moreover by connecting this unit s CAMERA IN jack with the camera line output you can check the sound being recorded by the camera Enabling monitoring...

Page 41: ...H1 Sub Monitor the dual recording mode sub file left channel CH2 Monitor the channel 2 input sound CH2 Main Monitor the dual recording mode main file right channel Option Meaning CH2 Sub Monitor the d...

Page 42: ...n the MENUscreen 2 Turn the DATA dial to select REC SETTING and press the DATA dial or button to open the REC SETTINGscreen 3 Turn the DATA dial to select FORMAT and press the DATA dial or button Set...

Page 43: ...n a new file Depending on the file format the amount of recording time will differ for the same file size The amount of recording time is shown on the right of the setting value in parentheses 8 When...

Page 44: ...phone jack or other level controllable output for connection to the unit Setting the input types Set the 1 L and 2 R input switches on the front of the unit according to the types of equipment connect...

Page 45: ...o 48V than when set to 24V CAUTION Confirm that phantom power is OFF before connecting a line level device to a 1 L connector or 2 R connector If you connect a line level device while phantom power is...

Page 46: ...output from the speakers could be picked up by the mic resulting in its unwanted recording or feedback noise Adjusting the input level Before starting recording the input level should be adjusted to...

Page 47: ...rding screen appears 7 Use the 1 L 2 R and 3 4 knobs on the front of the unit to adjust the input levels If the input levels are too high the peak indicators to the left of the 1 L 2 R and 3 4 knobs l...

Page 48: ...en CAUTION Distortion might occur if the input sound is too loud even when the limiter is on In such a case lower the input level or increase the distance between the unit and the sound source During...

Page 49: ...o phone If you use speakers to monitor the sound output from the speakers may also be recorded causing a poor recording and even feedback NOTE The low cut function can be set and changed even during r...

Page 50: ...recording CH3 Channel 3 mono recording CH4 Channel 4 mono recording STEREO CH1 2 Channel 1 and 2 stereo recording CH3 4 Channel 3 and 4 stereo recording 8 Press the DATA dial or button to select the o...

Page 51: ...e record 0 button again mono recording stereo recording When recording starts the indicator lights continuously and the display shows the elapsed recording time and the remaining recording time 3 Pres...

Page 52: ...REC MODE and press the DATA dial or button to open the REC MODEscreen 3 Turn the DATA dial to select REC MODE and press the DATA dial or button 4 Turn the DATA dial to set it to DUAL MONOor DUAL ST Du...

Page 53: ...the MENU button to return to the MENU screen Press the DATA dial or button to select the other item 15 Turn the DATA dial to select INPUT SETTING and press the DATA dial or button to open the INPUT SE...

Page 54: ...Recording 4 channels You can connect external mics or other equipment to record four independent channels as two stereo recording files channels 1 2 and 3 4 Making 4 channel recording settings 1 Press...

Page 55: ...ress the DATA dial or button 13 Turn the data dial to set the value according to the distance between mics Range 0ms default value to 150ms in 1ms increments NOTE If the mics channels 1 2 and channels...

Page 56: ...en the MENUscreen 2 Turn the DATA dial to select AUTO REC and press the DATA dial or button to open the AUTO RECscreen 3 Turn the DATA dial to select MODEand press the DATA dial or button 4 Turn the D...

Page 57: ...signal level falls below the END LEVELfor more than the END DELAYtime TRK INC The unit pauses recording resumes recording standby when the input signal level falls below the END LEVELfor more than th...

Page 58: ...ng file the number will be incremented until the new file has a unique name Automatic track increment by file size Without pausing recording a new file can be created automatically during recording wh...

Page 59: ...when playing back the file using software or equipment that supports the BWF format Adding marks automatically to a recording This function allows the unit to add marks automatically using AUTO REC On...

Page 60: ...ginnings of sounds NOTE If recording is started less than two seconds after entering record standby the sound since entering recording standby will be recorded If you turn the pre recording function o...

Page 61: ...time period NOTE This function cannot be used when recording is paused in the middle of recording Self timer function is not possible when using the AUTO REC function Using the auto tone function The...

Page 62: ...ording to add a slate tone whenever you like to the recording file The SLATE button is disabled by default in order to prevent accidental operation Follow the procedures below to enable the SLATE butt...

Page 63: ...6 6 12 WAV BWF 24bit STEREO 44 1kHz 1 07 2 15 4 30 9 00 48kHz 1 02 2 04 4 08 8 16 96kHz 0 31 1 02 2 04 4 08 p The recording times shown above are estimates They might differ depending on the SD SDHC c...

Page 64: ...elected press the button to show the contents of that folder p When a file or folder is selected press the button to exit the currently open folder and go to a higher level in the folder structure p W...

Page 65: ...ers Plain folder This icon shows folders that do not contain subfolders Open folder The contents of the folder marked with this icon currently appear on this screen New folder Create a new folder File...

Page 66: ...erations Select the desired folder on the BROWSEscreen and press the QUICK button to open the quick menu pop up window shown below Turn the DATA dial to select the item you want from the following lis...

Page 67: ...light NEW FOLDER and press the DATA dial or button A pop up appears to confirm that you want to create a new folder Press the DATA dial to create a new folder or press the stop 8 HOME button to cancel...

Page 68: ...can select any file on the SD card that you want Adjusting playback volume Use the PHONES and LINE OUT volume controls to adjust the levels output from the PHONES and LINE OUT jacks Setting the playba...

Page 69: ...n the BROWSEscreen A file list of the folder that contains the file selected in the Home Screen is displayed 3 Use the or button to select a folder level and Turn the DATA dial to select a folder For...

Page 70: ...ll be saved in this folder In addition the folder that contains this file becomes the playback area regardless of the playback area folder set previ ously Selecting files for playback skip When the Ho...

Page 71: ...forward and search the playback file NOTE Press and hold the or button to accelerate the search speed Changing the playback position When the Home Screen is open and playback is stopped or paused turn...

Page 72: ...n 2 Turn the DATA dial to select PLAY SETTING and press the DATA dial or button to open the PLAY SETTINGscreen 3 Turn the DATA dial to select JUMPBACK and press the DATA dial or button 4 Turn the DATA...

Page 73: ...menu pop up window includes mic input gain settings Quick menu during playback on the Home Screen p On the BROWSEscreen the quick menu pop up window includes operations for the selected file of folder...

Page 74: ...ected file DIVIDE on page 75 LEVEL ALIGN The perceived overall sound pressure can be increased to enhance listenability See Increasing the perceived overall sound pressure to enhance listenability Lev...

Page 75: ...e and return to the Home Screen Push the stop 8 HOME button to cancel deletion and return to the Home Screen NOTE If the currently selected file was recorded using dual recording or four channel recor...

Page 76: ...file name are created 4 channel recording file example File names before dividing TASCAM_0003S12 wav TASCAM_0003S34 wav File names after dividing TASCAM_0003aS12 wav part before division point TASCAM...

Page 77: ...open the quick menu pop up 2 Turn the DATA dial to select LEVEL ALIGN When stopped During playback 3 Press the DATA dial to open a pop up menu where you can turn the level align function on or off Wh...

Page 78: ...urn to the home screen default value OFF When on the icon appears on the Home Screen during playback When off the icon appears on the Home Screen during playback Setting mic input gain with the quick...

Page 79: ...e setting name and value in a pop up window at the top right 4 Turn the DATA dial to change the setting value Item Setting range Operation details PAN L12 C R12 Adjusts left right balance L12 left C c...

Page 80: ...put sound as you record or you can record as is and decode during playback The following explanation uses channels 1 and 2 If the mid side mics are connected to channels 3 and 4 however use the same p...

Page 81: ...t playback to decode during playback MS decoder settings When the MS MODEon the MIXERscreen is set to RECor MON the PANitem changes to WIDE which allows you to adjust the stereo width of the sound To...

Page 82: ...other functions of the recorder are disabled The unit should be connected directly with the computer instead of via a USB hub When the unit is connected through USB after being turned on or when the u...

Page 83: ...mputer You can create subfolders in the MUSIC folder up to the second level for use with this unit The DR 60D cannot recognize subfolders and audio files on the third level or below Since you can set...

Page 84: ...l to change the open page The pages show the following information FILE 1 3 Shows information about the currently loaded file CARD 2 3 Shows the use status of the currently inserted SD card SYSTEM 3 3...

Page 85: ...he total SD card capacity REMAIN SIZE USED SIZE Shows the amount of unused used capacity on the SD card Press the or button to switch between REMAINSIZE and USEDSIZE System information page The SYSTEM...

Page 86: ...Options OFF automatic power saving is disabled default value 3min 5min 10min 30min Setting the backlight Use BACKLIGHTto set the time until the backlight automatically turns OFF after the last operat...

Page 87: ...dial button to execute the quick formatting or press the Stop 8 HOME button to cancel formatting Using FULL FORMAT Use the FULLFORMATitem to completely format the SD card Full formatting checks the me...

Page 88: ...item can be set to either WORD default setting or DATE WORD When set to WORD a 6 character file name is used as the beginning of each file name Example TASCAM_0001S12 wav DATE The date is used as the...

Page 89: ...d press the DATA dial or button to open the REMOTEscreen 4 Turn the DATA dial to select CONTROLLER and press the DATA dial or button 5 Turn the DATA dial to select RC 3F default value RC 3F 6 Use the...

Page 90: ...ess the DATA dial or button to open the OTHERSscreen 3 Turn the DATA dial to select REMOTE and press the DATA dial or button to open the REMOTEscreen 4 Turn the DATA dial to select CONTROLLER and pres...

Page 91: ...t can use Battery Empty The battery is almost out of power Replace the AA batteries MBR Error Init CARD The card is not formatted properly or the formatting is broken Change the card or press the DATA...

Page 92: ...ivide The position selected for divide is not suitable too close to the beginning or end of a file Max File Size The file is larger than the designated size File Full The total number of folders and f...

Page 93: ...old separately and or disconnect the USB cable for bus power supply If the error message continues to appear frequently please contact a TASCAM Customer Support see the back cover for details File Err...

Page 94: ...cted to a PC with the USB cable Is USB connected shown on the display 8 8 The SD card is not recognized Confirm that the SD card is inserted completely 8 8 Playback does not work Confirm that the samp...

Page 95: ...se a file that has been copied from a computer after being write protected 8 8 This unit s files do not appear on the computer Confirm that the unit is connected to the computer using its USB port Con...

Page 96: ...r 24V 4V 10mA CH Maximum input level 0dBu Minimum input level 72dBu Mic input gain input level knob at maximum LOW 11dB MID 36dB HIGH 52dB Input switch set to LINE Input impedance 10 k or higher Stand...

Page 97: ...IGH SPEED mass storage class REMOTE jack Connector 2 5mm TRS Jack Audio performance Frequency response 20 20kHz 0 5 2dB LINE IN or MIC IN to LINE OUT Fs44 1k 48kHz JEITA 20 40kHz 0 5 3dB LINE IN or MI...

Page 98: ...input selected Recording 2 channel 44 1kHz 16 bit WAV files About 4 30 MIC input selected phantom power not used When using Ni MH batteries eneloop Format Continuous operating time hours minutes Note...

Page 99: ...eneloop pro Format Continuous operating time hours minutes Note Recording 2 channel 44 1kHz 16 bit WAV files About 9 30 MIC PHANTOM 48V input selected Recording 2 channel 44 1kHz 16 bit WAV files Abo...

Page 100: ...t R o Churubusco 364 Colonia Del Carmen Delegaci n Coyoac n CP 04100 M xico DF M xico TEAC UK LIMITED Phone 44 8451 302511 http tascam eu Suites 19 20 Building 6 Croxley Green Business Park Hatters La...

Reviews: