14
TASCAM DR-10C
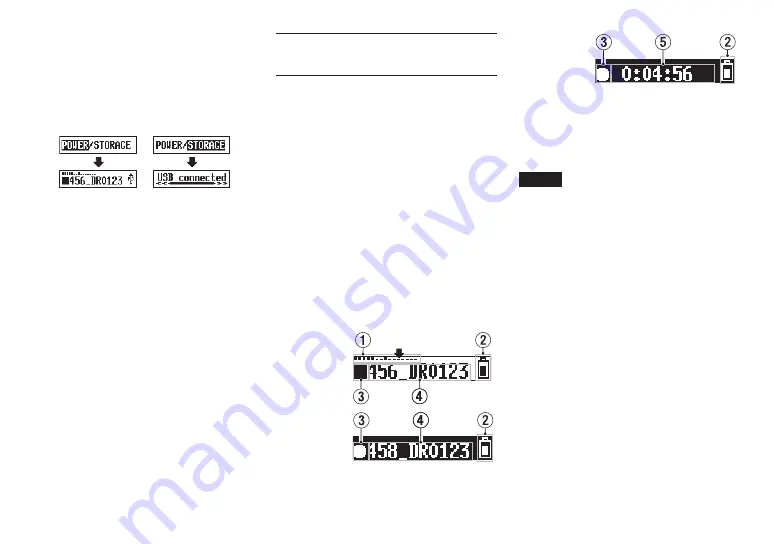
Whether the power is on or off, when connected, the
POWER/STORAGE
screen appears to allow selection
of bus power supply or USB connection with the
computer.
Use the
.
[
j
]
and
/
[
k
]
buttons to select
(highlight) the
POWER
or
STORAGE
item at the
bottom of the display, and press the
7’9
[ENTER]
button.
•
If
POWER
is selected, power will be supplied from
the USB port and the Home Screen will open.
•
If
STORAGE
is selected,
USB connected
will
appear on the display after the unit connects to
the computer without any problems.
The unit will be shown on the computer as a USB
device named “DR-10”.
Double-click the “DR-10” drive to open it and
show a list of the recording files, so you can
retrieve the desired files.
Starting and stopping
recording
You can use a single operation to start recording
with this unit even when it is off.
8
One touch recording
When the unit is off, slide and hold the
¤?o
—
0
REC
switch toward
0
REC
for
about one second until the
TASCAM DR-10
startup message appears and recording starts.
8
Ordinary recording
To start recording when the unit is on, slide the
¤?o
—
0
REC
switch toward
0
REC
for
about one second.
8
Stopping recording
Slide the switch toward
0
REC
during recording
for about one second to stop recording.
The following information appears on the display
when stopped, when recording starts and during
recording.
Stopped
−12dB
When recording
starts
Recording
1
Level meter
2
Remaining battery charge
3
Recorder operation status
4
File name
5
Elapsed recording time
NOTE
• The one-second delay is intended to prevent
accidental operation.
• Without pausing recording, a new file can be
created automatically during recording when
the file size reaches 2 GB. (Track incrementing)
• Set the mic input sensitivity with the
MIC GAIN
item on the Menu Screen so that that activity
of the level meters reaches the arrow (at −12
dB) in the illustration. (See “Menu structure” on
Summary of Contents for DR-10CH
Page 26: ...26 TASCAM DR 10C...
Page 50: ...50 TASCAM DR 10C...
Page 74: ...74 TASCAM DR 10C...
Page 122: ......
Page 123: ...TASCAM DR 10C 123 V V Y V N O V 5 1 V V N V Y V...
Page 144: ...144 TASCAM DR 10C...
Page 145: ...TASCAM DR 10C 145...
Page 146: ......
Page 147: ......
Page 148: ......


