background image

110

  TASCAM DR-05

14–Specifications

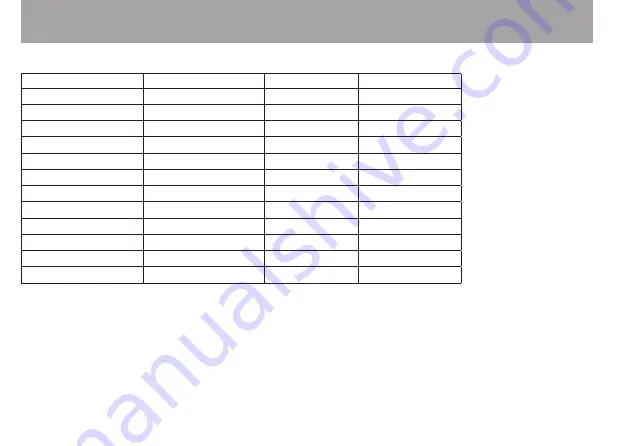
Ni-MH type battery (eneloop)

Recording/playback Format

Operation time  Note

Recording

WAV 96kHz, 24bit

About 10 hours

Built-in microphone

Recording

WAV 44.1kHz, 16bit

About 15.5 hours Built-in microphone

Recording

MP3 44.1kHz, 128Kbps

About 13 hours

Built-in microphone

Recording

MP3 48 kHz, 320Kbps

About 11 hours

Built-in microphone

Playback

WAV 96kHz, 24bit

About 15 hours

Headphones

Playback

WAV 96kHz, 24bit

About 14 hours

Built-in Speaker

Playback

WAV 44.1kHz, 16bit

About 16.5 hours Headphones

Playback

WAV 44.1kHz, 16bit

About 16.5 hours Built-in Speaker

Playback

MP3 44.1kHz, 128Kbps

About 16 hours

Headphones

Playback

MP3 44.1kHz, 128Kbps

About 15 hours

Built-in Speaker

Playback

MP3 48 kHz, 320Kbps

About 16 hours

Headphones

Playback

MP3 48 kHz, 320Kbps

About 15 hours

Built-in Speaker

Dimensions (W x H x D)

61 x 141 x 26 mm (2 3/8” x 5 9/16” x 1”)
Weight

116 g (4 1/16 oz) (not including batteries)

164 g (5 3/4 oz) (including batteries)
Operating temperature range

0 - 40°C (32°F - 104°F)

Summary of Contents for DR-05

Page 1: ...DR 05 Linear PCM Recorder D01231720A REFERENCE MANUAL...

Page 2: ...Resume function 29 Setting the date and time 29 Inserting and removing microSD cards 31 Inserting the microSD card 31 Removing the card 31 Preparing a microSD card for use 32 Using the built in speake...

Page 3: ...on 53 Recording the moment before pushing RECORD PRE REC 53 Self timer function 54 Using the AUTO TONE function 55 Setting the AUTO TONE function 56 Setting the AUTO TONE length 56 Adjusting the AUTO...

Page 4: ...set List 87 9 Tuning a Musical Instrument Tuner 88 Using the tuner 88 Setting the tuner 88 Tuning a musical instrument 89 Adjusting the input level for tuning 89 10 Connecting with a Computer 90 Trans...

Page 5: ...3 Troubleshooting 104 14 Specifications 107 Ratings 107 Input output ratings 107 Analog audio input output ratings 107 Control input output ratings 107 Audio performance 108 Computer compatibility 108...

Page 6: ...iles in BWF format 32 320 kbps MP3 format recording possible compatible with ID3 tag v2 4 Overdubbing allows playback and input signals to be mixed and recorded together as a new file Built in 0 3 W m...

Page 7: ...is available to show settings screens for playback speed control and IN OUT loop Tuner function to tune musical instruments Self timer function to start recording after a set period of time Jump back...

Page 8: ...lowing conventions are used in this manual When we refer to a button or connector or control on the DR 05 the typeface looks like this MENU When we show messages for example that appears on the screen...

Page 9: ...s a variety of information 4 HOME button Press this button during playback to cause the playback to pause at the current position Press this button during pause time to return to the beginning of the...

Page 10: ...splayed press this button to turn on or off loop playback 7 button Press this button to return to the beginning of a track that is playing or stopped in the middle When the IN and OUT points are set b...

Page 11: ...ding standby REC indicator starts to flash When INPUT is ON on the MONITOR MIX screen MONITOR MIX is ON a pop up menu appears to ask whether overdubbing is ON OFF w QUICK button When playing back stop...

Page 12: ...n the Home Screen is displayed and playback is stopped press this button to start playback During playback press this button to start jump back playback When a setting screen is open use this to confi...

Page 13: ...anel u MIC EXT IN jack Usethisinputjacktoconnectastereomini jack microphoneoranexternalinputdevice Thisjack providesplug inpowerwhensettodosoonthe InputSettingScreen Thebuilt inmicrophoneisdisabledifa...

Page 14: ...tion of the arrow to engage the hold function All buttons are inoperative when hold is ON Right side panel p USB port Use the included USB cable to connect with a computer USB port Power can be suppli...

Page 15: ...ed d Tripod attachment screw hole 1 4 inch Use this to attach the unit to a tripod or mic stand CAUTION Tighten the unit securely to the tripod or microphone stand to prevent it from falling off Place...

Page 16: ...mix function is on or off Monitor Mix off Monitor Mix on 4 Effect status Shows whether the effect function is ON or OFF Effect off Effect on 5 Power supply status When a battery is being used a batter...

Page 17: ...available for an MP3 file being played NOTE ID3 tag information includes the titles and artists names that can be saved in MP3 files 9 Playback position display The current playback position is shown...

Page 18: ...ition when the starting point is set The icon appears at the playback position when the ending point is set y Playback file number total number of files The total number of files in the playback area...

Page 19: ...isshown Duringoverdubrecording thelevelofthecombined inputandplaybacksoundsisshown A markisgivenatthe 12dBpositiononthescale asaguidemarkforinputleveladjustment 8 File name The file name that will aut...

Page 20: ...he Playback Control screen is displayed if the PB CONT button is pressed during playback or when playback is stopped Recording cannot be performed while this screen is displayed Press the or button to...

Page 21: ...k Control screen are as follows MARK Creates or deletes an IN or OUT point MENU Switch over between ON and OFF status of the loop playback function NOTE Unlike the other screens the QUICK button in th...

Page 22: ...ns and items are shown REC SETTING screen MIC POWER LOW CUT and AUTO REC items AUTO REC setting cannot be changed MONITOR MIX screen INPUT and PB INPUT items INPUT setting cannot be changed EFFECT scr...

Page 23: ...he same menu This enables you to select a new item Use the or button again to select an item to be set 7 Repeatstep3to6asnecessarytoseteachitem 8 To open the MENUscreen press the MENU button To return...

Page 24: ...the screen and to open folders on the BROWSEscreen button Use this to move the cursor the highlighted area to the left on the screen and to close folders on the BROWSEscreen button Use this to move th...

Page 25: ...he type of battery in order to accurately show the amount of power remaining and allow the unit to accurately determine whether power is available for proper operation See Setting the type of AA batte...

Page 26: ...the unit NOTE When both batteries are installed and the AC adaptor is connected power will be supplied from the AC adaptor Using USB bus power Connect the unit to a PC using the attached USB cable as...

Page 27: ...TASCAM PS P515U sold separately or bus power supplied from a USB port of a PC Turn down the volume of the sound system connected to the unit before starting up or shutting down the unit Do not use hea...

Page 28: ...the cursor highlighted area and use the or button to change values Press the button to fix the settings The start up screen is displayed and then the Home Screen appears after the unit has started up...

Page 29: ...here it left off when shut down previously If the Playback button is pressed after start up the track the unit was playing when shut down previously starts to be played from the position time where th...

Page 30: ...tton to confirm the change and return to the OTHERSscreen NOTE You can set the unit to automatically add the date to file names See Setting the format of file names on page 98 CAUTION The date and tim...

Page 31: ...lot as shown in the following illustration until it clicks into place Removing the card 1 Open the microSD slot cover on the right side panel 2 Press the microSD card in gently and then release it to...

Page 32: ...rmat the card in this unit at any time See System Settings and Formatting on page 95 CAUTION When formatting a card the unit should be operating on AC power supplied through the PS P515U adapter sold...

Page 33: ...hrough the speaker when the unit is recording sound in recording standby or muted with headphones or external speaker system connected Connecting monitors and headphones To listen with headphones conn...

Page 34: ...s unit you can mix and record a sound input through the built in mic or one of the input jack with an audio file that is played back using the overdubbing function Selecting file format sampling frequ...

Page 35: ...ONO If MONOis selected a mono file is created and the same signals are sent to both L and R level meters and output channels If sound is recorded in MONOin WAV format the file size will be half that r...

Page 36: ...arentheses Recording automatically stops if recording time exceeds 24 hours 10 Press the HOME button to return to the Home Screen Set where to save the file Set the folder where recorded files are sav...

Page 37: ...or connecting a dynamic microphone or microphone with a built in battery If set to ON the plug in power may damage such microphones Use headphones to monitor when you are recording with a microphone...

Page 38: ...rding an external device EXT IN Use a stereo miniplug cable to connect to the output of an external audio device Other audio equipment or external sound source CAUTION Reduce the output level of the e...

Page 39: ...tance and angle between the microphone and the sound source The angle and distance of the microphone can also change the character of the recorded sound Manually adjusting the input level The followin...

Page 40: ...and fro with this mark at about the center without causing the PEAK indicator to light red when the loudest sounds occur NOTE Press the HOME button to exit recording standby When in recording standby...

Page 41: ...nd press the button The level control setting screen will appear Options OFF default PEAK REDUCTION AUTO LEVEL LIMITER 4 Use the or button to select highlight a mode and press the button to enable the...

Page 42: ...rding in the limiter mode after automatically setting the recording level in the peak reduction mode AUTO LEVEL The recording level is controlled automatically to increase or decrease the input level...

Page 43: ...input a pop up appears that allows you to turn overdubbing ON or OFF For ordinary recording select OFF and continue to step 2 2 To start recording press the RECORD button again When recording starts...

Page 44: ...prerecording function is disabled if the input monitor is ON for overdubbing Overdub recording is not possible when using the AUTO REC function When overdub recording you cannot start new files manua...

Page 45: ...ltaneous listening to playback and input sound Monitor Mix This allows you to listen to playback and input sound at the same time Monitor Mix You can use a recorded or copied from a computer audio tra...

Page 46: ...ot change the MONITOR MIX setting during recording or when in recording standby TIP By making the above settings in addition to overdubbing you can use a recorded or copied audio track for instrument...

Page 47: ...left abovethedisplaywillbeturnedon Adjusttheinputlevelfor recordingsoasnottoallowthePEAKindicatortobeturned on NOTE When input monitoring is ON and during overdub recording the PEAK indicator lights w...

Page 48: ...ording automatically AUTO REC The unit starts and pauses recording renews files and sets marks automatically depending on the input signal level This function allows the unit to respond to input sound...

Page 49: ...ult 24dB 48dB 8 Press the HOME button to return to the Home Screen 9 Press the RECORD button to put the unit into recording standby Recording starts automatically when the input signal exceeds the LEV...

Page 50: ...when using the AUTO RECfunction Creating and changeover to a new file during continued recording Track incrementing You can manually or automatically split a recording by creating a new file Track inc...

Page 51: ...or button to select REC SETTING and press the button REC SETTINGscreen appears 3 Use the or button to select SIZE and press the or button Use the or button to set the maximum file size at which track...

Page 52: ...maximum number of marks in a file is 99 As the unit is compatible with the BWF format for WAV files marks added to a WAV file during recording are stored in the file Marks stored in the file are avai...

Page 53: ...u cannot move to a mark in a different file Recording the moment before pushing RECORD PRE REC By using prerecording when the unit is in recording standby you can record up to two seconds of the signa...

Page 54: ...on you can record events without losing the beginnings of sounds Self timer function Like a camera the unit has a self timer to trigger the start of recording after a set period of time 1 Press RECORD...

Page 55: ...sert a tone signal whenever recording starts and stops When connecting this unit to a digital SLR camera for example connect the attenuator cable included in the AK DR11C accessory kit sold separately...

Page 56: ...F default HEAD recording start only HEAD TAIL recording start and stop 5 After completing the setting press the HOME button to return to the Home Screen Setting the AUTO TONE length You can set the le...

Page 57: ...button to open the MENU screen 2 Use the and buttons to select the REC SETTINGmenu and press the button to open the REC SETTINGscreen 3 Use the and buttons to select the TONE VOLitem and press the or...

Page 58: ...reo mono 32 kbps 44 1 kHz 48 kHz 74 32 149 04 298 08 596 16 64 kbps 44 1 kHz 48 kHz 37 16 72 32 149 04 298 08 96 kbps 44 1 kHz 48 kHz 24 50 49 40 99 20 198 40 128 kbps 44 1 kHz 48 kHz 18 38 37 16 74 3...

Page 59: ...and press the button The contents of the folder that contains the file that was selected on the Home Screen before the BROWSEScreen was opened appears on the display Screen navigation On the BROWSEScr...

Page 60: ...layback area is set to FOLDER and this folder becomes the new playback area Icons on the BROWSE screen The meanings of icons that appear on the BROWSE Screen are as follows Root Music Folder MUSIC The...

Page 61: ...ppears Press the button again or press the HOME button to return to the BROWSE screen ADD LIST Adds the selected file to the playlist See Playlist on page 68 DELETE A message appears to confirm that y...

Page 62: ...rea is set to FOLDER and this folder becomes the new playback area When recording files are created in this folder ALL DEL A pop up message appears to confirm that you want to delete all the files in...

Page 63: ...t to create a new folder Press the button to create a new folder or press the HOME button to cancel Note that the unit supports only a two level folder structure and accordingly NEWFOLDERdoes not exis...

Page 64: ...use the BROWSE Screen to set a folder as the playback area TIP On the BROWSEScreen regardless of the playback area setting you can select any file on the card that you want Adjusting playback volume...

Page 65: ...card FOLDER default Set the playback area as all the files in the currently selected folder PLAYLIST Set the playback area as the tracks in the playlist See Playlist on page 68 If there is no playlist...

Page 66: ...s displayed 3 Use the or button to select a folder level and use the or button to select a folder For an explanation of how to use the Browse Screen see Screen navigation on page 59 4 Press the QUICK...

Page 67: ...splayed 3 Use the or button to select a folder level and use the or button to select the folder that contains the track file you want to play For an explanation of how to use the BROWSE Screen see Scr...

Page 68: ...ars NOTE For an explanation of how to use the BROWSEScreen see Screen navigation on page 59 3 Use the or button to select the file you want to add to the playlist and press the QUICK button NOTE For d...

Page 69: ...n to select PLAYLIST and press the button PLAYLISTscreen appears 5 Use the or button to select the file you want to edit and press the QUICK button A pop up window appears 6 Use the or button to selec...

Page 70: ...this to change the order of tracks in the playlist In addition to the file name the track number also appears highlighted in inverse Use the or button to move the selected track to a different positio...

Page 71: ...ack name file number and other file information for the currently playing track appear on the display The icon appears on the display when playback is stopped at the beginning a track and the icon app...

Page 72: ...and hold the or button to rewind or fast forward and search the playback track NOTE Press and hold the or button to accelerate the search speed Repeat playback REPEAT You can repeatedly playback one...

Page 73: ...creen NOTE If you start loop playback the REPEAT item automatically switches to OFF if it is in a different mode 5 Press the HOME button to return to the Home Screen Special Playback Control Functions...

Page 74: ...utton or press the PB CONT button to return to the Home Screen Repeated Playback of Selection Loop Playback With this function you can continuously repeat loop the playback of a selection that you mak...

Page 75: ...n at the points corresponding to the IN and OUT points under the playback indicator bar NOTE The pop up message of I O Too Short appears if the section between the IN and OUT points is too short Set t...

Page 76: ...the adjustment of playback speed select a file recorded with a sampling frequency of 44 1 kHz or 48 kHz by using the or button Press the or button after opening the Playback Control screen to increas...

Page 77: ...TING and press the button PLAY SETTINGscreen appears 3 Use the or button to select PLAY EQ and press the or button 4 Use the or button to set the equalizer TREBLE MIDDLE and BASS indicate that adjustm...

Page 78: ...e The jump back time is set as a JUMPBACKsetting 1 Press the MENU button to open the MENU screen 2 Use the or button to select PLAY SETTING and press the button PLAY SETTINGscreen appears 3 Use the or...

Page 79: ...een will not appear in this case A pop up menu to work with a selected file or folder appears if the BROWSEscreen or the PLAYLIST screen is open Switches CALIBand INPUTLEVELon the TUNERscreen NOTE The...

Page 80: ...Delete on page 82 DIVIDE The current track can be divided See Dividing the selected file DIVIDE on page 83 LEVEL ALIGN The perceived overall sound pressure can be increased to enhance listenability S...

Page 81: ...ion see Using the Level Control Function on page 41 When Monitor Mix is enabled the input level can be adjusted in a simple way using the or button Press the or button to open the input level setting...

Page 82: ...g the BROWSEscreen 1 To delete a file select it using the or button or the BROWSEscreen 2 Open the Quick menu screen by pressing the QUICK button while the Home Screen is open when stopped 3 Use the o...

Page 83: ...position for file division and press the RECORD button The following pop up window appears 5 Press the button to divide the file Or press the HOME button to return to the DIVIDEscreen without dividing...

Page 84: ...re than 200 characters long Division is not possible if a file that already exists has the same name as the name that would be given to a new file created by division TIP Add marks during recording at...

Page 85: ...button to select ON and press the button to enable the level alignment function Or select OFFand press the button to disable the level alignment function NOTE The level alignment function may not be a...

Page 86: ...ess the MENU button to open the MENU screen 2 Use the or button to select OTHERS and press the button to open the OTHERS submenu 3 Use the or button to select EFFECT and press the button The EFFECTscr...

Page 87: ...ing to return to item selection status 7 Press the HOME button to return to the Home Screen CAUTION When the sampling frequency is set to 96 kHz or a WAV file with a sampling frequency of 96 kHz is pl...

Page 88: ...ss the button to open the OTHERS submenu 3 Use the or button to select TUNER and press the button TUNERscreen appears The TUNERscreen contains the CALIBoption to set the fundamental frequency of the A...

Page 89: ...e sound is lower or higher than the target pitch The bar becomes longer as the sound shifts away from the target pitch Adjusting the input level for tuning 1 PresstheQUICKbuttontoswitchCALIBtoINPUT LE...

Page 90: ...g the microSD card from the DR 05 and connecting it directly to a computer that has a built in microSD card slot or by using a card reader CAUTION You cannot use this unit s other functions when it is...

Page 91: ...rly inserted before making the USB connection Can t Save Data appears on the screen If you open the Computer directory this unit will appear as an external drive named DR 05 Transferring files to a co...

Page 92: ...nd audio files on the third level or below Since you can set the DR 05 to only play the contents of a specific folder you can organize tracks into genres artists or other categories as you like If you...

Page 93: ...ded file Card information page CARD Shows the use status of the currently inserted microSD card System information page SYSTEM Shows the unit s system setting information and firmware version File inf...

Page 94: ...SD card capacity REMAIN SIZE USED SIZE Shows the amount of unused used capacity on the microSD card Press the or button to switch between REMAINSIZEand USEDSIZE System information page The SYSTEM page...

Page 95: ...the button SYSTEMscreen appears The following settings can be made for the items on the SYSTEMscreen Use the or button and the or button to set each item Setting the automatic power saving function Y...

Page 96: ...ne if the unit has enough power for normal operation Values ALKAL alkaline batteries default Ni MH nickel metal hydride batteries Restoring the factory settings Use the INITIALIZEitem to restore the v...

Page 97: ...ess the HOME button to cancel formatting Using FULL FORMAT Use the FULLFORMATitem to completely format the microSD card Full formatting checks the memory for errors while formatting so it takes more t...

Page 98: ...formatting the formatting may not occur correctly Setting the format of file names You can select the format of names given to files recorded by this unit 1 PresstheMENUbuttontoopentheMENUscreen 2 Use...

Page 99: ...DATE The date is used as the file name in yymmdd format Example 110101_0000 wav NOTE The date is set using the unit s internal clock See Setting the date and time on page 29 Setting the WORD item To...

Page 100: ...Before choosing the DIVIDE function connect the unit to a computer and edit the file name File Not Found The file added to the playlist cannot be found or a file could be damaged Please check the file...

Page 101: ...FAT format CAUTION Execution of FAT formatting erases all data currently on the card File Not Found Make Sys File The system file is missing This unit requires a system file for operation When this me...

Page 102: ...move them to your computer Card Error The card could not be handled properly Replace the card Current File MP3 MP3 files cannot be divided File Protected The file is read only and cannot be erased No...

Page 103: ...adaptor TASCAM PS P515U and or disconnect the USB cable for bus power supply If the error message continues to appear frequently please contact a TEAC Repair Center File Error Can t Save Data Player...

Page 104: ...ly is not connected via a USB hub Confirm that the HOLD switch is not set in the direction of the arrow The unit turns off automatically Is the automatic power saving function enabled See Setting the...

Page 105: ...it minimized Recording does not work If you are using an external device check the connection again Check the input settings again Confirm that the recording level is not too low Confirm that the micr...

Page 106: ...ed Do the built in effects work I cannot erase a file Confirm that you are not trying to erase a file that has been copied from a computer after being write protected This unit s files do not appear o...

Page 107: ...ings MIC EXT IN jack supporting plug in power Connector 1 8 3 5 mm stereo mini Input impedance 25 k Nominal input level 20 dBV Maximum input level 4 dBV LINE OUT Connector 1 8 3 5 mm stereo mini Outpu...

Page 108: ...44 1 48 96kHz JEITA S N ratio 92dB or higher EXT IN to LINE OUT Fs 44 1 48 96kHz JEITA Note JEITA Conforming to JEITA CP 2150 Computer compatibility Windows Pentium 300 MHz or faster 128 MB or more me...

Page 109: ...ut 17 5 hours Built in microphone Recording MP3 44 1kHz 128Kbps About 16 hours Built in microphone Recording MP3 48 kHz 320Kbps About 11 hours Built in microphone Playback WAV 96kHz 24bit About 17 hou...

Page 110: ...s Headphones Playback WAV 96kHz 24bit About 14 hours Built in Speaker Playback WAV 44 1kHz 16bit About 16 5 hours Headphones Playback WAV 44 1kHz 16bit About 16 5 hours Built in Speaker Playback MP3 4...

Page 111: ...onal drawings 61mm 26mm 141mm Illustrations and other depictions may differ in part from the actual product Specifications and external appearance may be changed without notification to improve the pr...

Page 112: ...64 Colonia Del Carmen Delegaci n Coyoac n CP 04100 M xico DF M xico TEAC UK LIMITED Phone 44 8451 302511 http tascam eu Meridien House Ground Floor 69 71 Clarendon Road Watford Hertfordshire WD17 1DS...

Reviews: