background image

IMPORTANT SAFETY INSTRUCTIONS

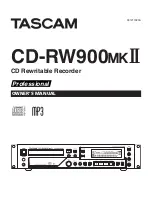
TASCAM  CD-RW900MKII

 3

•  The apparatus draws nominal non-operating power 

from the AC outlet with its POWER or STANDBY/ON 

switch not in the ON position.

•  The mains plug is used as the disconnect device, the 

disconnect device shall remain readily operable.

•  Caution should be taken when using earphones or 

headphones with the product because excessive 

sound pressure (volume) from earphones or 

headphones can cause hearing loss.

•  If you are experiencing problems with this product, 

contact TEAC for a service referral. Do not use the 

product until it has been repaired.

CAUTION

•  Do not expose this apparatus to drips or splashes.
•  Do not place any objects filled with liquids, such as 

vases, on the apparatus.

•  Do not install this apparatus in a confined space 

such as a book case or similar unit.

•  The apparatus should be located close enough to 

the AC outlet so that you can easily grasp the power 

cord plug at any time.

•  If the product uses batteries (including a battery 

pack or installed batteries), they should not be 

exposed to sunshine, fire or excessive heat.

•  CAUTION for products that use replaceable lithium 

batteries: there is danger of explosion if a battery is 

replaced with an incorrect type of battery. Replace 

only with the same or equivalent type.

WARNING

•  Products with Class 

!

 construction are equipped 

with a power supply cord that has a grounding 

plug. The cord of such a product must be plugged 

into an AC outlet that has a protective grounding 

connection.


8

RACK-MOUNTING THE UNIT

Use the supplied rack-mounting kit to mount the unit in a 

standard 19-inch rack, as shown below.
Remove the feet of the unit before mounting.

CAUTION

•  Leave 1U of space above the unit for ventilation.

•  Allow at least 10 cm (4 in) at the rear of the unit for 

ventilation.


1  Read these instructions.

  2  Keep these instructions.

  3  Heed all warnings.

  4  Follow all instructions.

  5  Do not use this apparatus near water.

  6  Clean only with dry cloth.

  7  Do not block any ventilation openings. Install in 

accordance with the manufacturer's instructions.

  8  Do not install near any heat sources such as radiators, 

heat registers, stoves, or other apparatus (including 

amplifiers) that produce heat.

  9  Do not defeat the safety purpose of the polarized 

or grounding-type plug. A polarized plug has two 

blades with one wider than the other. A ground-

ing type plug has two blades and a third grounding 

prong. The wide blade or the third prong are pro-

vided for your safety. If the provided plug does not 

fit into your outlet, consult an electrician for replace-

ment of the obsolete outlet.

 10  Protect the power cord from being walked on or 

pinched particularly at plugs, convenience recep-

tacles, and the point where they exit from the appa-

ratus.

 11  Only use attachments/accessories specified by the 

manufacturer.

 12  Use only with the cart, stand, tripod, bracket, or table 

specified by the manufacturer, or sold with the appa-

ratus. When a cart is used, use caution when moving 

the cart/apparatus combination to avoid injury from 

tip-over.

 13  Unplug this apparatus during lightning storms or 

when unused for long periods of time.

 14  Refer all servicing to qualified service personnel. 

Servicing is required when the apparatus has been 

damaged in any way, such as power-supply cord or 

plug is damaged, liquid has been spilled or objects 

have fallen into the apparatus, the apparatus has 

been exposed to rain or moisture, does not operate 

normally, or has been dropped.

Summary of Contents for CD-RW900mkII

Page 1: ...D01217020A CD RW900 CD Rewritable Recorder Professional OWNER S MANUAL...

Page 2: ...o cause harmful interference in which case the user will be required to correct the interference at his own expense CAUTION Changes or modifications to this equipment not expressly approved by TEAC CO...

Page 3: ...e feet of the unit before mounting CAUTION Leave 1U of space above the unit for ventilation Allow at least 10 cm 4 in at the rear of the unit for ventilation 1 Read these instructions 2 Keep these ins...

Page 4: ...install them correctly in the battery compartment as indicated Putting them in backward could make the batteries rupture or leak causing fire injury or stains around them When you store or dispose ba...

Page 5: ...e waste disposal service or the shop where you purchased the equipment Disposal of batteries and or accumulators a Waste batteries and or accumulators should be disposed of separately from the municip...

Page 6: ...m playback 19 Time display switching 20 Timer playback 20 Repeat playback 20 A to B repeat playback 21 Auto Cue function 21 Auto Ready function 21 Pitch control function 21 Key control function 22 Pla...

Page 7: ...he consequences of any illegal copying performed using the CD RW900MKII About this manual In this manual we use the following conventions The names of keys and controls are given in the follow ing typ...

Page 8: ...one of the following logos High Speed However you should note that an audio CD created using a CD RW disc may not play back satisfactorily on every audio CD player It will naturally be playable on the...

Page 9: ...er pickup to skip Keep discs away from direct sunlight and places of high heat and humidity If left in such places warping could result Do not affix any labels or stickers to the label side of the dis...

Page 10: ...lways replace both batteries with new batteries of the same type Point the remote control to the remote sensor on the main unit Do not obstruct the path between the remote control and the remote senso...

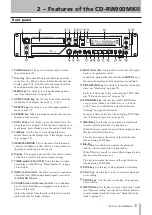
Page 11: ...e level control Use a standard pair of stereo headphones equipped with a 1 4 inch plug with this jack Adjust the volume from the jack with the level control turn clockwise for higher volume r MULTI JO...

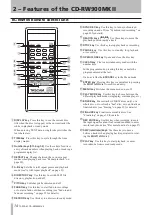
Page 12: ...ertain operations of the CD RW900MKII with the keyboard Title input operations in particular can be performed with greater efficiency Rear panel h ANALOG IN UNBALANCED L R These RCA jacks accept analo...

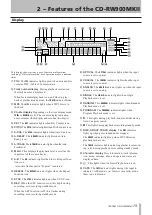
Page 13: ...ator lights when the Repeat function is on SYNC The SYNC indicator lights up when SYNC is on REC When the SRC function is on this lights during recording or in recording standby mode When the SRC func...

Page 14: ...d recording on page 26 for details q SEARCH keys Use these keys to move the playback position inside a track w STOP key Use this key to stop playback or recording e PAUSE key Use this key to standby f...

Page 15: ...ror setting P23 MP3 action settings READ SPEED data reading speed setting P17 Simple playback operations A_READY Auto ready on off P21 Auto Ready function A_CUE Auto cue on off P21 Auto Cue function A...

Page 16: ...the sub menu PLAY MODE is selected the menu item shows up like this NOTE To return to the sub menu option selection screen press the ESCAPE key on the front panel or the CLEAR key on the remote contro...

Page 17: ...th the label side up 3 Press the OPEN CLOSE key to close the tray The display shows C l o s ewhen a disc is loaded into the unit then T O C R e a d i n gwill appear with the peri od flashing When the...

Page 18: ...on page 20 the time from the start of the specified track is displayed Pressing the CLEAR key cancels the input at any stage during input During stop or playback modes when the final digit is entered...

Page 19: ...er Random playback In this mode the unit will play back all the tracks on the disc in completely random order regardless of track number When stopped set the mode to display Program or Mode Random Pre...

Page 20: ...a disc is not loaded into the unit 4 Set the timer to the desired time Consult the timer s operation manual for details At the set time the power to the CD RW900MKII will be turned on and playback wi...

Page 21: ...cuing of the next track ready for playback Use the A_READY sub menu option to turn the function on or off When on the A READY indicator lights up on the display Combined with Auto Cue function the uni...

Page 22: ...the same way as files are handled in an ordinary PC with some MP3 files held within a directory In addition several directories can be combined into one directory This results in multiple layers of d...

Page 23: ...lso NOTE MP3 file formatted at 44 1 kHz sampling rate and 128 kbps or higher are required otherwise that MP3 file cannot be played back Total number of tracks You can choose whether the unit continues...

Page 24: ...ore than 1 away from the standard the CD RW900MKII s internal frequency converter SRC Sampling Rate Convertor will automatically convert the incom ing frequency to 44 1 kHz To enable the SRC Press the...

Page 25: ...t from the volume controls is equivalent to a reading of 16 dB on the meters 4 Press the PLAY key to start recording Pressing the PAUSE key stands by recording tempo rarily To restart recording press...

Page 26: ...input level drops below the adjusted thresh old level for more than five seconds recording stops automatically and enters in recording ready mode 3 To cancel the Sync recording mode press the SYNC RE...

Page 27: ...nd sound has re started the track will be divided Use A_TRK LEVEL option in the REC sub menu The trigger level is set to 24dB to 72 dB A_LVL At least 2 seconds level time Track increment Manually divi...

Page 28: ...ized disc can always be distinguished on the CD RW900MKII by the TOC indicator under the disc type on the display being unlit when the disc is inserted To finalize a disc 1 Load the unfinalized disc a...

Page 29: ...l the operation at this point press the STOP key 3 Push the MULTI JOG dial or press the ENTER key again to proceed the operation The display shows Erase flashing and the remaining time The unit starts...

Page 30: ...rt a character and press the FINALIZE INS key on the front panel or the FINALIZE key on the remote control To change a character Place the cursor on the character to be changed then input the desired...

Page 31: ...rch TRACK 3 CTRL F4 Direct track search TRACK 4 CTRL F5 Direct track search TRACK 5 CTRL F6 Direct track search TRACK 6 CTRL F7 Direct track search TRACK 7 CTRL F8 Direct track search TRACK 8 CTRL F9...

Page 32: ...input the letters Sure Text The text data is not written on the disc yet Open the tray to cancel the text you entered or perform the finalize operation to write the data to the disc Drive Error There...

Page 33: ...irm the connections with the audio system Check the volume level and proper amplifier operation Recording is not possible Confirm the connections with the audio system Adjust the recording level The d...

Page 34: ...nmeasurable Analog inputs Unbalanced RCA pin Level 10 dBV 2 dB Full Scale 16 dB Minimum input level 19 dBV adjustable level at Full Scale 16 dB Input impedance 22 K 10 unbalanced Analog outputs Unbala...

Page 35: ...s LIMITATION OF IMPLIED WARRANTIES Any implied warranties INCLUDING WARRANTIES OF MERCHANTABILITY AND FITNESS FOR A PARTICULAR PURPOSE are limited in duration to the length of this warranty EXCLUSION...

Page 36: ...RRANTY TEAC CORPORATION http tascam jp Phone 81 42 356 9143 1 47 Ochiai Tama shi Tokyo 206 8530 Japan TEAC AMERICA INC http tascam com Phone 1 323 726 0303 7733 Telegraph Road Montebello California 90...

Reviews: