background image

TASCAM  CD-RW900


19

Pitch control function

A to B repeat playback

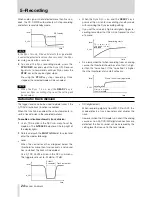
If a specific portion between two points on the disc is 
specified, that portion can be played back repeatedly. 

1

  During playback, press the 

A-B 

key on the remote 

control at the beginning of the desired portion on the 
disc.

REPEAT

 indicator lights up in the display and the 

A- 

indicator will flashes.

2

  At the end of the desired portion on the disc, press 

the 

A-B 

key again.

Then, 

REPEAT

 and 

A-B

 indicator light up in the dis-

play, and the desired A-B section will be played back 
repeatedly. 

NOTE

You can also operate this function during playback 
standby.

3

  To cancel the A-B repeat mode and resume normal 

playback, press the 

A-B 

key once again.

REPEAT

 and 

A-B

 indicator will turn off.

NOTE

≠ 

A-B repeat mode cannot function


For MP3 discs.

≠ 

In Random and Program modes, A-B repeat cannot 
function when the specified A-B section spans more 
than one track, and does not function for MP3 discs.

≠ 

When the 

STOP

 key is pressed, the specified A-B 

section is cancelled. 

When playing back an audio CD, the pitch (or speed) 
of the playback can be varied. Pitch can be /-  
16%. 

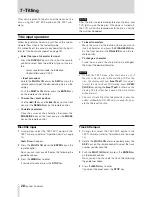
1

  During stop, press the 

PITCH

 key on the remote 

control to turn on the Pitch control function. 
Or, use the PITCH option in the PLAY sub-menu to 
turn on (refer to “Operation basics” on page 14) 
The current pitch value appears on the display for 
seconds and the 

PITCH

 indicator will light up.

2

  Press the 

MENU

 key and select the PITCH CONT 

option in the PLAY sub-menu to set the desired 
value and push the 

MULTI JOG 

dial to enter.

Pitch>XXX

 will appear on the dispaly.

Then, rotate the 

MULTI JOG 

dial to set the desired 

value. 

NOTE

Use the PITCH STEP option in the PLAY sub-menu to 

adjust the pitch value steps from 0.1% to 1.0% in 0.1% 
increments (default: 0.1%) 

3

  Press the 

MENU

 key or push the 

MULTI JOG

 dial to 

enter and return to normal mode.

During playback, the pitch control playback can be  
off temporally. Press the 

PITCH

 key on the remote 

control or use the PITCH option in the PLAY sub-
menu to turn the function off.

Pitch>OFF

 appears on the display and the pitch 

control playback will be off temporally, until the func-
tion is re-set again.
To resume the pitch control playback, press the 

PITCH

 key again or use the PITCH option.

NOTE

≠ 

When turning the pitch control on and off during 
playback, sound output is cut for a short instant.

≠ 

Pitch control cannot be applied for MP3 discs. 

Key control function

The key of the music can be changed during stop, play-
back or playback standby mode. However, please note 
that this feature does not operate with MP3 discs.

1

  Press the 

MENU

 key to select the KEY option in the 

PLAY sub-menu (refer to “Operation basics” on page 
14) to enter the function.
The 

KEY

 indicator will light up.

2

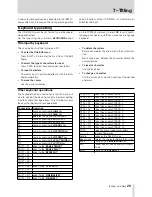
  Call up the KEY LEVEL option in the PLAY sub-

menu to adjust the playback key level.
The playback key can be raised or lowered 1/2 oc-
tave in half-tone increments. Selection values: 0 (no 
change), 

â

1 to 

â

6, 

ã

1 to 

ã

6.

3

  Rotate the 

MULTI JOG

 dial to select the desired key 

level and push to enter.

NOTE

≠ 

In this condition, when a CD is played back, the key 
of the music is changed while the speed of the mu-
sic remains the same.

≠ 

Even when the power is turned off, the key change 
setting is retained.

≠ 

When the Key control function is on, even if the 
Pitch control function is used to change the play-
back speed, the key of playback will remain fixed at 
the preset key {even if the key level is 0 (zero)}, the 
Key control function can be turned on.

≠ 

When using the key control function, playback 
sound may occasionally sound as vibrating. This is 
a result of a special process applied to CD playback 
sound and is normal.


4−Playback operations

Summary of Contents for CD-RW900

Page 1: ...CD RW900 CD Rewritable Recorder D00892620A OWNER S MANUAL Professional ...

Page 2: ... un produit de Classe A Dans un environnement domestique cet appareil peut provoquer des interférences radio dans ce cas l utilisateur peut être amené à prendre des mesures appropriées Für Kunden in Europa Warnung Dies ist eine Einrichtung welche die Funk Entstö rung nach Klasse A besitzt Diese Einrichtung kann im Wohnbereich Funkstörungen versursachen in diesem Fall kann vom Betrieber verlang wer...

Page 3: ...ies specified by the manufacturer 12 Use only with the cart stand tripod bracket or table specified by the manufacturer or sold with the apparatus When a cart is used use caution when moving the cart apparatus combination to avoid injury from tip over 13 Unplug this apparatus during lightning storms or when unused for long periods of time 14 Refer all servicing to qualified service personnel Servi...

Page 4: ... product is completely confined in the protective housings The label required in this regulation is shown 1 CAUTION DO NOT REMOVE THE PROTECTIVE HOUSING USING A SCREWDRIVER USE OF CONTROLS OR ADJUSTMENTS OR PERFORMANCE OF PROCEDURES OTHER THAN THOSE SPECIFIED HEREIN MAY RESULT IN HAZARDOUS RADIATION EXPOSURE IF THIS PRODUCT DEVELOPS TROUBLE CONTACT YOUR NEAREST QUALIFIED SERVICE PERSONNEL AND DO N...

Page 5: ...rack playback 17 Program playback 17 Random playback 18 Time display switching 18 Timer playback 18 Repeat playback 18 A to B repeat playback 19 Pitch control function 19 Key control function 19 Playingback MP3 files 20 About MP3 track data 20 Directory playback setting 20 5 Recording Input selection 21 Input monitoring 21 Frequency conversion 21 Basic recording 22 Time display while recording 22 ...

Page 6: ...older or the rightful licensor your unau thorized recording reproduction or distribution thereof may result in severe criminal penalties under copyright laws and international copyright treaties If you are un certain about your rights contact your legal advisor Under no circumstances will TEAC Corporation be re sponsible for the consequences of any illegal copying performed using the CD RW900 1 In...

Page 7: ...o one of the following logos However you should note that an audio CD created using a CD RW900 disc may not play back satisfactorily on every audio CD player It will naturally be playable on the CD RW900 This is in no way a limitation of the CD RW900 itself but of the difference between the different types of media and the methods used to read them There are precautions that you should take when h...

Page 8: ...s that have adhesive remaining from tape or stickers that have been removed If they are inserted into the player they could stick to the internal mechanism requiring removal by a techni cian Do not use cracked discs Only use circular compact discs Avoid using non circular promotional etc discs The CD RW900 cannot play unfinalized CD R RW discs Music discs with copy control a compact disc copy prot...

Page 9: ...tions by using an infrared light signal When using the unit to control the CD RW900 other devices that are turned on could be operated by its signal If the range of remote operation becomes smaller or commands do not always function properly the bat teries have become weak and should be replaced Always replace both batteries with new batteries of the same type Point the remote control to the remot...

Page 10: ...w the current status of the unit as well as the current menu set tings q TIMER switch PLAY OFF Using this key switches Timer play on and off See Timer playback on page 18 for details w INPUT L R controls Use these concentric con trols to adjust the level of the analog audio signals received at the ANALOG IN jacks e PHONES jack and the level control Use a stan dard pair of stereo headphones equippe...

Page 11: ...the right direction when entering TEXT data o STOP key Use this key to stop playback or record ing p PLAY key Use this key to start or resume playback or recording a READY key Use this key to stands by playback or recording s RECORD key Use this key to enter record ready mode see Recording on page 21 for details and also to enter manual track divisions see Manual track division on page 25 d SYNC R...

Page 12: ... MUTE key Use this key when recording to mute the input signal for about four seconds and then to enter record ready mode see Rec mute function on page 25 s SKIP Â keys Use these keys to move be tween tracks when playing back equivalent to rotat ing the MULTI JOG dial d PLAY key Use this key to start playback or enter record mode from record ready mode RC RW900 Remote control unit 3 4 5 7 8 0 6 e ...

Page 13: ...recording A_TRK Auto track mode setting P24 Automatic track division A_TRK LEVEL Auto track operation level P24 Automatic track division TEXT TEXT EDIT Text setting P28 Title input SYSTEM KEYBOARD Setting for keyboard type P29 Keyboard setting PLAY TIME Confirming total playing time P18 Time display switching REC TIME Confirming total recording time P22 Time display while recording Operation basic...

Page 14: ...the desired menu item or value Pushing the dial enters and exits menu mode Remote control operation Use the SKIP key to select Pressing the ENTER key confirms and exits menu mode NOTE Some menu options exist for confirmation purposes only and setting cannot be performed 4 How to exit menu mode after setting or confir mation during menu option display As well as pushing the MULTI JOG dial or pressi...

Page 15: ... of the disc The CD RW900 also shows one of the following TOC A disc finalized MP3 A disc contains MP3 files 4 Press the PLAY key to start playback Adjust the connected monitor system or the level control for the PHONES on the unit to set the listen ing level you desire WARNING If you monitoring using headphones adjust the level control to low on the unit then connect to the PHONES jack before pla...

Page 16: ... the three digit track number such as 002 for track 2 then the desired elapsed time min sec from the start of that track Example To specify 1 min 30 sec from the start of track 2 input 002 001 30 During input the counter in the display will flash Pressing the CLEAR key cancels the input at any stage during input NOTE Regardless of the time display mode refer to Time dis play switching on page 18 t...

Page 17: ...d to select the track also 3 Press the PLAY key to begin playback After the selected track finishes playback stops Continuous playback Programing is cancelled and playback continuous in the normal order 1 During stop set the Continue or the Mode Cont mode 2 Press the PLAY key to begin playback in order of the track number Program playback This function enables playback of selected tracks in any de...

Page 18: ...splay Remaining disc time TOTAL and REMAIN are lit in the display When stopped the total recording time is shown re gardless of the status of the TOTAL and REMAIN indi cators NOTE In program mode pressing the TIME key displays the elapsed and the remaining time of the whole program When playing an MP3 disc elapsed track time is al ways displayed and the TIME key cannot be used For details on time ...

Page 19: ...om 0 1 to 1 0 in 0 1 increments default 0 1 3 Press the MENU key or push the MULTI JOG dial to enter and return to normal mode During playback the pitch control playback can be off temporally Press the PITCH key on the remote control or use the PITCH option in the PLAY sub menu to turn the function off Pitch OFF appears on the display and the pitch control playback will be off temporally until the...

Page 20: ...ed on the number of MP3 files and directories Maximum number of directories 255 Maximum number of hierarchical structures 8 Maximum number of MP3 files 999 Maximum title size of MP3 files and directories 255 MP3 files are played in the following order In this manner playback is performed from the top level directories 1 Press the DIRECTORY key on the remote control Or use the DIRECTORY option in t...

Page 21: ...e recorded Input selection To select the input to be recorded press the INPUT SELECT key on the main unit Repeated presses of the key cycle through the follow ing options ANALOG Analog OPTICAL Optical digital in COAXIAL Coaxial digital in In the case of either the coaxial or optical inputs being selected the appropriate indicator COAXIAL or OPTI CAL lights on the right of the screen If the analog ...

Page 22: ... dB on the meters 4 Press the PLAY key to start recording Pressing the READY key stands by recording tem porarily To restart recording press the READY key or PLAY key again 5 Press the STOP key to stop recording When recording stops the display shows PMA Writing Program Memory Area flashing for a few seconds as the unit writes to the disc NOTE During the PMA Writing is shown any key cannot be used...

Page 23: ...uto mated start and stopping of recording when a signal is received During stop or recording stancby mode repeated presses of this key cycle through the fol lowing modes Sync ALL The SYNC indicator lights up Sync 1 The unit stops when a selected track is fin ished and the SYNC indicator flashes Sync OFF Turns Sync recording function off After the synchronization mode is selected the record ready m...

Page 24: ...han the threshold a false start will occur 5 Recording Automatic track division The trigger level can also be used to divide tracks if the A_TRACK auto track function is enabled When this function is enabled the unit automatically in serts a track division in the recorded material To enable or disable automatic track division 1 Use A_TRK option in the REC sub menu to set the mode on The A TRACK in...

Page 25: ... unit enters record ready mode NOTE This function is only available from the remote control unit Manually divide track While recording is taking place press the RECORD key The current track number is incremented by one For details of automatic track division while record ing see Automatic track division on page 24 NOTE According to the Red Book the specification for audio CDs a track cannot be les...

Page 26: ...re can be recorded on them By contrast CD RW discs can be unfinalized using the CD RW900 i e their TOC can be deleted and if there is space further ma terial can be recorded on them Even if the disc is full tracks can be erased following the unfinalize process and new material can be recorded As has been explained earlier Finalizing on page 7 in order for a disc to become a standard CD it must hav...

Page 27: ...on the remote control Se lect the ERASE DISC rotating the MULTI JOG dial or pressing the SKIP keys on the remote control To cancel the operation at this point press the ERASE DEL or the ERASE key again 2 Push the MULTI JOG dial or press the ENTER key to enter the function The display shows Sure To cancel the operation at this point press the STOP key 3 Push the MULTI JOG dial or press the ENTER ke...

Page 28: ...ress the FINALIZE INS key on the front panel or the FINALIZE key on the re mote control To change a character Place the cursor on the character to be changed then input the desired character NOTE As with the TEXT menu after the name is set if the disc is tried to eject without writing TOC on the disc the display will show Sure Text If you want to eject the disc without TOC writing press OPEN CLOSE...

Page 29: ... functions and other operations The list below shows the keys that perform various operations Keyboard key Operation F1 same as pressing the µ key F2 same as pressing the key F3 operates the Key control on or off F4 same as pressing the STOP key F5 same as pressing the PLAY key F6 same as pressing the READY key F7 F8 same as pressing the RECORD key F9 F10 same as pressing the REPEAT key F11 same a...

Page 30: ...rs Sure Text The text data is not written on the disc yet Open the tray to cancel the text you enter or operate final ization to write the data on the disc Drive Error There is a problem in the drive D IN UNLOCK The digital input is not connected Turn on the power of the equipment connected to DIGITAL IN Not Audio There is no audio signal from DIGITAL IN Erase Error An error occurred while erasing...

Page 31: ...10 dBV Maximum output level 6 dBV 2 dB Output impedance 600 Ø 10 Phones output Stereo 6 3 20 mW 32 Ø Digital input Coaxial RCA pin jack IEC 60958 Consumer use Optical TOSLINK IEC 60958 Consumer use Digital output Coaxial RCA pin jack IEC 60958 Consumer use Optical TOSLINK IEC 60958 Consumer use Keyboard Mini DIN 6 pin Power U S A Canada 120VAC 60Hz U K Erope 230VAC 50Hz Australia 240VAC 50Hz Power...

Page 32: ... L4Z 1Z8 Canada TEAC MEXICO S A De C V Phone 52 555 581 5500 www tascam com Campesinos No 184 Colonia Granjes Esmeralda Delegaacion Iztapalapa CP 09810 Mexico DF TEAC UK LIMITED Phone 44 8451 302511 www tascam co uk Unit 19 20 The Courtyards Hatters Lane Watford Hertfordshire WD18 8TE U K TEAC EUROPE GmbH Phone 49 611 71580 www tascam de Bahnstrasse 12 65205 Wiesbaden Erbenheim Germany TEAC ITALIA...

Reviews: