background image

30

Dubbing/Importing

Importing Data from a BD/

DVD to the HDD

Data can be imported from a BD/DVD to the HDD as follows.

•  File formats that can be imported

  BD-MV, BD-AV, AVCHD, DVD-VR, DVD-VIDEO, and JPEG

Memo:

•  Titles that are imported using “FULL IMPORT” combined 

into one title.  

This unit does not support combining of titles during the 

editing operation after import is complete. To combine and 

import data, select “FULL IMPORT”.

•  For data that is selected for import via “SEL. 

TITLE(VIDEO)”, titles with the same date are combined.

•  Titles of two or more scenes cannot be combined if the 

recording criteria, such as video size, are different.

Note:

•  Only titles that are not copyright-protected can be imported.

•  Recognizing the device and importing the files may take a 

long time depending on the amount of files in the device.

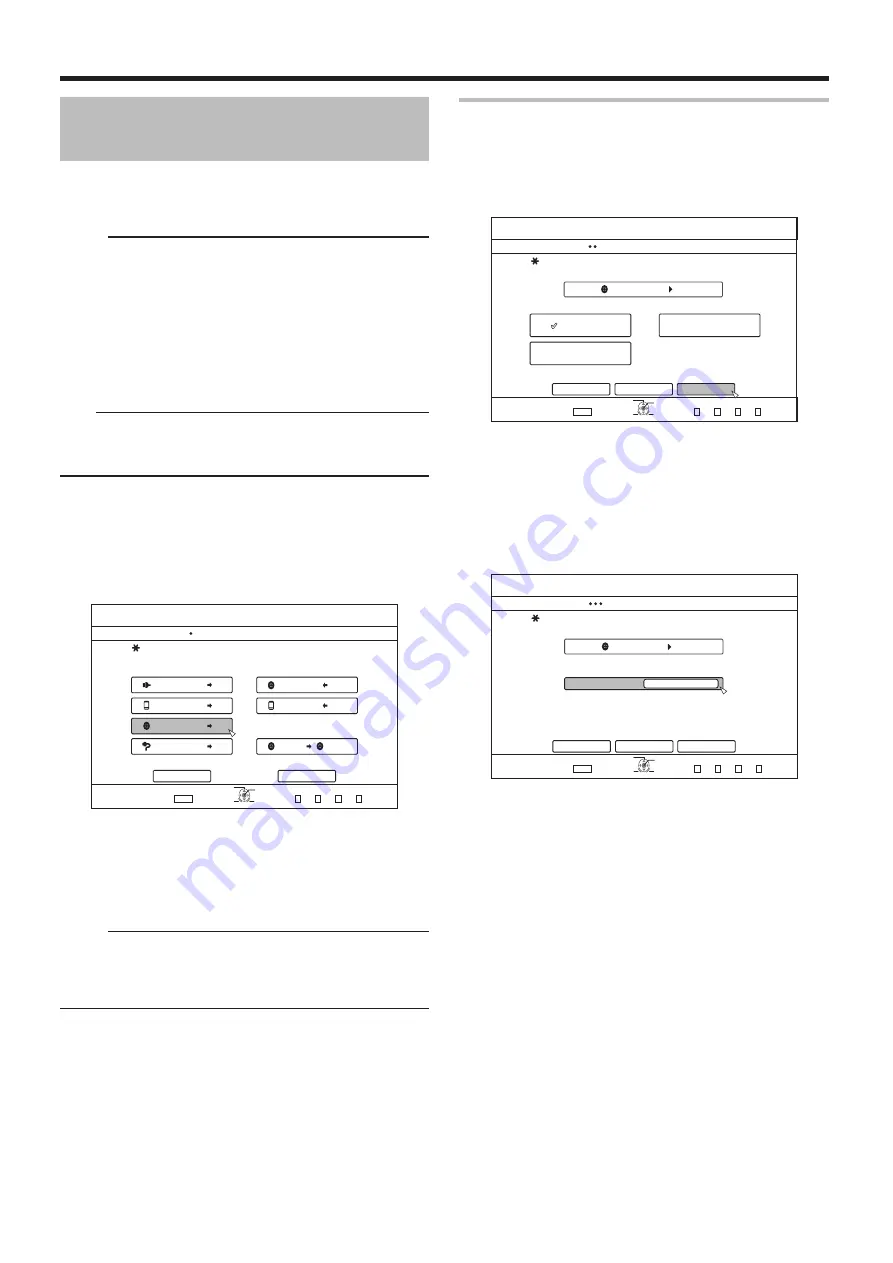
o

  Preparations

1

  Set a BD or DVD on the disc tray

2

  Press the [DUBBING] button on the remote 

control unit

•  The importing screen appears.

3

  Select "DISC

h

HDD" in the importing screen, and 

press the [OK] button

•  A check mark is added to the "DISC

h

HDD" item.

4

  Select “NEXT”, and press the [OK] button

•  The import selection screen appears.

Memo:

•  A recording mode selection appears instead of the import 

selection screen when DVD-VIDEO is detected.  

For more details, refer to "Importing DVD-VIDEO" (

A

 page 

32) .

75$

5&

&+5%

*&8&8

&+5%

&+5%

&+5%

&+5%5&

126+10

1-

4'6740

':+6

5'.'%6

&7$$+0)

56'2

5'.'%6+/2146&7$$+0)

*&&

*&&

*&&

*&&

61*&&

61&8&

&+5%%12;

%#0%'.

0':6

&7$$+0)

8+&'1

2+%674'

Full import

1

  Select “FULL IMPORT” in the import selection 

screen, and press the [OK] button

•  A check mark is added to the “FULL IMPORT” item.

2

  Select “NEXT”, and press the [OK] button

•  “START” will appear instead of “NEXT” in the menu if the 

disc is of a format other than "BD-AV". In this case, go to 

Step 5.

3

  Select “RECORDING MODE”, and press the [OK] 

button

•  A pop-up menu appears.

4

  Select the “RECORDING MODE” option

For more details, refer to "Recording Modes" (

A

 page 28) .

&+5%

126+10

1-

4'6740

&7$$+0)

56'2

5'.'%66*'/'6*1&1(+/2146

*&&

(7..+/2146

5'.6+6.'8+&'1

5'.6+6.'2+%674'

%#0%'.

$#%-

':+6

5'.'%6

&7$$+0)

0':6

&+5%

52

&7$$+0)

56'2

5'66*'4'%14&+0)/1&'

*&&

%#0%'.

$#%-

':+6

5'.'%6

126+10

1-

4'6740

56#46

4'%14&+0)/1&'

&7$$+0)

Summary of Contents for BD-R2000

Page 1: ...LST1148 001B BD R2000 HDD BLU RAYTM DVD RECORDER OWNER S MANUAL...

Page 2: ...EXPOSURE DO NOT OPEN COVERS AND DO NOT REPAIR YOURSELF REFER SERVICING TO QUALIFIED PERSONNEL CLASS 1 LASER PRODUCT REPRODUCTION OF LABELS WARNING LABEL INSIDE OF THE UNIT This unit apply to the stand...

Page 3: ...DO NOT place any containers filled with water or liquids such as cosmetics or medicines flower vases potted plants cups etc on top of this unit 7 DO NOT place any naked flame sources such as lighted...

Page 4: ...y 0 Replace an exhausted battery with a new one promptly 0 If you will not use the remote control for a long time remove the batteries 0 If leaked battery fluid gets on your skin or clothing rinseimme...

Page 5: ...46 Recording Using External Inputs 47 Playing Back About Playing Back 48 Using Playback Navigation 48 Option menu list 50 Video Playback Operation 51 Playing Videos on a BD DVD 53 Playing Videos on th...

Page 6: ...to a Blu ray Disc in high definition from a high definition camcorder or down convert the videos and record them onto DVDs all without the need for a PC The internal hard disk drive enables for easy...

Page 7: ...pyright protection technologies Copyrights According to the copyright law video or music data that you store must not be used for purposes other than personal enjoyment without the authorization of th...

Page 8: ...ispose a card after erasing all data inside it is recommended that this be done using a commercially available data deletion software or by destroying the card physically such as with a hammer Formatt...

Page 9: ...ing is required when the disc is used in VR MODE Format the disc using this unit Formatting is not required when using the disc in VIDEO MODE Note BD R and DVD R discs cannot be reformatted Check the...

Page 10: ...playback can be performed The disc cannot be used for recording or editing 8 cm discs can be used without adapters DVD RAM cartridges and BD RE are not supported Take the DVD RAM out of the cartridge...

Page 11: ...recording playback lens is dirty Dust or dirt may be attached to the recording playback lens after using this unit for a prolonged period of time and recording or playback may not be properly perform...

Page 12: ...wise unstable Near windows or other places exposed to direct sunlight Near heaters or other extremely hot places Extremely cold places Places with bad ventilation or high humidity Make sure that the u...

Page 13: ...p Lights up when in BD DVD mode The REC lamp lights up while recording dubbing K MEDIA SELECT button Switches between HDD and BD SD L SD lamp Lights up when in SD mode M ONE TOUCH DUBBING button Start...

Page 14: ...IO OUT IN terminals For connecting using an audio cable E VIDEO OUT IN terminals For connecting using a video cable A B C D English messages appear for a number of operations Examples HELLO When the p...

Page 15: ...PROGRESSIVE SCAN Switches the resolution of the image output Q AUDIO Switches the playback audio R EDIT Displays the editing menu screen S MEDIA MANAGE Displays the media management menu screen T A Sw...

Page 16: ...nths depending on the frequency of use Remote control codes By setting a remote control code for the unit and remote control you can prevent two recorders from operating simultaneously using the remot...

Page 17: ...splay video images from this unit connect it to a monitor This unit supports connections using HDMI cable component video cable S video cable or video cable Memo Switch to the appropriate monitor inpu...

Page 18: ...more details refer to VIDEO INPUT SETTING A page 81 To record video images played back on this unit to an external device video deck etc connect the output terminal of this unit to the input terminal...

Page 19: ...ternal operation is enabled by connecting a RS 232C cable to a PC or similar device For details on external operation refer to RS 232C Interface A page 83 Connecting the Power Supply Connect the suppl...

Page 20: ...ppears 5 Set the time and date Repeat the steps below to specify the time and date A Press the J or K button select the Clock Set item and press the OK button B Press the J or K button change the sett...

Page 21: ...672 1 5 6 4 106 0 6 06 4 1 4 6740 6 5 6 5 672 761 219 4 1 1 1 4 16 10641 1 4 16 10641 1 5 6 52 2 0 52 4 60 55 37 56 4672 7 4 176276 7 6 5 66 0 5 672 5QHVYCTG 8GTUKQP ZZZZZ ZZZZZ ZZZZZ 1 4 6740 5 672 7...

Page 22: ...pears 6 Select the time display style Select from 12H or 24H 12H Displays the time in AM PM format 24H Displays the time in 24 hour format 7 After selecting press the OK button The time display style...

Page 23: ...ng mode with image quality higher than that of the original recording mode is chosen Dubbing using a specific recording mode will cause the disc to be re encoded Other options for importing data into...

Page 24: ...VIDEO format discs in EP mode title To perform high speed dubbing of a EP mode title to a DVD VIDEO format disc set HIGH SPEED DUBBING A page 77 in the settings menu to 4 3 before recording or importi...

Page 25: ...ve the disc and load it again o DVD format chart Format VR Format Video Format DVD RW Single sided single layer 4 7 GB X X DVD R Single sided single layer 4 7 GB X X Single sided dual layer 8 5 GB X X...

Page 26: ...te that formatting a disc with copyright protected titles erases all the titles from the disc o Cancel formatting Memo 1 Press the OPTION button while formatting 2 Select STOP and press the OK button...

Page 27: ...age the SD card Note that formatting a disc with copyright protected titles erases all the titles from the disc Once the formatting of the SD card begins it cannot be stopped 0 06 8 14 6 0 4 0 5 5 4 8...

Page 28: ...modes All figures shown in the table are approximate values Recording Mode Quality BD Single sided Single Layer BD Single sided Dual Layer DVD Single sided Single Layer DVD Single sided Dual Layer HDD...

Page 29: ...a is searched according to the order of priority listed below when multiple devices are connected to this unit USB h SD card h i LINK Data is retrieved only from the first device and imported to the H...

Page 30: ...control unit The importing screen appears 3 Select DISChHDD in the importing screen and press the OK button A check mark is added to the DISChHDD item 4 Select NEXT and press the OK button The import...

Page 31: ...e the title All titles with a check mark can be added to the list at the same time Select a title from the dubbing title list and press the OK button to perform the following changes Delete the select...

Page 32: ...press the OK button to cancel importing of a title Alternatively you can press the RETURN button to cancel importing and return to the initial screen o To cancel importing while it is in progress Pre...

Page 33: ...is selected for import via SEL TITLE VIDEO titles with the same date are combined Titles of two or more scenes cannot be combined if the recording criteria such as video size are different Note Turn...

Page 34: ...ANCEL from the Cancel Importing menu and press the OK button Doing so imports data to the HDD up to the position where you have chosen to stop Importing Data from a USB compatible Device to the HDD Co...

Page 35: ...titles during the editing operation after import is complete To combine and import data select FULL IMPORT For data that is selected for import via SEL TITLE VIDEO titles with the same date are combin...

Page 36: ...n Select CANCEL from the Cancel Importing menu and press the OK button Doing so imports data to the HDD up to the position where you have chosen to stop Importing Data from an SD Card to the HDD Conti...

Page 37: ...ted can be imported Devices that have in built copyright protection such as D VHS and digital tuners cannot be connected This unit only allows import from tape media Importing will not be performed if...

Page 38: ...ss the OK button to cancel importing of a title Alternatively you can press the RETURN button to cancel importing and return to the initial screen o To cancel importing while it is in progress Press t...

Page 39: ...unit are BD RE BD R DVD RW and DVD R For more details refer to Discs that enable both dubbing and playback A page 10 HD content for which the delete scene operation has been applied cannot be dubbed t...

Page 40: ...the disc menu Select a background image for the disc menu from Background SELECT FROM DEFAULT BACKGROUND A default background set is used for the disc menu Dubbing a Title from the HDD to a BD DVD Con...

Page 41: ...dubbing is discontinued Memo The background image of the disc menu can be selected only for DVD Video and BD MV 7 Set the operations for finalize Finalize will be performed after dubbing if ON has bee...

Page 42: ...roup DESELECT ALL Clears the selection of all still images within the same group Note A message appears if the selected still images do not fit into the disc Check mark cannot be added to a still imag...

Page 43: ...reen will remain added to the image on the still image selection screen o Cancel dubbing To cancel dubbing before it starts Select CANCEL from the menu and press the OK button to cancel dubbing Altern...

Page 44: ...serted into another device B Select REPEAT and select an appropriate repeat setting item Set the disc action to be taken after all titles have been played back OFF The disc will stop and the menu will...

Page 45: ...monitor C Select CHANGE DISC MENU BACKGROUND to select a background image for the top menu You can register and use a background image of your preference Memo The items in FIRST PLAY REPEAT and CHANG...

Page 46: ...o another disc Note Content cannot be copied to a formatted BD R or DVD R disc Make use of an unformatted disc Use a DVD R RW instead of a BD R RE or DVD when the source disc is a BD disc The disc to...

Page 47: ...and press the OK button End the recording Memo Recording will continue even if the external device is stopped Recording will be stopped if the maximum recording time has been reached or if there is i...

Page 48: ...he group About Playing Back Videos or edited videos stored on the internal HDD as well as videos stored on a disc or SD card can be played back on this unit The types of media that are playable on thi...

Page 49: ...image displays You can switch the display between the video thumbnail list screen and still image thumbnail screen When the video thumbnail list screen is displayed Press the GREEN button to display...

Page 50: ...r to Option menu list A page 50 Option menu list BACK Returns to the previous screen PLAY Plays back the selected title group For details on the button operations during playback refer to Video Playba...

Page 51: ...nd slow motion is an approximate amount Pressing the button in the Still mode forwards the video frame by frame Pressing and holding down the button in the Still mode starts playback in slow motion Pr...

Page 52: ...playback fast forward or fast reverse pressing the button moves the playback position back by about seven seconds Pressing the button multiple times moves playback to the position equivalent to the n...

Page 53: ...rom the beginning of the disc Playback may not be possible due to compatibility problems Playing Videos on a BD DVD Playback starts automatically after a BD DVD is set If the Auto Play feature is disa...

Page 54: ...back Navigation Pressing the I button starts playback from the stop position resume point If the stop position resume point is not memorized playback starts from the beginning of the playable content...

Page 55: ...ay is given to the media BD DVD or SD CARD that contains playable still images If both BD DVD and SD CARD contain playable videos priority of display will be given to the most recently used media Play...

Page 56: ...o TIME JUMP You can move to a specific playback position by entering a time This is not possible if the specified time is not valid o SLIDESHOW INTERVAL The following items can be set 3SEC 5SEC 10SEC...

Page 57: ...RMAL Standard picture quality CINEMA Effective when playing movies FINE Produces sharp images with enhanced outlines SOFT Reduces noise that is prominent in the video image USER SETTING Enables the De...

Page 58: ...at are editable vary according to the type of media on which the video data is stored For details refer to the media chart below o Media chart Editing option HDD BD R BDAV BD RE BDAV DVD RW DVD R SD H...

Page 59: ...VD VIDEO The number of characters that can be displayed varies with the character Note If you switch the screen display before confirming the input characters a message will appear on the screen To ca...

Page 60: ...reen Ungrouping 1 Press the NAVIGATION button on the remote control unit The Playback Navigation screen appears 2 Select the group to ungroup and press the OPTION button A pop up option list appears 3...

Page 61: ...elected titles are now excluded from the group Memo To cancel select NO and press the OK button Alternatively you can press the RETURN button to cancel group exclusion and return to the initial screen...

Page 62: ...appears 2 Select the titles groups to delete and press the OPTION button A pop up option list appears 3 Select DELETE and press the OK button A confirmation screen for title group deletion appears 4...

Page 63: ...PROTECT items will be displayed 5 Select YES or PROTECT and press the OK button The selected titles groups are now protected Memo All selected titles and groups will be protected when multiple titles...

Page 64: ...t YES and press the OK button Protection of the selected titles groups is now turned off Memo Protection will be turned off from all selected titles and groups when multiple titles or groups are selec...

Page 65: ...the TARGET PLAYLIST and press the OK button B Select DELETE and press the OK button o Entering the playlist name A Select TARGET PLAYLIST and press the OK button B Enter a playlist name and press the...

Page 66: ...he Playback Navigation screen A Select the title for which the thumbnail is to be changed and press the OPTION button B Select EDIT INFO and press the OK button An information editing screen appears C...

Page 67: ...how to play videos refer to Video Playback Operation A page 51 Frame movement on the Chapter Edit screen can only be performed one frame at a time regardless of the STILL MODE A page 77 setting Editi...

Page 68: ...hapter A Select a chapter followed by COMB W PREV CH and press the OK button Combines chapters o Combining with next chapter Combines the selected chapter with the next chapter A Select a chapter foll...

Page 69: ...o two titles Memo Dividing can only be applied to titles stored on the HDD Titles that are protected cannot be divided To divide a title turn off the protection For details on turning off the title pr...

Page 70: ...e 64 HD content for which the delete scene operation has been applied cannot be dubbed to BDMV Perform seamless conversion before starting a dubbing operation For details refer to Mode conversion A pa...

Page 71: ...ion select CANCEL and press the OK button Alternatively you can press the RETURN button to cancel delete scene and return to the initial screen A Play the video and press the W button at the point whe...

Page 72: ...o be changed and press the OK button The screen for changing the shooting date time appears 4 Change the shooting date time Perform the following steps to change the shooting date time A Use the J and...

Page 73: ...conversion to the XP SP LP EP mode To apply MODE CHANGE after turning off the power select AFTER POWER OFF for START METHOD under the MODE CHANGE Note When seamless conversion is performed the chapter...

Page 74: ...control unit The Settings Menu screen appears Memo When playback is in progress pressing the button stops it and displays the Settings Menu screen The cursor position appears at the position when the...

Page 75: ...fied using the DIMMER POWER ON and DIMMER POWER OFF control items DIMMER POWER ON For setting the brightness of the display window when the power is turned On Setting Values Description BRIGHT Bright...

Page 76: ...details on the language codes refer to the Language Code List A page 94 MENU LANGUAGE For setting the menu language when playing back BD Videos or DVD Videos For details on the language codes refer to...

Page 77: ...o DVD Video BDMV AVCHD finalized discs or SD card is stopped halfway Setting Values Description OFF Resume information is not stored ON Stores resume information Memo Resume information is stored at a...

Page 78: ...setting audio output to BITSTREAM or PCM Setting Values Description BITSTREAM Use this setting when connecting a device that is able to decode DTS PCM Audio input will be changed and output as PCM Us...

Page 79: ...evice that is unable to decode DTS HD AAC For setting audio output to BITSTREAM or PCM Setting Values Description BITSTREAM Use this setting when connecting a device that is able to decode AAC PCM Aud...

Page 80: ...tible monitor Elements other than 24p ones are output at 60p No video images will be output from the video S video and component outputs when the HDMI output resolution is at 1080 24p Connection o MON...

Page 81: ...setting when connecting via the video BNC terminal S VIDEO Use this setting when connecting via the S video black terminal x v Color Setting Values Description AUTO Outputs x v Color information with...

Page 82: ...ur settings for the following functions are kept in the memory These settings will resume when the unit is turned on again Locking the Disc Tray By turning on the lock for the disc tray the tray canno...

Page 83: ...Command Connector the cable to be used should be a RS 232C interface cable straight type 3 m or shorter When using RS 232C set QUICK STARTUP in the settings menu to ON During command transmission a mi...

Page 84: ...nctions like the T button on the remote control 9E Returns to the previous title Functions like the S button on the remote control 9F Issues the same codes as the wired remote control via RS 232C A0 P...

Page 85: ...e Title Search PLAY LIST 38 Hundreds Tens Ones ASCII codes 30 39 38 3 3 3 E g 028 38 30 32 38 E g When searching the 28th play list as indicated by the play list number on the top right corner of the...

Page 86: ...SP LP EP 32 BD DVD DECK 34 DUBBING 37 SET UP 3C OK ENTER 3E ON SCREEN 44 HDD DECK 48 MEDIA MANAGEMENT 80 CUSOR 0 Moves the arrow in the index list to the right I 81 MENU BD DVD Deck only 82 CUSOR 90 M...

Page 87: ...COLOR KEY RED D9 JOG 1 6 DA JOG 1 6 DB JOG 1 DC INSTANT REPLAY DD EDIT DE COLOR KEY GREEN DF COLOR KEY YELLOW B8 B8 Input Output Selection 1st Byte 2nd Byte External input selection L 1 VIDEO 30 31 E...

Page 88: ...61 TE 3C 83 AA 3C 1C GU 3C 3D MY 3C 62 TG 3C 84 AB 3C 1D HA 3C 3E NA 3C 63 TH 3C 85 AF 3C 1E HI 3C 3F NE 3C 64 TI 3C 86 AM 3C 1F HR 3C 40 OC 3C 65 TK 3C 87 AR 3C 20 HU 3C 41 OM 3C 66 TL 3C 88 AS 3C 2...

Page 89: ...3D MY 39 62 TG 39 84 AB 39 1D HA 39 3E NA 39 63 TH 39 85 AF 39 1E HI 39 3F NE 39 64 TI 39 86 AM 39 1F HR 39 40 OC 39 65 TK 39 87 AR 39 20 HU 39 41 OM 39 66 TL 39 88 AS 39 21 HY 39 42 OR 39 67 TN 39 8...

Page 90: ...ng information such as deck status Command Description 60 Chapter Sense For acquiring the current chapter number 61 Title Track Sense For acquiring the current title number under ORIGINAL or in the PL...

Page 91: ...h L 1 S VIDEO Output selection h Common output Frame is fixed at 0 Recording mode selection h SP Audio language selection h ENGLISH Subtitle selection h GERMAN For response data for B9 see data forma...

Page 92: ...t Inserted Disc Not Inserted Disc Not Inserted Occurrence of abnormality in VTR 0 Fixed During STANDBY Unit Power Off Refer to the SEARCH SPEED table bit2 0 Fixed 0 Fixed 0 Fixed 0 Fixed During Repeat...

Page 93: ...D BD SD HDD BD SD HDD BD SD bit7 1 Fixed 0 Fixed 1 Fixed 1 Fixed bit6 0 Fixed 0 Fixed 0 Fixed 1 Fixed bit5 0 Fixed 1 Fixed 0 Fixed 0 Fixed bit4 0 Fixed 0 Fixed 0 Fixed 0 Fixed bit3 0 Fixed Refer to th...

Page 94: ...JV Javanese SA Sanskrit BA Bashkir JA Japanese SR Serbia BM Bambara KL Kalaallisut HR Croatian EU Basque KN Kannada SI Sinhala BE Belarusian KS Kashmiri SK Slovak BN Bengali KR Kanuri SL Slovenian BH...

Page 95: ...FR French MO Moldavian UG Uighur FY Western Frisian MN Mongolian UK Ukrainian FF Fulah NA Nauruan UR Urdu KA Georgian NV Navajo UZ Uzbek DE German NR South Ndebele VE Venda GD Scottish Gaelic ND North...

Page 96: ...BB Barbados IE Ireland RE Reunon Island BD Bangladesh IL Israel RO Romania BE Belgium IN India RU Russian Federation BF Burkina Faso IO British Indian Ocean Territory RW Rwanda BG Bulgaria IQ Iraq SA...

Page 97: ...lands EE Estonia MP Northern Mariana Islands US United States EG Egypt MQ Martinique UY Uruguay EH Western Sahara MR Mauritania UZ Uzbekistan ER Eritrea MS Montserrat VA Vatican ES Spain MT Malta VC S...

Page 98: ...DD in the SD picture quality you can create a seamless DVD by setting SEAMLESS PLAYBACK under the Setting Menu List to ON followed by performing re encode dubbing Refer to SEAMLESS PLAYBACK A page 77...

Page 99: ...eo images may be distorted during reencoding dubbing when the monitor TV is connected to this unit using a HDMI cable or when the screen resolution is set to 1080p This is not a malfunction Change the...

Page 100: ...ppear from the unit s display window and the disc tray does not open when the M button is pressed Pressing the M button at the front of the unit for five seconds or longer opens the disc tray To close...

Page 101: ...o 789 nm Output No hazardous radiation is emitted with the safety protection For DVD Wavelength 656 nm to 663 nm Output No hazardous radiation is emitted with the safety protection For BD Wavelength 4...

Page 102: ...9 58 93 BD MIX SOUND 79 BD VIDEO DATA 8 BDAV 9 10 24 BDMV 9 10 24 BD ROM 10 56 93 BD VIDEO RATINGS 76 BLUE BACK 79 C CHANGE ANGLE 56 CHANGE AUDIO OUTPUT 56 CHANGE CHAPTER 56 CHAPTER EDIT 50 67 CHAPTER...

Page 103: ...Everyone is permitted to copy and distribute verbatim copies of this license document but changing it is not allowed Preamble The licenses for most software are designed to take away your freedom to s...

Page 104: ...e requirements apply to the modified work as a whole If identifiable sections of that work are not derived from the Program and can be reasonably considered independent and separate works in themselve...

Page 105: ...or she is willing to distribute software through any other system and a licensee cannot impose that choice This section is intended to make thoroughly clear what is believed to be a consequence of the...

Page 106: ...r General Public License instead of this License GNU LESSER GENERAL PUBLIC LICENSE Version 2 1 February 1999 Copyright C 1989 1991 Free Software Foundation Inc 51 Franklin Street Fifth Floor Boston MA...

Page 107: ...ses the library The former contains code derived from the library whereas the latter must be combined with the library in order to run GNU LESSER GENERAL PUBLIC LICENSE TERMS AND CONDITIONS FOR COPYIN...

Page 108: ...ted place then offering equivalent access to copy the source code from the same place satisfies the requirement to distribute the source code even though third parties are not compelled to copy the so...

Page 109: ...istribute the Library or its derivative works These actions are prohibited by law if you do not accept this License Therefore by modifying or distributing the Library or any work based on the Library...

Page 110: ...NDERED INACCURATE OR LOSSES SUSTAINED BY YOU OR THIRD PARTIES OR A FAILURE OF THE LIBRARY TO OPERATE WITH ANY OTHER SOFTWARE EVEN IF SUCH HOLDER OR OTHER PARTY HAS BEEN ADVISED OF THE POSSIBILITY OF S...

Page 111: ...111 Others...

Page 112: ...1905 890 9888 5939 Wallace Street Mississauga Ontario L4Z 1Z8 Canada TEAC MEXICO S A de C V www teacmexico net Phone 52 55 5010 6000 R o Churubusco 364 Colonia Del Carmen Delegaci n Coyoac n CP 04100...

Reviews: