background image

55

EDITING

Title and Chapter Editing (Continued)

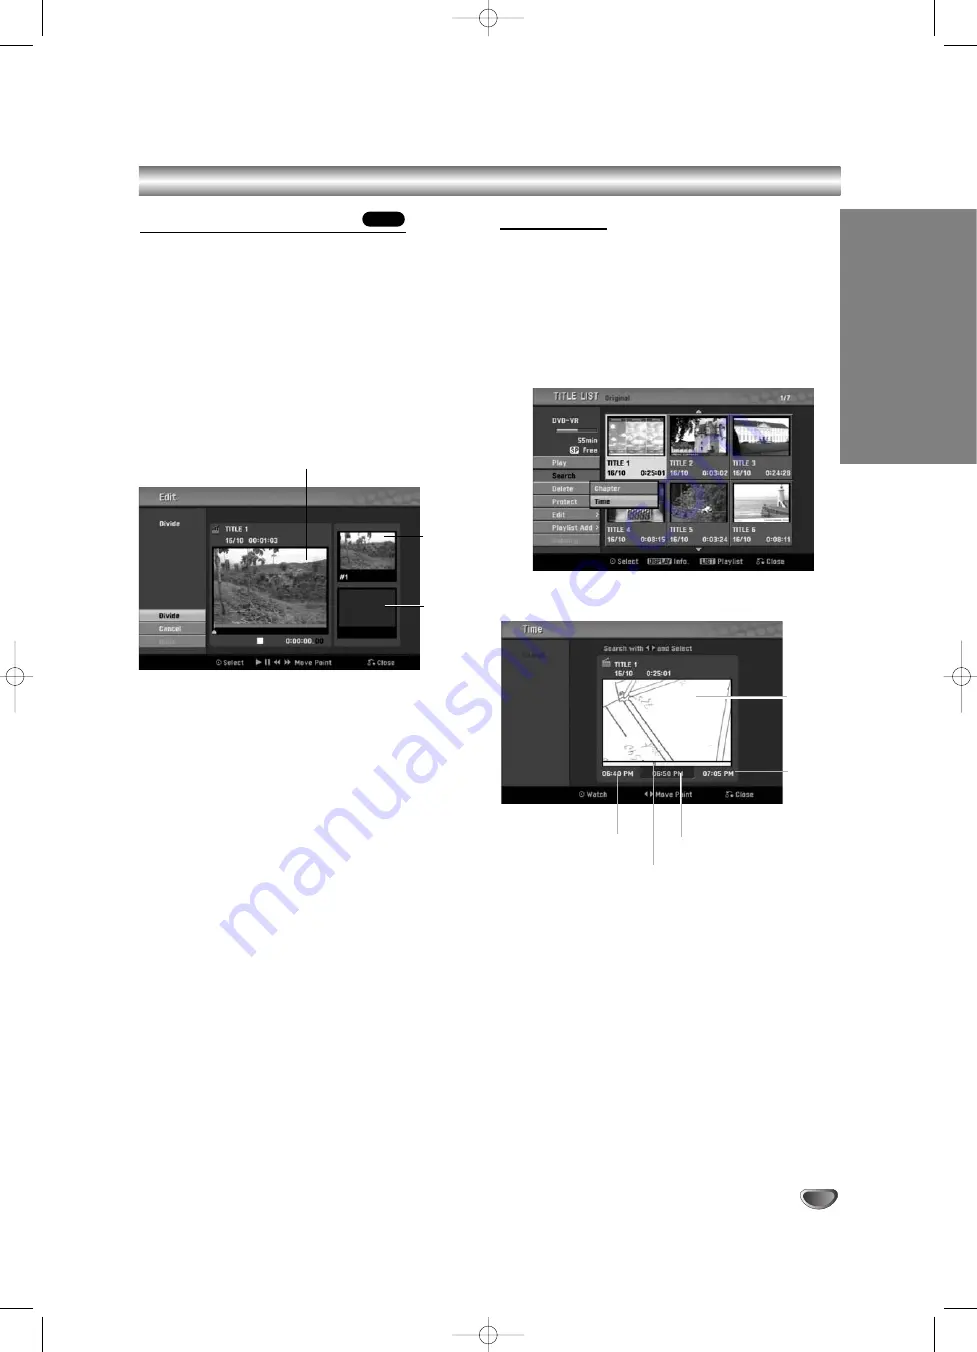
Divide One Title Into Two

Use this command to split a title up into two new titles.

11

On the Title List menu, select a title you want to
divide then press ENTER.

The menu options appears on the left side of the
screen.

2

2

Select ‘Edit - Divide’ from the Title List menu
options.

3

3

Press ENTER when ‘Divide’ option is highlight-
ed.

Title Edit-Divide menu appears and goes into STOP
mode.

4

4

Use pause step, search, skip and slow-motion
to find the point you want to divide the title.

5

5

When ‘Divide’ option is highlighted, press
ENTER at the point. 

You can clear the dividing point and exit the Title
Edit-Divide menu, use 

v

/

V

to select ‘Cancel’

option then press ENTER. The dividing point is
clear.

6

6

Choose ‘Done’ option then press ENTER to fix
the dividing point.

The title is divided into two new titles. It take up to 
4 minutes to divide.

Time Search

You can select start point of the title.

11

Use 

b

/

v

V

to choose a title on the Title

List menu then press ENTER.

The options appears on the left side of the menu.

2

2

Select Time option then press ENTER.

Example : Title List (DVD-VR).

Time Search menu appears on the TV screen.

3

3

Use 

b

to find the point you want to start.

The point increase 1 minute step.

If you press and hold

b

then the point increase

5 minute step.

4

4

Press ENTER to start selected point.

+RW

The first
title’s
thumbnail

Current picture

The
second
title’s
thumbnail

Current
picture

Start time

End
time

Selected time

Selected point

RC174P1_NA4UTTA_S_48T_ENG  7/24/06  2:07 PM  Page 55

Summary of Contents for DVR-5200 Series

Page 1: ...Video output of an external source TV Monitor VCR Camcorder etc 16 AV3 IN VIDEO IN AUDIO IN Left Right Connect the audio video output of an external source Audio system TV Monitor VCR Camcorder etc 17...

Page 2: ...quantities Discharged batteries must not be disposed of with your domestic waste Use the possibility of returning old batteries free of charge Protect the environment Recycle used batteries 16 To avoi...

Page 3: ...unique to this unit and not available to others You should record requested information here and retain this guide as a permanent record of your purchase Model No ___________________________________ S...

Page 4: ...nitialize 27 Finalize 28 Disc Label 28 Disc Protect 29 PBC 29 Auto Play 29 About DivX R 29 General Explanation of On Screen Display 30 PLAYBACK Operation with DVD and Video CD 31 34 Playing a DivX Mov...

Page 5: ...a DVD recorder of another manufacturer or used insertion playback recording or editing in a personal computer DVD drive When a DVD that has been used as above is used again in this recorder When a DV...

Page 6: ...r typical computer like operations Moreover high resolu tion still pictures can be played if they are included on the disc Video CDs not equipped with PBC Version 1 1 Operated in the same way as audio...

Page 7: ...s playing discs recorded on this recorder in other players Is editing a DVD like editing a video tape No When you edit a video tape you need one video deck to play the original tape and another to rec...

Page 8: ...ing time will depend on the material being recorded When recording a TV broadcast if the reception is poor or the picture contains interference the record ing times may be shorter If you record still...

Page 9: ...uch as films or music is unlawful unless permitted by a legal exception or consented to by the rights owner This product incorporates copyright protection tech nology that is protected by method claim...

Page 10: ...tly moistened with a mild detergent solution Do not use strong solvents such as alcohol benzine or thinner as these might damage the surface of the unit Notes on Discs Handling discs Do not touch the...

Page 11: ...ght Connect the audio video output of an external source Audio system TV Monitor VCR Camcorder etc AV3 IN S VIDEO IN Connect the S Video output of an external source TV Monitor VCR Camcorder etc DV IN...

Page 12: ...plus programming EJECT OPEN CLOSE Opens and closes the disc tray Ejects the tape in the VCR deck TV Control Buttons See page 58 POWER Turns the TV on or off AV INPUT Selects the TV s source PR CH Sel...

Page 13: ...om the AERIAL to your TV monitor EURO AV 1 AUDIO VIDEO Connect to a TV with SCART jack AUDIO OUT Left Right Connect to an amplifier receiver or stereo system COMPONENT PROGRESSIVE SCAN VIDEO OUT Y Pb...

Page 14: ...cable T S Video connection Connect the S VIDEO OUT jack on the Recorder to the S Video in jack on the TV using the S Video cable S Component Video connection Connect the COMPONENT PROGRESSIVE SCAN VID...

Page 15: ...malfunctions To solve the problem turn off the recorder and then turn it on again About HDMI HDMI High Definition Multimedia Interface supports both video and audio on a single digital connection for...

Page 16: ...ectly to your TV or AV receiver Connecting an external decoder box If you have an external dedicated decoder box for your satellite or cable TV system use the setup described on this page 1 1 Connect...

Page 17: ...channel Audio Video receiver that supports one or more of the audio formats supported by your Recorder MPEG 2 Dolby Digital and DTS Check the receiver manual and the logos on the front of the receiver...

Page 18: ...it is possible to connect a DV digital camcorder or video deck or DVD R RW recorder and digitally transfer DV tapes or DVD R RW discs to DVD R RW Use a DV cable not supplied to connect the DV in out j...

Page 19: ...rs The unit will be in tuner mode always when the Home menu appears 2 2 Use b B to select the desired option Setup Start Displays the Setup menu TV Auto Ch Scan Link to the Auto Programming page 19 PR...

Page 20: ...n Rename Edits the station name Move Moves the program s location on the pro gram list Delete Deletes the program from program list Decoder On Off Set the decoder for the program to On or Off NICAM Au...

Page 21: ...ears on the left side of the Program List menu 2 Use v V to select Move option from Program List options then press ENTER 3 Use v V to select a desired position then press ENTER to store Deleting a pr...

Page 22: ...ENTER 3 3 Enter the necessary information for date and time b B left right Moves the cursor to the previous or next column v V up down Changes the setting at the current cursor position 4 4 Press ENT...

Page 23: ...able in the standby mode for the timer recording and when power off of the unit after receiving the encoded television signals CANAL or PREMIERE Factory Set If you need to you can reset the recorder t...

Page 24: ...PCM 2ch format when you play a DVD video disc recorded on the MPEG2 recording system Bitstream Select Bitstream if you connected the Recorder s DIGITAL OUT jack to a MPEG decoder or an amplifier or o...

Page 25: ...then press ENTER The 4 digit password is cleared Enter a new code as shown above Rating Movies on DVDs may contain scenes not suitable for children Therefore discs may contain Parental Control informa...

Page 26: ...r using B buttons and select the second character using v V buttons 1 11 1 Press ENTER to confirm your Area Code selec tion then press HOME to exit the menu Recording Settings Disc Record Mode You can...

Page 27: ...completely blank disc the recorder will ini tialize the disc DVD R The recorder initialize the disc to Video mode The recording mode will always be Video mode DVD RW The Initialize menu will appears S...

Page 28: ...rom the Finalize menu After doing this you can edit and re record onto the disc Disc Label Use this to enter a name for the disc This name appears when you display disc information on screen The disc...

Page 29: ...ayback time and then play back the title automatically ON Auto Play function is active OFF Auto Play function is not active ote The Auto Play function may not work for some DVDs About DivX R We provid...

Page 30: ...Example DVD Video disc 2 2 You can select an item by pressing v V and change or select the setting by pressing b B For details about each item see the pages in parentheses TITLE Current title or track...

Page 31: ...d otherwise all operations described use the remote control Some features may also be avail able on the Setup menu Moving to another TITLE When a disc has more than one title you can move to another t...

Page 32: ...PEAT OFF VCD REPEAT TRACK REPEAT ALL REPEAT OFF or REPEAT TRACK REPEAT ALL RANDOM NORMAL DVD RW VR REPEAT CHAPTER REPEAT TITLE REPEAT ALL REPEAT OFF ip By pressing SKIP during Random playback the unit...

Page 33: ...t OK then press ENTER 5 Repeat steps 2 4 to erase additional Marked scene 6 To remove the Marker Search menu press RETURN O Checking the Contents of DVD Video Discs Menus DVDs may contain menus that a...

Page 34: ...nt subtitle languages Finding Locations on a Disc You can directly access any point on a video CD using this function Use this function only while a video CD is playing Playback jumps to the point spe...

Page 35: ...y Start playback the selected title Open Opens the folder and a list of files in the folder appears Dubbing Copies the file s to a VHS tape page 41 About DivX movie files DivX disc compatibility with...

Page 36: ...D menu and Photo CD menu by pressing TITLE repeatedly in Stop mode If you select a MP3 and press DISPLAY the file informations are displayed Press DISPLAY again to remove the file informations If you...

Page 37: ...o exit SEARCH mode press N PLAY Notes on MP3 WMA Recordings About MP3 An MP3 file is audio data compressed by using the MPEG1 audio layer 3 file coding scheme We call files that have the mp3 file exte...

Page 38: ...ure clockwise or counterclockwise View Slide Shows 1 Select Slide Show option on the Photo menu 2 Press ENTER The Slide Show menu appears 3 Use v V b B to set the options Object Selected file or All f...

Page 39: ...Horizontal lines noise bars will appear on the TV screen This is normal The audio is automatically muted during special effect modes so there is no sound during search During the high speed picture se...

Page 40: ...reases the recording time by 30 minutes Please confirm the VHS tape has enough remaining time to be recorded before recording Instant Timer Record Menu Checking the Recording Time Press REC z or DISPL...

Page 41: ...ver and over again Copying from VCR to DVD You can copy the contents of a VHS tape to a record able DVD disc using the DUBBING button This allows you to archive your old VHS tapes to DVD ote If the VH...

Page 42: ...ove the cursor left right v V up down change the setting at the cur rent cursor position Press RETURN O to exit the Timer Record menu Press RETURN O to display Timer Record List 6 6 Press ENTER to sav...

Page 43: ...ecording Press ENTER to edit the selected program Timer Record menu appears Press CLEAR to delete the selected program from the Timer Record List Canceling a Timer Recording You can clear a timer sett...

Page 44: ...der s remote you can control both the cam corder and this recorder Before recording make sure that the audio input for the DV IN jack is set up see page 27 ips The source signal must be DVC SD format...

Page 45: ...t or the DV cable becomes discon nected Although DV Record Audio is set to Audio 2 and Audio 2 signal is not present DV Record Audio will be reset to Audio 1 automatically DV Related Messages You may...

Page 46: ...ions Title Name Edits the title name page 53 Delete Part Deletes a part of the Title page 52 Playlist Add Adds the title to the Playlist page 51 Dubbing Copys the title to a VHS tape 4 4 Press RETURN...

Page 47: ...p Press DISPLAY to display more detailed title information for selected title Using the Chapter List Playlist Menu 1 1 Press DISC MENU LIST repeatedly to display the Title List Playlist menu 2 2 Use v...

Page 48: ...ected title Deleting a Title Before a disc is finalized you can delete titles recorded on the disc Caution If you delete a title from a DVD R disc the title will disappear from the Title List but the...

Page 49: ...Title Name Edits the title name page 53 Divide Divides one title into two titles page 55 Hide Show Hides or Shows the all chapters within the title page 54 Dubbing Copys the title to a VHS tape 4 4 Pr...

Page 50: ...dding Chapter Markers You can put a chapter marker anywhere in a Playlist or Original title during recording or playback Once the chapter is marked you can use the Chapter Search feature as well as de...

Page 51: ...s on the left side of the Original menu 3 3 Use v V to select Playlist Add from Original options then press ENTER 4 4 Select New Playlist then press ENTER The new title appears in the updated Playlist...

Page 52: ...cording the deleted title s name is changed to Deleted Title If the deleted titles more than two are continued the titles are combined into one Deleting a Part You can delete a part which you do not w...

Page 53: ...d on the DVD player only after finalizing Combining Two Chapters Into One Use this function to combine two adjacent Playlist or Original chapters into one ote This function is not available if there i...

Page 54: ...display Title List menu 2 2 Use v V b B to choose a title you want to pro tect then press ENTER Options appears on the left side of the screen 3 3 Select Protect option on the options e g If you sele...

Page 55: ...elect Cancel option then press ENTER The dividing point is clear 6 6 Choose Done option then press ENTER to fix the dividing point The title is divided into two new titles It take up to 4 minutes to d...

Page 56: ...the another DVD player that is capable of playing DVD RW or DVD R discs 1 1 Insert DVD R or DVD RW disc recorded already 2 2 Press TITLE button Title List menu will appear as below ip You can remove t...

Page 57: ...Cambodian 7577 Catalan 6765 Chinese 9072 Corsican 6779 Croatian 7282 Czech 6783 Danish 6865 Dutch 7876 English 6978 Esperanto 6979 Estonian 6984 Faroese 7079 Language Code Fiji 7074 Finnish 7073 Frenc...

Page 58: ...holding down TV POWER button press the number buttons to select the manufacturer code for your TV see the table below 2 Release TV POWER button Code numbers of controllable TVs If more than one code n...

Page 59: ...Those channels are not stored in the recorder Aerial or cables are loose Camcorder is off Recorder INPUT SELECT is incorrect Solution Plug the power cord into the wall outlet securely Select the appro...

Page 60: ...at the remote sensor of the Recorder The remote control is too far from the Recorder There is an obstacle in the path of the remote control and the Recorder The batteries in the remote control are exh...

Page 61: ...96 kHz 8 Hz to 44 kHz Signal to noise ratio More than 100 dB AUDIO OUT connector Harmonic distortion Less than 0 008 AUDIO OUT connector Dynamic range More than 95 dB AUDIO OUT connector Inputs AERIA...

Page 62: ...back N PLAY Starts playback STOP x Stops playback or recording HOME Accesses or removes the HOME menu b B v V left right up down Selects an option in the menu PR CH TRK Select channel programme of the...

Reviews: