background image

Targa Visionary LCD 19-4 Wide


18


English 

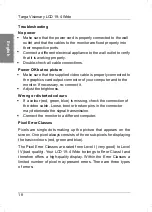
Troubleshooting 

No power


ƒ

  Make sure that the power cord is properly connected to the wall 

outlet and that the cables to the monitor are fixed properly into 
their respective ports.


ƒ

  Connect a different electrical appliance to the wall outlet to verify 

that it is working properly.


ƒ

  Double-check all cable connections.


Power OK but no picture


ƒ

  Make sure that the supplied video cable is properly connected to 

the graphics card output connector of your computer and to the 
monitor. If necessary, re-connect it. 

ƒ

  Adjust the brightness. 

Wrong or distorted colours


ƒ

  If a colour (red, green, blue) is missing, check the connection of 

the video cable. Loose, bent or broken pins in the connector 
may deteriorate the signal transmission. 

ƒ

  Connect the monitor to a different computer. 

Pixel Error Classes 

Pixels are single dots making up the picture that appears on the 
screen. One pixel always consists of three sub-pixels for displaying 
the basic colours (red, green and blue). 

The Pixel Error Classes are rated from Level I (very good) to Level 
IV (bad quality). Your LCD 19-4 Wide  belongs to Error Class II and 
therefore offers a high-quality display. Within the Error Classes a 
limited number of pixel may present errors. There are three types 
of errors: 


Summary of Contents for 19"

Page 1: ...LCD DISPLAY 19 User manual GB IE CY Targa Visionary LCD 19 4 Wide 6_tft_19 4_0710 qxd hb_sc_nb_traveller kit qxd 22 10 2007 13 00 Uhr Seite 1...

Page 2: ...xternal devices may be used that comply with safety standards and the electromagnetic compatibility and shielding quality of this device This device fulfils all that relates to CE Conformity relevant...

Page 3: ...gs 3 Disposal of Old Devices 5 Getting Started 6 Back Panel Connectors 7 Quick Guide 7 Setting the Resolution 8 Front Panel Controls 9 Setting the Menu Language 10 Button Function Overview 11 OSD Menu...

Page 4: ...you are not sure about the electrical output please contact a qualified electrician or your local electrical company Warning The wall outlet must be within easy reach and next to the device Do not us...

Page 5: ...s into the device and seek the help of a service technician Unplug the device from the mains before cleaning the monitor First spray an ammoniac free detergent onto a cloth to slightly dampen it and d...

Page 6: ...rvision Children may not be able to comprehend the presence of potential risks Keep all packaging away from children as this can cause suffocation If you are not using the device within the Republic o...

Page 7: ...ing Started Mount the supplied socket to the base of your LCD 19 4 Wide as indicated on the bottom of the base Please check that delivery contents are complete using the list below 1 Monitor 2 VGA cab...

Page 8: ...ct the computer to the port 8 of the monitor 2 Connecting the Audio Cable Use the audio cable 3 to connect the computer s Audio Out port to the audio input 7 of your monitor 3 Connecting the Power Cor...

Page 9: ...ngs tab Use the ruler to select the proper screen resolution Confirm the setting by clicking OK For Microsoft Windows Vista Right click on the Desktop Click Start Control Panel to open Control Panel F...

Page 10: ...9 4 Wide 9 English Front Panel Controls 11 13 15 12 14 16 11 Display hide the OSD menu 12 Decrease value navigate downwards 13 Increase value navigate upwards 14 To confirm the settings 15 Power On Of...

Page 11: ...enu opens and the item Language Select should be highlighted Otherwise press the buttons 12 or 13 to select it 4 Press the button 2 14 5 Press the button 12 to scroll downwards or press 13 to scroll u...

Page 12: ...he contrast 2 Opens the brightness setting 1 Exits the setting 2 Automatically adjusts the settings for the horizontal and vertical position the horizontal size as well as the fine control and sharpne...

Page 13: ...9 to navigate the menu Start with the main menu by pressing the button 1 on the monitor Press the buttons and to choose a menu item press the button 2 to confirm the selection Auto Adjust Automaticall...

Page 14: ...ns or to adjust the selected colour Information Shows information about the input signal coming from your computer s graphics card as well as the model and serial number of your monitor Image Adjust T...

Page 15: ...Press the button 2 to toggle between horizontal and vertical movement Press or to move the OSD menu upwards downwards to the left or to the right OSD Time Out After the set time the OSD menu will disa...

Page 16: ...ESA 848 x 480 60Hz VESA 1024 x 768 60Hz MAC 1024 x 768 70Hz VESA 1024 x 768 75Hz VESA 1152 x 864 75Hz VESA 1280 x 960 60Hz VESA 1280 x 720 60Hz VESA 1280 x 768 60Hz VESA 1280 x 768 75Hz VESA 1280 x 10...

Page 17: ...ly place the LCD 19 4 Wide with its front on it 3 Loosen the monitor socket by carefully pushing the four hooks inwards and pulling the socket towards the bottom 4 Loosen the four screws located insid...

Page 18: ...ize 0 285 x 0 285 mm Display Colours 16 2 million Viewing angle 160 160 CR 10 Inclination 0 20 Contrast Ratio 800 1 typical Brightness 300 cd m typical Response time 5 ms typical Active Screen Area 41...

Page 19: ...connect it Adjust the brightness Wrong or distorted colours If a colour red green blue is missing check the connection of the video cable Loose bent or broken pins in the connector may deteriorate th...

Page 20: ...d cluster a matrix of 5x5 pixel may contain a limited number of erroneous pixel only For Error Class II for each 1 million pixel only 2 pixel may contain errors of Type 1 Type 2 and Cluster it may pre...

Page 21: ...Targa Visionary LCD 19 4 Wide 20 English...

Page 22: ...TARGA GmbH Lange Wende 41 D 59494 Soest Deutschland www targa online com Ready for you www targa online com 6_tft_19 4_0710 qxd hb_sc_nb_traveller kit qxd 22 10 2007 13 00 Uhr Seite 2...

Reviews: