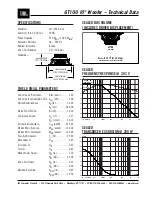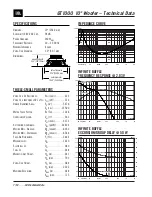


5
Getting Started
The following steps will
help you set up your
subwoofer quickly.
INITIAL SETTINGS:
1.
Turn the INPUT SENSITIVITY control on the rear panel
all the way down (MIN).
2.
Set the left and right CROSSOVER controls to the
center position (80 Hz).
3.
Set the POLARITY switch out (0
º
).
4.
Turn the POWER switch OFF.
5.
Set the AC SELECT switch to the correct position for
your country (115 VAC or 230 VAC).
CONNECTIONS:
1.
Connect the left and right line-level signal from
your mixer (or other signal source) to the LEFT and
RIGHT INPUT jacks on the SW•10 (XLR or RCA).
2.
Connect the LEFT and RIGHT OUTPUT jacks on the
SW•10 (XLR or RCA) to the inputs of the left and
right main powered speakers (or to the inputs of
the amplifi ers powering the left and right main
speakers).
3.
Connect the supplied AC power cord to the IEC
socket on the back of the subwoofer. Plug the
other end into an AC outlet properly confi gured
with the correct voltage for the AC SELECT switch
setting you have selected.
TURN IT ON:
1.
Turn on the power to the other components in the
system. Generally, it is best to turn on powered
speakers and amplifi ers last to avoid thumps and
pops from getting to the speakers.
2.
Turn on the POWER switch on the back of the SW•10.
3.
Start your signal source (tape deck, CD, DAW, or
whatever), but leave the master level control on
your mixer down.
4.
Adjust the master volume on your mixer to a
comfortably loud listening level.
5.
Slowly turn up the INPUT SENSITVITY control on
the SW•10 to MAX (fully clockwise), or until you
achieve a balance between the subwoofer and
the other speakers in the system.
6.
Enjoy the authoritative, commanding lows of the
SW•10.
Now that you have your
subwoofer working, it’s time
to hunker down and read the
rest of this manual…especially
the following:
Placement
An Extremely Important Note on
SW•10 Bass Response and Your
Control Room or Listening Room
You’ve heard it before. “Low-frequencies
are non-directional, so it doesn’t matter
where you place the subwoofer.” Although
it is true that frequencies below about 100 Hz
are non-directional, it is also true that a lot of
factors can conspire to thwart the SW•10’s
extended low frequency — including
room shape, room volume, and acoustical
treatment.
This is not a cop-out or an apology. It’s
plain old physics in action. Here are some
tips to help you fi nd the best placement for
your SW•10 and optimize the low-frequency
response in your particular room. Consider
the following:
Room acoustics and bass-handling
ability
Nobody likes to buy a subwoofer and a
new set of speakers and then be told that
they should spend extra bucks on bass
traps or a remodeling job. But the simple
fact is, “standard” rooms, i.e., rectangular
rooms in conventional business or residential
structures, are rarely if ever conducive to
optimal low-bass reproduction without some
modifi cations.
However, understanding what can cause
degradation of the low-frequency response
in a room can help in choosing a location
that can minimize the problems associated
with poor bass response—most notably
interference and resonance.
Interference is caused when the refl ected
wave from the surrounding walls arrive out-
LOOK
CLOSER
Summary of Contents for SW-10
Page 1: ...active studio subwoofer...