5
USB
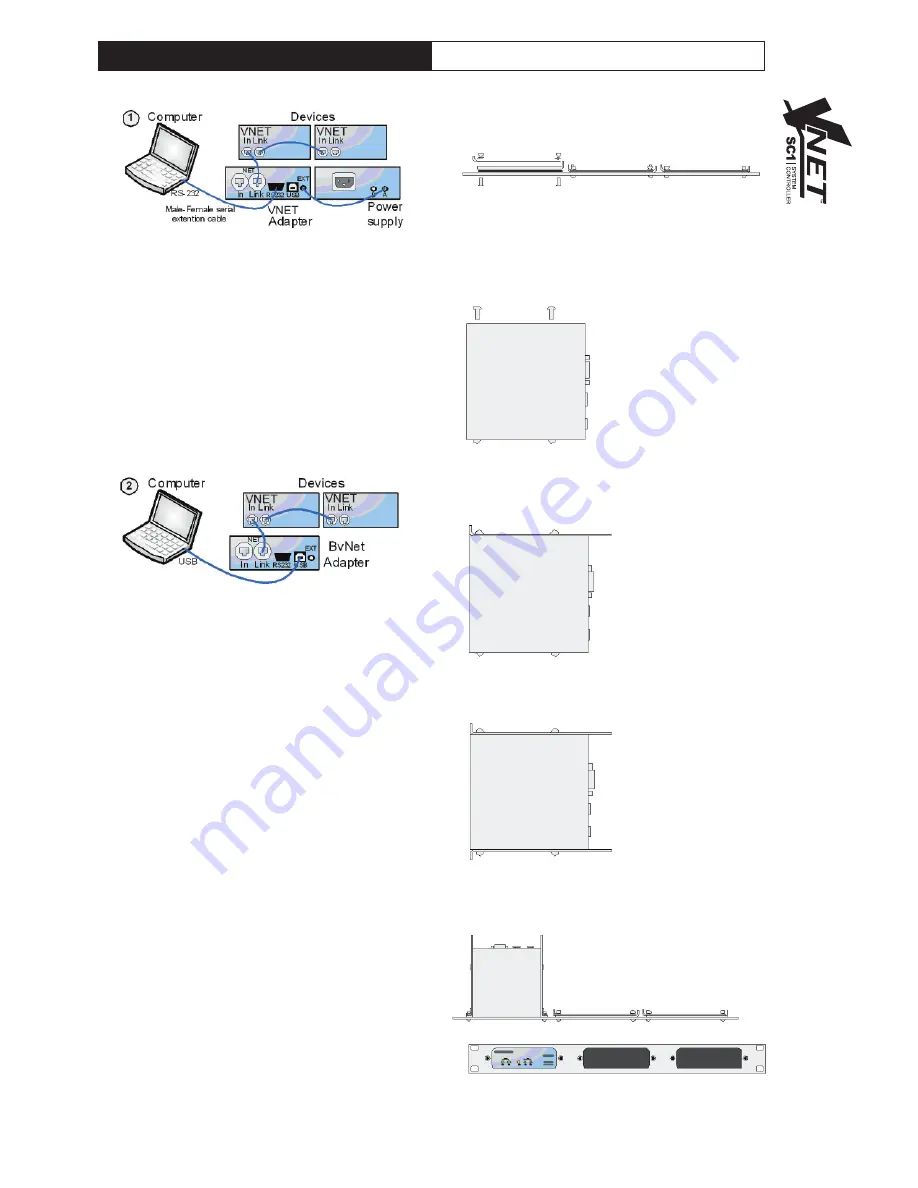
You can connect your computer to the VNET™
Interface via USB using a USB Type A to USB Type B
cable as in diagram 2. It is not usually necessary to
use a Power Supply to power the VNET™ Interface
when using USB, since USB will supply sufficient
power for the Interface. If there are any Network
powered devices on the network however, then it will
be necessary to use the Accessory Power Supply.
CONNECTING DEVICES
Connect the VNET™ Link socket on the VNET™
Interface to the VNET™ In socket of the first device
you wish to control, then the VNET™ Link socket of
this device to the VNET™ In socket of the next
device, and so on. The order in which the devices are
connected is not important. The Link socket of the
last device in the ‘chain’ need not be connected. The
In socket of the VNET™ Interface is intended for
special applications, and would not normally be
connected. The ‘Ethercon’ network connectors are
fully compatible with standard RJ45 Ethernet patch
cables which may be used to make these
connections. If additional ruggedness is required, we
recommend using the Neutrik Ethercon locking type
of connector.
RACKING
The VNET™ Interface and Accessory Power Supply
may be used free-standing. If you wish to mount
them in a 19-inch rack, then the Tannoy VNET™
accessory rack-mount kit may be used. To mount an
Accessory in the Mounting Kit panel:
1. Remove the two mounting brackets and blanking
sheet which are covering the aperture you wish to
mount the Accessory in, by removing the two nuts.
(Keep these and the screws and washers).
2. Remove the two screws from one side of the
Accessory.
3. Using the two screws removed in 2, attach one
mounting bracket loosely to the side of the
Accessory, with the ‘ear’ towards the front, pointing
outwards.
4. Repeat 2 and 3 for the other side. Now push the
lid towards the back of the unit as far as it will go then
align the bracket ears with the front edge of the lid.
Now tighten the screws.
5. Offer the Accessory with its mounting brackets up
to the reverse side of the Mounting Panel, and fix it in
place using the two sets of screws, washers and nuts
removed in 1.
Note that the holes at the rear ends of the brackets
may be used as cable tie-off points if desired.
V
NET
INTERFACE USER GUIDE
Summary of Contents for Vnet USB RS232 Interface
Page 1: ...User Guide VNETTM USB AND RS232 INTERFACE ...
Page 7: ...7 NOTES ...


