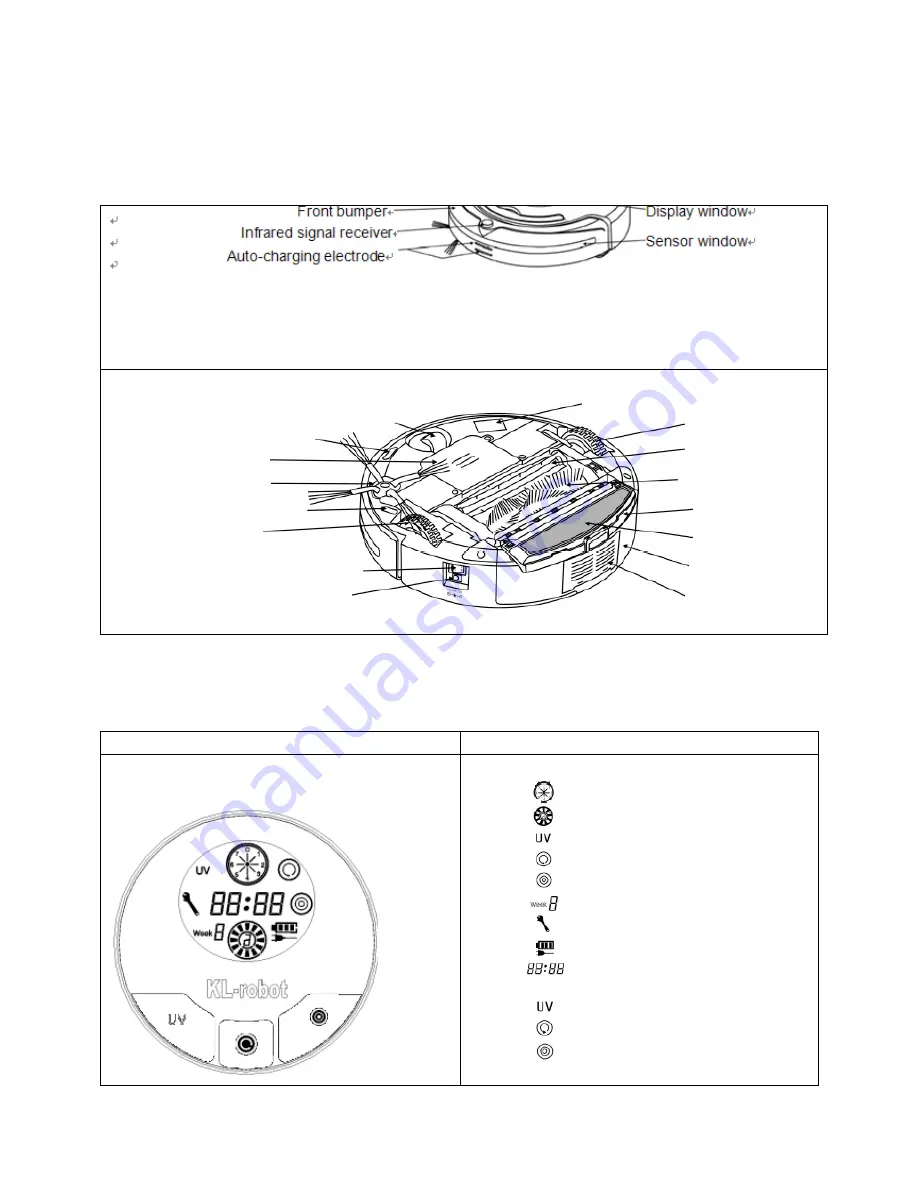
TanGO X3s User Manual Download Page 7


Main body                                                                                                                                                       

Top of main body   

Bottom of main body   


Control Panel of the main body 

Display Interface 

LCD directive sign 


Menu Display:   

1.              Date/week set display 
2.              Wheel rotation/speed display 
3.              UV lamp display 
4.              Automatic cleaning display 
5.              Timing cleaning display 
6.              Current week display 
7.              Breakdown maintenance display 
8.              Charging/power display 
9.              Time/error code display 

Touch keys:   

1.              UV lamp key 
2.              Automatic cleaning key 
3.              Timing cleaning key 


Front wheel


Ground detection sensor


Battery cover


Side cleaning brush


Ground detection sensor


Right wheel


Power


switch


DC


socket


UV sterilizing lamp


Left wheel


Rubber brush


Main brush


Mopping part


Mop


Dustbin


Air outlet window


Summary of Contents for X3s

Page 1: ...TanGO X3s MULTIFUNCTIONAL VACUUM CLEANER USER MANUAL MODEL NO TanGO X3s...

Page 2: ...1 Thank you for purchasing our new robotic vacuum cleaner Please read this manual carefully before using the product...

Page 3: ...r and Infrared Transparent Window 11 Replacement of Battery 11 Remote Control 12 Using Method Functional Status of Control Panel 12 Auto Charging Docking Station 14 The Docking Station Display and Con...

Page 4: ...3 Technical Specifications of Remote Control 21 Technical Specifications of Docking Station 21 Technical Specifications of Virtual Wall 22...

Page 5: ...ell or it may cause electric shock short circuit smoking or fire Check whether the charger and socket is connected well or it may cause charging failure or even fire Remove all easily damaged objects...

Page 6: ...y microcomputer intelligent and integrated with automatic cleaning dust absorption mopping sterilizing timing reservation cleaning remote control speed selection various identification protection func...

Page 7: ...5 Timing cleaning display 6 Current week display 7 Breakdown maintenance display 8 Charging power display 9 Time error code display Touch keys 1 UV lamp key 2 Automatic cleaning key 3 Timing cleaning...

Page 8: ...and then press Automatic Cleaning Key it will clean by spiral linear zigzag follow the wall modes automatically b The Robot may choose fast or slow running while cleaning c The Robot will stop running...

Page 9: ...ilter will appear Refer to Figure 6 5 Change a new filter press the semicircle bracket by one hand to release the fastener from the filter screen and remove the filter grid by the other hand and then...

Page 10: ...Refer to Figure 5 and Figure 6 6 After cleaning you can assemble it firmly as before the disassembly Assembly Disassembly and Cleaning of Brush Assembly Disassembly of Mid Cleaning Brush and Floor Br...

Page 11: ...mall particles by brush cleaner directly Rotate the brush carefully and cut by scissors or pull by hand the hair yarn and other twisted objects 2 The cleaning of the brush and floor brush can be done...

Page 12: ...Please keep the transparent window clean so as to make the Robot work better Replacement of Battery Battery replacement of the Cleaner 1 Release the screw with the screwdriver open its base plate and...

Page 13: ...ey 11 Forward key 12 Back key 13 Turn left key 14 Turn right key 14 keys in total Using Method Functional Status of Control Panel the following steps are very important or the remote control may fail...

Page 14: ...y day then the selected date will flicker In 1 means Sunday 2 means Monday accordingly 7 means Saturday 4 Press any date from Sunday to Saturday when you want the reserve interval or cleaning time for...

Page 15: ...arrow and it will stop after you release the key Turn left key Press Turn left for long the Cleaner will turn counterclockwise in situ and while you release the key it will run forward as you expecte...

Page 16: ...ation between the Cleaner and adaptor so the recharger should be placed against the wall firmly and the adaptor cable should be away from the recharger or the Robot may have impact and winding during...

Page 17: ...er is searching for the recharger the Cleaner will then stop searching Figure 3 6 After the battery is used up the first grid of the charging icon will flicker when the second and then the third grid...

Page 18: ...Virtual Wall Display and Control Panel Overall Display Function Instructions 1 Toggle switch 1 Turn off 2 Low 3 Middle 4 High 2 Infrared wall transmitting signal head 3 Near infrared transmitting hea...

Page 19: ...e difference in the direction transmitting infrared signal of the virtual wall and receiving distance of the Cleaner due to environmental impact and movement of the Cleaner during the actual using The...

Page 20: ...nnected well with the charger and whether power LED of the recharger lights 2 Check whether the battery power is too low in case of that charge the Cleaner with the adaptor directly Increased noise in...

Page 21: ...detection of the left wheel The left wheel and speed grating was damaged E020 No speed detection of the right wheel The right wheel and speed grating was damaged E021 No rotational speed of the front...

Page 22: ...y Capacity 1500mA 12 Dustbin Capacity 350mL Place of Origin China Technical Specifications of Remote Control Applicable Models KL XXX Rated Voltage 3V Battery 2 AAA batteries Remote Mode ISM Frequency...

Page 23: ...chnical Specifications of Virtual Wall No Models Parameters Remark 1 Specification L W H 102 71 106mm 2 Weight 0 14kg 3 Rated Voltage 3V 4 Operating Temperature Range 10 45 5 Operating Humidity Range...

Reviews: