background image

40

Returning the Network Settings    


                           to the Factory Default Settings

If you have forgotten the IP address or the password you can easily return the 
logger to the default factory settings.

* With the backup battery, the recorded data in the TR-7W will be saved as is.
* The "warning settings" and "get current reading settings" will also be saved as they are.

1.

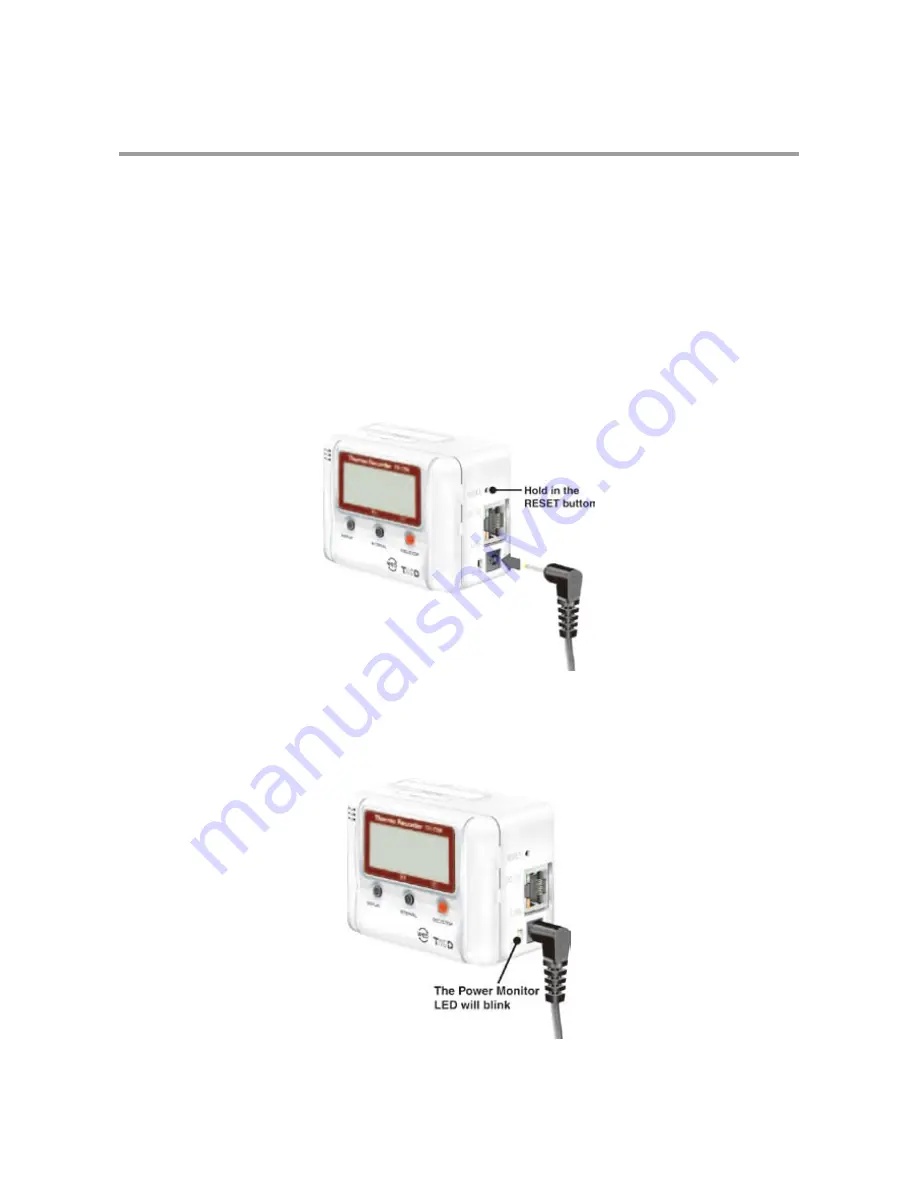
Pull out the AC adaptor plug from the TR-7W logger.

2.

Press in the [RESET] button on the TR-7W logger with a sharp 
object and while pressing in, reconnect the AC adaptor.

3.

When the [Power Monitor LED] on the TR-7W logger starts 
blinking, release the [RESET] button and the unit will have been 
returned to the factory default settings.

Summary of Contents for TR-71W

Page 1: ...er s Manual Thank you for purchasing our product Carefully read this instruction manual before using this unit Copyright T D Corporation All rights reserved 2011 10 16507000008 8th Edition TR 71W TR 7...

Page 2: ...T D Corporation of any mistakes errors or unclear explanations in this manual T D Corporation accepts no responsibility for any damage or loss of income caused by the use of our product This product h...

Page 3: ...ired to correct the interference at his own expense Caution Changes or modifications not expressly approved by the party responsible for compliance could void the user s authority to operate the equip...

Page 4: ...on of Warning Symbols DANGER These entries are actions that absolutely under no circumstance should be taken The taking of such an action may cause serious personal physical damage or death CAUTION Th...

Page 5: ...on or damage Store all batteries sensors and Thermo Recorder units out of the reach of children It is dangerous to swallow batteries If any smoke or strange smells are emitted from the unit immediatel...

Page 6: ...is moved from one environment to another where the difference in temperature is great Use the unit in an environment where the ambient temperature is from 0 to 60 C and the humidity is from 20 to 80 R...

Page 7: ...er damage including malfunction Areas prone to strong magnetic fields This may cause damage including malfunction Areas exposed to water leakage This may cause electrocution or other damage including...

Page 8: ...led Network Settings 37 Sending the Settings 37 Changing the Settings 38 Returning the Network Settings to the Factory Default Settings 40 Basic Functions Operating the TR 7W Series Web Viewer 41 Open...

Page 9: ...s 79 Warning Mail Transmission Test 80 Forced Cancellation of Communication 80 Restarting the System 81 Checking and Making Changes to Computer Network Settings 82 For Windows XP 2000 82 For Windows 7...

Page 10: ...e sending of warning mails can all be done easily over the Internet or LAN network It is possible to connect to both a wired LAN and a wireless LAN The use of an Internet connection provides a low cos...

Page 11: ...000 readings FULL will appear on the LCD display and recording will automatically stop Endless Loop Upon reaching capacity of 8 000 readings the oldest data is overwritten and recording continues Chan...

Page 12: ...sted measurement values About the TR 7W Series Web Viewer With the TR 7W Series Web Viewer you can not only use a browser and manage recording start and the downloading of recorded data but can carry...

Page 13: ...designate a desired range from which the highest lowest and average readings will be calculated and displayed Graph Printing It is possible to print in full color the graph as you see it on display D...

Page 14: ...owing items are included in the package TR 71W Thermo Recorder TR 71W x 1 unit Temperature Sensor TR 0106 x 2 Sensors LAN Cable LN 20W x 1 AC Adaptor x 1 AD 0605 or AD 05C1 Software CD ROM x 1 Introdu...

Page 15: ...corder TR 72W x 1 unit Temperature Humidity Sensor TR 3110 x 1 Sensor LAN Cable LN 20W x 1 AC Adaptor x 1 AD 0605 or AD 05C1 Coin Type Lithium Battery CR 2032 x 1 Software CD ROM x 1 Introductory Guid...

Page 16: ...REC STOP Button By pressing this button you can start or stop recording If you have deactivated the buttons in the Web Viewer Button Operation Settings the buttons will not function even if pressed To...

Page 17: ...0Base TX Ethernet Jack Connect the LAN Cable AC Adaptor Jack Connect the supplied AC adaptor here Reset Button Press to return to the factory default settings Data Display LED When data is being input...

Page 18: ...CD display and recording will automatically stop Endless Loop Upon reaching capacity of 8 000 readings the oldest data is overwritten and recording continues Battery Life Warning Display When the batt...

Page 19: ...lay E P When external power has been disconnected the display will alternate CH1 CH2 E P If the display has been set for a fixed channel that fixed CH and E P will be alternately displayed FULL When r...

Page 20: ...Settings Utility into your computer With the TR 7W Settings Utility you will be able to make all basic network settings When installing the TR 7W Settings Utility we suggest that you also install the...

Page 21: ...o view current readings of up to 10 TR 7W loggers in the same browser The current reading will be refreshed every 30 seconds Warning Monitoring From the TR 7W Settings Utility You can make settings to...

Page 22: ...Wireless LAN POP Before SMTP Settings SMTP Authentication Settings Rebooting the TR7W Restarting the System Warning Report Settings Warning Report Mail Recipient Address Settings Adjustment Settings...

Page 23: ...Current Readings Graph Display Administrator Tools Recording Start Gather Recorded Data WEB Viewer Settings Main Unit Settings Clock and Calendar Settings Button Settings LCD Settings Channel Name Se...

Page 24: ...Battery 1 Pull out the battery case 2 Insert the battery into the case making sure not to mistake Insert a new battery into the case 3 Replace the battery case There are no POWER switches on the TR 7...

Page 25: ...on as the Battery Warning Mark appears NOTE Battery performance deteriorates by natural discharge and corrosion We suggest changing batteries somewhere between one and two years use Connecting the AC...

Page 26: ...mpletely inserted TR 72W When using the temperature humidity sensor in environments where the temperature is 0 to 15 and humidity under 30 RH there may occur changes in measurement readings This is no...

Page 27: ...a cool dark place with a temperature of between 5 to 25 C and a humidity of below 30 RH Attached to the temperature humidity sensor are two stickers a wetness detection sticker and a temperature detec...

Page 28: ...r higher Using a LAN Connect the provided LAN cable to the HUB that is connected to your computer Connecting Directly to a PC Connect the TR 71W 72W to your computer with the supplied LAN cable or a L...

Page 29: ...for Intracompany Communication To ensure a proper connection make sure that the plug is completely inserted To HUB Connection Examples Connecting Directly to PC for Communication If communication is n...

Page 30: ...is difficult or troublesome To ensure a proper connection make sure that the plug is completely inserted NOTE Please do not use any CF type Wireless LAN cards that have not been proven to be compatib...

Page 31: ...IP address and domain please contact your provider The following are examples of connection methods Please select the connection method that suits your network environment Connection Examples Using t...

Page 32: ...P mail server NOTE In order to receive mail it is necessary to have a SMTP mail server and a POP or IMAP mail server located on the LAN Sending Internet Mail The TR 7W accesses the SMTP server and sen...

Page 33: ...This software is compatible with Windows Vista and Windows 7 The layout of the installation window for Windows Vista 7 closely resembles that of Windows XP SP2 Please refer to the installation instruc...

Page 34: ...lation by following the directions as they appear During installation you can choose which modules you wish to install Please select the modules you wish and follow the installation directions Next bu...

Page 35: ...u Bar and then How to Use TR 7W Settings Utility you can click on one of the tabs Contents or Index to search for the topic or term you are unsure about or have questions about Contents By clicking on...

Page 36: ...Detailed Network Settings Tab Make detailed Network settings here Warning Settings Tab Make settings to send mail to report when measured readings have exceeded limit settings Also if the TR7W backup...

Page 37: ...me address to the network at the same time 1 It is necessary to connect to the same network as to which the computer you have opened this application TR 7W Settings Utility is connected to 2 In TR 7W...

Page 38: ...ke any necessary changes to the login ID and password at Detailed Network Settings See page 37 39 for details 6 After checking for entry errors click the Send button After transmission has been comple...

Page 39: ...will appear A list that shows all of the IP addresses and domain names with which successful communication has occurred until now will appear in the Settings History If you select an IP address or dom...

Page 40: ...make settings for Send Settings button Restart TR 7W button 2 After making the changes enter the info for the recipient of the settings and click the Send Settings button 3 A message will appear askin...

Page 41: ...settings when getting current readings from a number of loggers or if any errors occur during communication click the Restart TR 7W button Note that by restarting the graph in the TR 7W Web Viewer wi...

Page 42: ...7W will be saved as is The warning settings and get current reading settings will also be saved as they are 1 Pull out the AC adaptor plug from the TR 7W logger 2 Press in the RESET button on the TR...

Page 43: ...applets and Java script 2 In the address area enter the address of the TR 7W logger you wish to view Enter address 3 By pressing the Enter key the TR 7W Series Web Viewer will appear If the system ha...

Page 44: ...le Current Readings By registering a multiple number of TR 7W loggers in TR 7W Settings Utility it is possible to simultaneously view a number of current readings from multiple loggers Graph Measureme...

Page 45: ...s about making settings for the Auto clock settings see page 62 63 1 Open the Web Viewer for the TR 7W you wish to make settings for See page 41 for more details about the display 2 If the system has...

Page 46: ...ecording Start Date Time Select from Immediate Start Programmed Start Immediate Start Recording will start after the Recording Start has been clicked Programmed Start Recording will begin on the set d...

Page 47: ...ils about the display 2 Under Administrator Tools select Recording Settings To open Administrator Tools the proper Login ID and Password are needed 3 Click the OK button NOTE While downloading recorde...

Page 48: ...TE By clicking the Open button the Temp Humidity Graph may not function properly Please do not click the Open button 6 After the downloaded data has been saved by clicking the Open File button the Tem...

Page 49: ...ks next to the topics listed you can find detailed information for that subject Index To get an explanation from a keyword select a keyword from the Index list and then click the View button Search En...

Page 50: ...g Horizontal Axis The time axis moves by clicking these arrow buttons Horizontal Gauge Bar By dragging the gauge you can move left and right to the data you want to be displayed Button for Moving Vert...

Page 51: ...49 Zoom in Using the Mouse With the left button drag the mouse to outline the area you want to zoom in on Menu Display Using the Mouse By right clicking on the graph the Menu will be displayed...

Page 52: ...play between the recorded date and the amount of elapsed time since recording started Date Time button Recorded Date Display The highest value is in RED lowest is in BLUE and the average is in PINK Sc...

Page 53: ...ls in Graph View Menu You can choose to view only the selected channels in the Graph 1 By moving the mouse to Selected Channels ON OFF the channel numbers are displayed 2 Click the channel number to r...

Page 54: ...g the Entire Graph button the dates and times for the entire graph will be displayed If in the graph display place the A cursor at the position for the beginning of the calculation range and the B cur...

Page 55: ...y will show info for that channel number Name Up to 32 letters can be entered Starting Date Time The month day year hour minute and second can be changed Restore button OK button Channel Number Edit I...

Page 56: ...changes After clicking the OK button the settings cannot be restored to the original settings OK button Restore button Drag the channel number you wish to move to the desired position Specify the Chan...

Page 57: ...nnel number you wish to erase 2 By clicking on the OK button the deletion will be completed Check OK button Shift Unit C F Tools Menu By clicking on Shift Unit C F you can automatically change the tem...

Page 58: ...g the OK button the change will be completed By clicking the Default button you will return to the color settings when the software was opened Line Width Settings Change the width of the data lines an...

Page 59: ...57 Copy Display to Clipboard Tools Menu By clicking Copy Display to Clipboard you can copy the currently displayed window to the clipboard and make use of the graph by pasting to other software...

Page 60: ...ft Moving Up and Down on the Graph Move the Graph Display up or down Vertical Axis Settings Set the vertical axis scale temperature 1 Check either Auto or Manual AUTO The vertical axis will automatica...

Page 61: ...e operation can be carried out from Save in the Toolbar In the File Menu select Save All Data as Save with a new File Name In the File Menu select Save Displayed Data Save only that data in the curren...

Page 62: ...d Semi colon are codes used by common spreadsheet software such as Excel and Lotus when reading Text File to divide cells OK button Select the Range to be Saved Select the Text File Type 3 Designate t...

Page 63: ...To open a previously saved file designate the file name to open it 1 Click Open in the File Menu 2 Select the name of the data you wish to open and click Open to view the data in graph form Open butto...

Page 64: ...Click the Change Settings button and the Detailed Network Settings window will appear where you can make changes to the settings 3 Under SNTP Settings click ON to change the setting How to find an NTP...

Page 65: ...R 7W you wish to make settings for Send Settings button 5 A message will appear asking you if it is OK to restart the system Click the Yes button to restart the TR 7W The new settings will not become...

Page 66: ...alendar Settings window will appear only the first time the Web Viewer is opened Viewing Current Readings from a Multiple Number of TR 7W Loggers It is possible to view simultaneously in one browser t...

Page 67: ...History will not appear 3 By clicking on the Receive Registrant Info button you can easily confirm the registration info All registration info will be displayed in the Registration Info List 4 Regist...

Page 68: ...units repeat the process as in 4 and 5 6 Open the Web Viewer for the TR 7W you have set as the Registrant Logger See page 41 for more details about the display 7 By clicking Monitor Multiple Units you...

Page 69: ...helpful when you wish to send the same registration info to a different Registrant Logger Delete Button Pressing this will delete the selected remote unit from the Registration Info List Delete All B...

Page 70: ...warning settings have been changed the reporting has been stopped or the measured value falls back within the acceptable range and once again exceeds a limit If no Upper or Lower limit settings have...

Page 71: ...SPAM or junk mail and not allow it to be sent If you do use an imaginary address make sure the address is permissible on your SMTP server Subject Set the Subject Title for the Warning Mail Even if you...

Page 72: ...appear 5 In Warning Report Mail enter the SMTP server name Make necessary settings for the gateway address DNS server address POP before SMTP and SMTP authentication Gateway Address DNS server Addres...

Page 73: ...cipient of the settings and click the Send Settings button Send Settings button Enter info of the TR 7W you wish to make settings for 7 In the TR 7W Settings Utility Warning Report Settings window cli...

Page 74: ...tings after having stopped recording 1 Check the channel you wish to adjust 2 Check either 1 Point Adjustment or 2 Point Adjustment and enter the adjustment values NOTE When adjusting at 2 points make...

Page 75: ...0 2 C In this case the slope a is 10 2 0 4 10 0 0 98 The offset is 0 4 so the conversion equation becomes Y 0 98X 0 4 The range of the slope is 0 a 2 Entries are valid to one decimal point but after c...

Page 76: ...iew current temperature and humidity readings via a cell phone browser 1 Open the URL entry display and enter the URL for the TR 7W logger you wish to view and press enter 2 Select the format that dis...

Page 77: ...ent readings monitor via cell phone it is necessary to open the TR 7W to the public on the Internet The current readings will not be automatically refreshed You will have to use the browser refresh fu...

Page 78: ...y of the following operations are performed all data in the graph will be erased If the communication function is restarted from the TR 7W Setting Utility If the AC adaptor plug is removed If you have...

Page 79: ...der Administrator Tools select Web Viewer Settings To open Administrator Tools the proper Login ID and Password are needed 3 Make any desired changes to the names by deleting the old name and entering...

Page 80: ...settings upon removal of the AC adaptor or after restarting the system Hence it is necessary to reset the clock after having restarted the system or having lost AC power 1 Entering the Current Time a...

Page 81: ...s alternately 1 Click the topic you wish to change 2 Click the Set button to finish Set button Click here Channel Name Settings You can make settings for the channel name that will be displayed with t...

Page 82: ...dress Forced Cancellation of Communication If while communicating the message Another communication is in progress continually appears it is possible to forcibly cancel and end communication You shoul...

Page 83: ...81 Restarting the System Click to restart the System 1 By clicking Restart a confirmation message will appear Restart button 2 Click the OK button to begin the restart process...

Page 84: ...rocedures for checking and making changes to your computer network settings For Windows XP 2000 1 In the Control Panel open Network Connections 2 Select the Network adaptor that you are using and righ...

Page 85: ...net mask are correct Check the IP address and Subnet mask 5 Make sure to write down the following so that you can re enter the settings later the currently set IP address the Subnet mask Default Gatew...

Page 86: ...returned to their original settings Redo steps 1 4 above to open the Internet Protocol TCP IP Properties window Re enter the IP address Subnet mask Default Gateway Preferred DNS server and Alternate...

Page 87: ...Internet View network status and tasks For the Classic View double click on the Network and Sharing Center icon 2 Click Management network connections under Tasks 3 Select the Network adapter that yo...

Page 88: ...TCP IPv4 If there is no check the Properties button cannot be clicked 5 In the Internet Protocol Version 4 TCP IPv4 Properties window under Use the following IP address make sure that the IP address a...

Page 89: ...s the IP address and 255 255 255 0 as the Subnet mask IP Address 192 168 1 1 Subnet Mask 255 255 255 0 8 After entering click the OK button 9 Click the OK button in the Properties window to close the...

Page 90: ...n down before and click the OK button If Obtain an IP address automatically was set as the original setting select it again without entering the IP address Subnet mask in that area 13 Open the browser...

Page 91: ...puter into which it will be installed For Windows XP 2000 1 In the Windows Control Panel click on Add Remove Programs 2 From the list of currently installed programs select TR 7W Settings Utility and...

Page 92: ...90 For Windows 7 Vista 1 In the Control Panel click Program Program Uninstall 2 From the list of currently installed programs select TR 7W for Windows and click the Uninstall button...

Page 93: ...click Next Check Remove 4 Follow the directions to Uninstall 5 After the uninstall process is completed reinstall by following the directions to Install Even after uninstalling saved data files will s...

Page 94: ...The TR 7W Settings Utility is already being used by another computer Security software used to detect viruses is currently activated Please temporarily close the software The LAN card which is being u...

Page 95: ...if the wireless LAN settings are incorrect and a wired LAN is connected communication will not take place via the wired LAN and hence communication will not occur Q 8 Even after carrying out adjustme...

Page 96: ...ain and communication should work normally Q 3 Can the Warning Mail Transmission Test fail A The only way to know whether a warning mail transmission test has succeeded or not is by checking to see is...

Page 97: ...to another TR 7W without entering a Login ID or a Password Q 6 I cannot connect to a wireless LAN Is there a way to check the wireless LAN status A Unfortunately there is no way to check But you can c...

Page 98: ...clock and calendar A The TR 7W has an internal clock calendar built into it If the internal clock s date and time are set incorrectly the programmed recording start time the download data time and the...

Page 99: ...the necessary settings such as IP address the TR 7W cannot be active in the network and hence is not really connected After having inserted the wireless LAN card into the TR 7W make sure to go to TR 7...

Page 100: ...a provider of services to various users is called a server and the computers which request these services from the server are referred to as clients Most communication service is made up of exchanges...

Page 101: ...ty and then registering a multiple number of loggers as remote or slave units of that registrant it is possible to simultaneously view a number of current readings from multiple loggers in the same br...

Page 102: ...P address In a Local Area Network the IP address that is used is called a Private IP address An IP address is divided into 4 blocks of numbers separated by periods such as 192 168 15 10 The assigned n...

Page 103: ...munication computer server router etc Each MAC address is assigned to the hardware and is unique to that device so there is no chance for duplication If you compared it to a cell phone even though the...

Page 104: ...URL is an address that is written in a way so that it is easy for the DNS function to determine on which server the IP address is located This address begins with http and is followed by such things a...

Page 105: ...special unique IP address Some providers may give you a fixed IP address from the beginning of service but with most providers it is necessary to sign up for this special service Q 2 How do you get a...

Page 106: ...ynamic DNS tracks the IP address you can still access the desired server using the same URL There are many types of dynamic DNS plans and services available please contact your local provider for more...

Page 107: ...ter the HTTP port number at the end of the URL as such http www tr7w com 9680 For more information about these settings see the user s manual that came with your router Q 8 If I connect the TR 7W to t...

Page 108: ...ackage AC Adaptor AD 0605 or AD 05C1 Lithium Battery LAN cable 2m Software CD User s Manual Warranty Browser Functions View Temperature and Humidity Data in Graph Form Start Recording Download Data Mo...

Page 109: ...Channel Colors Turn ON and OFF Channel Display Data Display Channel Name Recording Interval Number of Readings Highest Lowest and Average Readings Unit of Measurement AB Cursor Dates Times and Data Re...

Page 110: ...nsor Cable Length 0 6 m Thermal Constant In agitated water Approx 20 Sec TR 0506 Stainless Protection Sensor Cable Length 0 6 m Thermal Constant In agitated water Approx 20 Sec TR 0706 Stainless Prote...

Page 111: ...e SUS316 Fluoropolymer Coated Compaction Tube Fluoropolymer Coated Electrical Wire Possible Measurement Range 60 to 155 C Sensor Temperature Durability 70 to 180 C Meaurement Accuracy Average 0 5 C 40...

Page 112: ...ure Measurement Range 0 to 50 C Possible Humidity Measurement Range 10 to 95 RH Sensor Temperature Durability 10 to 55 C Humidity Measurement Accuracy 5 RH at 25 C 50 RH Service life 1 year under norm...

Page 113: ...D Corporation 817 1 Shimadachi Matsumoto Nagano JAPAN 390 0852 Fax 81 263 40 3152 E mail support tandd com Website http www tandd com Thermo Recorder TR 71W TR 72W User s Manual Published by T D CORPO...

Reviews: