background image

D14489.01—JULY 2009

59

Quick Set C20/C20plus

Administrator Guide

Contents

Introduction

Getting started

About the menus

Advanced settings

Settings Library

Cameras

Appendices

Contact us

Appendices

CE Declaration for Codec C20

For an official, signed version of this document, or details regarding documentation from 
the technical construction file, please contact TANDBERG.

EC Declaration of conformity

MANUFACTURER:

TANDBERG Telecom AS

PRODUCT NAME:

TANDBERG Codec C20

TYPE NUMBER:

TTC7-18

DESCRIPTION:

Video Conferencing Equipment

DIRECTIVES:

This equipment complies with.

LVD 2006/95/EC
EMC 2004/108/EC

HARMONIZED STANDARDS:

Applied in order to verify compliance with 

directives.

EN 60950-1:2006
EN 55022 (2006)
EN 55024 (1998) + A1 (2001) + A2 (2003)
EN 61000-3-2 (2006)
EN 61000-3-3 (1995) + A1 (2001) + A2 (2005)

TEST REPORTS and

CERTIFICATES ISSUED BY:

Reports/Certificates No.:
LVD (Nemko AS) 121905
EMC (Nemko AS) E09659.00

TECHNICAL CONSTRUCTION FILE NO.:

14508

YEAR WHICH THE CE-MARK WAS AFFIXED:

2009

Summary of Contents for Codec C20

Page 1: ...D14489 01 JULY 2009 1 Software version TC2 0 JULY 2009 TANDBERG Quick Set C20 C20plus Administrator Guide ...

Page 2: ...itor 17 Dual monitors 17 About the menus The Home menu 19 The Settings menu 19 The Advanced menu 19 The Advanced settings The Advanced menus 21 How to change a value 21 Description of each setting 21 The search functionality 22 How to change the password 23 The Advanced settings library Description of the Advanced configuration settings 25 The Experimental menu 36 Cameras The PrecisionHD 1080p 4x ...

Page 3: ...vanced settings Settings Library Cameras Appendices Contact us Contents Supported RFCs in SIP 58 Current RFCs and drafts supported in SIP 58 Media capabilities supported in SIP 58 CE Declaration for Codec C20 59 China RoHS table 60 Dimensions Codec C20 61 PrecisionHD 1080p camera dimensions 62 Technical specifications 63 ...

Page 4: ...opied from other chapters but adapted when needed to let you have all the relevant information there and then This helps eliminating the need to read through long sections before you can even think of getting started Our main objective with this user guide is to address your goals and needs Please let us know how well we succeeded We recommend you visit the TANDBERG web site regularly for updated ...

Page 5: ...Every effort has been made to supply complete and accurate information in this Administrator Guide however TANDBERG assumes no responsibility or liability for any errors or inaccuracies that may appear in this document INTELLECTUAL PROPERTY RIGHTS The Products that are covered by this Administrator Guide are protected under copyright patent and other intellectual property rights of various jurisdi...

Page 6: ...er power source before consulting service personnel s The plug connecting the power cord to the product power supply serves as the main disconnect device for this equipment The power cord must always be easily accessible s Route the power cord so as to avoid it being walked on or pinched by items placed upon or against it Pay particular attention to the plugs receptacles and the point where the co...

Page 7: ...es 2002 96 EC WEEE Waste Electrical and Electronic Equipment and 2002 95 EC RoHS The primary aim of the WEEE Directive and RoHS Directive is to reduce the impact of disposal of electrical and electronic equipment at end of life The WEEE Directive aims to reduce the amount of waste electrical and electronic equipment sent for disposal to landfill or incineration by requiring producers to arrange fo...

Page 8: ...oing This guide has been divided into several chapters all of which provide different information You can access the chapters directly by clicking on the menu bar at the top of this page In this chapter Explains the menu system Assemble the system The physical interface Using the remote control Initial configurations Waking up the system The IP address settings Static IP address settings Add the s...

Page 9: ...ush the button to boot up the codec s Push and hold the button for 1 second to shut down the codec s Push and hold the button for 7 seconds to force a shut down of the codec The LED in front of the codec The LED in front of the codec indicates the status of the codec s When the LED is OFF the codec is Off s The LED flashes green during the boot up and shut down of the codec s The LED pulses green ...

Page 10: ...protocol The Pin No 4 on the Camera Control port provides 12 V DC 1 A to the main camera DVI I input for PC DVI I socket digital analog video input for PC presentations s DVI D s DVI A Analog RGB VGA s DVI A Analog component YPbPr HDMI input for camera HDMI socket digital video input for camera HDMI output for the main monitor HDMI socket digital video and audio output for the main monitor HDMI ou...

Page 11: ... Hot Plug Detect 10 T M D S Clock Pin out TANDBERG camera cable Signal name RJ 45 pin D SUB pin 12V DC 1 Twisted pair 4 GND 2 5 RX 3 Twisted pair 2 TX 6 3 NC 4 Twisted pair 1 NC 5 6 GND 7 Twisted pair 5 12V DC 8 4 Pin out VISCA camera control RJ11 8 pins shielded modular jack Pin Signal name 8 12V presence 2 8mA current source when connected in daisy chain 7 GND 6 TXD out 5 NC no connect 4 NC no c...

Page 12: ...lay the layout menu then select a view in the menu Batteries Make sure the remote control has working batteries 4 x AAA batteries ARROW UP DOWN Use the up and down arrow keys to navigate in the menu ARROW LEFT Press the left arrow key to go one step back in the menu or to move to the left in a text field ARROW RIGHT Press the right arrow key to expand the selected menu item or to move to the right...

Page 13: ... screen and the middle part of the remote control is used to handle the video part of the call while the lower part of the remote control resembles very much the keypad of a mobile phone Touch the rubber line sensors along the sides to wake up the system Press the HOME key to show the menu on screen The DIP switch abc 123 Press the key to toggle between lower case characters and numbers 0 9 a z pe...

Page 14: ...eave without saving 5 Press Home to exit Verify IP address settings How to go to the System Information page to verify the IP address 1 Navigate to Settings System Information to open the System information page 2 When the IP address is automatically assigned from a DHCP server the network IP address of the codec is shown on the System Information page 3 Press Home to exit 2 Initial configurations...

Page 15: ...as you did when you verified you IP address setting 1 Navigate to Settings System Information 2 Verify the previous configurations s If you successfully registered to a Gatekeeper the Status will show Registered If the registration failed the Status will show Not registered s If you successfully registered to a SIP server the Status will show Registered If the registration failed the Status will s...

Page 16: ...havior of the system and should be done by the system administrator NOTE When you define or change a password make sure you save a copy of the password in a safe place How to set the menu password Navigate to Settings Advanced Change password 1 On the remote control press the key to toggle between lower or upper case characters and numbers abc ABC 123 2 Enter the password The password you enter is...

Page 17: ...s no audio on HDMI 2 Key sequence for moving the OSD If you have moved the monitor from one HDMI output to the other and the menu and other information does not show on screen you must move the OSD to the output in use Check which connector the monitor is connected to and run the following key sequence on the remote control s Disconnect 0 x where x is output 2 Example 1 Set HDMI 1 as the OSD outpu...

Page 18: ...r Guide Contents Introduction Getting started About the menus Advanced settings Settings Library Cameras Appendices Contact us About the menus About the menus Chapter 3 In this chapter Explains the menu system The Home menu The Setting menu The Advanced menu ...

Page 19: ...thout saving Download the TANDBERG Quick Set C20 C20plus User Guide from the web site Go to http www tandberg com docs The Home menu The Home menu is explained in the TANDBERG Quick Set C20 C20plus User Guide s Call Menu for making calls s Presentation Select a presentation source s Camera control Control the camera settings s Settings Configure the system The Settings menu The Settings menu is ex...

Page 20: ...s Advanced settings Settings Library Cameras Appendices Contact us Advanced settings The Advanced settings Chapter 4 In this chapter Explains the menu system The Advanced menus Password protection of the Advanced menu How to change a value Description of each setting The search functionality How to change the password ...

Page 21: ...alue s Select a value from a drop down list and press the OK button to save or press the left arrow to leave without saving s Enter a value text in a value text field Press Save to save the change or Cancel to leave without saving Description of each setting Each of the settings in the Advanced configuration menu is explained in the Settings library section Press the Settings library in the menu o...

Page 22: ...23 When searching for words like H323 SIP or key all settings with these characters in the name will be listed s Search Enter the as many characters as needed until the setting you are searching for displays in the list s Refine the search Add or remove characters until you get the desired result s Clear Remove all characters to return to the main view Search Enter the as many characters as needed...

Page 23: ...or the first time the password is not set When you define or change a password make sure you save a copy of the password in a safe place Set a new password 1 On the remote control press the key to toggle between lower or upper case characters and numbers abc ABC 123 2 Enter the password The password you enter is hidden and each character is replaced with a star 3 Press Save to save the changes or ...

Page 24: ...ovisioning settings The Serial port settings The SIP profile settings The Standby settings The System unit settings The Time settings The Video settings Experimental settings Chapter 5 The Advanced settings library This chapter gives a detailed description of each setting in the Advanced configuration menu The Advanced configuration defines the system settings and are structured in a hierarchy mak...

Page 25: ...automatically or it can be set manually using the Brightness Level configuration Auto The camera automatically adjusts brightness level Manual Set brightness level manually with the Brightness Level configuration Example xConfiguration Cameras Camera 1 Brightness Mode Auto xConfiguration Cameras Camera 1 1 Brightness Level 1 31 Set a Brightness Level for the camera Requires the Brightness Mode to ...

Page 26: ...l must be answered manually by pressing the OK key or the green Call key on the remote control Example xConfiguration Conference 1 AutoAnswer Mode Off xConfiguration Conference 1 1 AutoAnswer Mute On Off The Autoanswer Mute setting determines whether the microphone is muted when an incoming call is automatically answered On The incoming call will be muted when automatically answered Off The incomi...

Page 27: ...323 Profile Gatekeeper Address and H323 Profile Gatekeeper Discovery settings must also be configured NOTE Direct H 323 calls can be made even though the H 323 Call Setup Mode is set to Gatekeeper Example xConfiguration H323 Profile 1 CallSetup Mode Gatekeeper xConfiguration H323 Profile 1 1 Gatekeeper Address S 0 64 Specifies the IP address of the Gatekeeper Requires the H 323 Call Setup Mode to ...

Page 28: ...d Example xConfiguration Network 1 IEEE8021X Eap Md5 On xConfiguration Network 1 1 IEEE8021X Eap Peap On Off Protected Transport Layer Security Developed by Microsoft Cisco and RSA Security Authenticates LAN clients without the need for client certificates EAP Extensible Authentication Protocol PEAP Protected Extensible Authentication Protocol On The EAP PEAP protocol is enabled Default mode is On...

Page 29: ...IPv4 QoS Diffserv Signalling 0 63 The DiffServ Signalling setting is used to define which priority Signalling packets should have in an IP network Enter a priority which ranges from 0 to 63 for the packets The higher the number the higher the priority These priorities might be overridden when packets are leaving the network controlled by the local network administrator Signalling A recommended val...

Page 30: ...NMP Community SNMP Community names are used to authenticate SNMP requests SNMP requests must have a password case sensitive in order to receive a response from the SNMP Agent in the codec The default password is public If you have the TANDBERG Management Suite TMS you must make sure the same SNMP Community is configured there too Note The SNMP Community password is case sensitive Format String wit...

Page 31: ... Mode setting Example xConfiguration Provisioning ExternalManager Protocol http xConfiguration Provisioning Mode Off TMS Provides the possibility of managing the codec endpoint by using an external manager management system Off The system will not try to register to any management system TMS If set to TMS the system will try to register with a TMS server as described in Provisioning ExternalManage...

Page 32: ... system A Uniform Resource Identifier URI is a compact string of characters used to identify or name a resource Format Compact string with a maximum of 255 characters Example xConfiguration SIP Profile 1 URI sip name example com xConfiguration Standby BootAction None Preset1 Preset2 Preset3 Preset4 Preset5 Preset6 Preset7 Preset8 Preset9 Preset10 Preset11 Preset12 Preset13 Preset14 Preset15 Restor...

Page 33: ... 02 00 Harare Pretoria GMT 02 00 Jerusalem GMT 02 00 Athens Istanbul Minsk GMT 02 00 Helsinki Kyiv Riga Sofia Tallinn Vilnius GMT 02 00 Cairo GMT 02 00 Bucharest GMT 03 00 Nairobi GMT 03 00 Kuwait Riyadh GMT 03 00 Moscow St Petersburg Volgograd GMT 03 00 Baghdad GMT 03 30 Tehran GMT 04 00 Abu Dhabi Muscat GMT 04 00 Baku Tbilisi Yerevan GMT 04 30 Kabul GMT 05 00 Islamabad Karachi Tashkent GMT 05 00...

Page 34: ...ate than high resolution and vice versa The Quality setting specifies whether to give priority to high frame rate or to high resolution for a given source Addresses the selected video input connector Motion Prioritizes framerate over resolution 30fps of 60fps depending on the Threshold60fps configuration Used when there is a need for higher frame rates typically when a large number of participants...

Page 35: ...ion Video Output HDMI 1 MonitorRole First xConfiguration Video Output HDMI 1 2 Resolution Auto 640_480_60 800_600_60 10 24_768_60 1280_1024_60 1280_720_60 1920_1080_60 1280_768_60 1360_768_60 1366_768_ 60 1600_1200_60 1920_1200_60 Select the preferred resolution for the monitor connected to HDMI video output This will force the selected resolution on the monitor Auto The system will automatically ...

Page 36: ...Appendices Contact us Settings library The Experimental menu The Advanced configuration menu has an option called Experimental The settings within this menu can be used as is and will not be documented NOTE The Experimental menu WILL change We recommend you visit the TANDBERG web site regularly for updated versions of the manual Go to http www tandberg com docs ...

Page 37: ...G camera has been designed to give you many years of safe reliable operation The TANDBERG Quick Set is available in two versions s TANDBERG Quick Set C20 comes with PrecisionHD 1080p 4x zoom s TANDBERG Quick Set C20plus comes with PrecisionHD 1080p 12x zoom In this chapter Explains the menu system The PrecisionHD 1080p 4x 12x camera Video output formats DIP switch settings for video output formats...

Page 38: ...DBERG codecs power will be supplied through the Camera Control cable When used with non TANDBERG Codecs you may have to connect power separately HDMI and HD SDI s HDMI is the main video source when connected to Codec C20 Maximum resolution is 1080p60 with PrecisionHD 1080p 12x and 1080p30 with PrecisionHD 1080p 4x s HD SDI is a secondary video source The maximum resolution is 1080p30 Kensington lo...

Page 39: ...ed when the camera is used with a TANDBERG Codec VISCA is a trademark of Sony Corporation The PrecisionHD 1080p 4x 12x camera cont The HDMI cable The HDMI cable delivered with the camera is 5 meters Maximum length is 15 meter with a category 2 certified good quality HDMI cable Connect the camera control cable RJ45 to RS 232 Visca protocol is supported Connect from the HDMI HD Video out on the came...

Page 40: ...or PrecisionHD 1080p 12x and 1080p30 for PrecisionHD 1080p 4x s Maximum resolution for HD SDI is 1080p30 Line voltage frequency The camera will automatically detect the line voltage frequency when it is 50 or 60Hz You may set the video output format to a specific value use the DIP switches to override the auto frequency detection if a different line voltage frequency is an issue DIP Switch table f...

Page 41: ...ngs Library Cameras Appendices Contact us Appendices Appendices Chapter 7 In this chapter Explains the menu system General room guidelines The remote control The codec password The menu password The web interface The supported RFCs in SIP The CE declaration The RoHS table The codec dimensions The camera dimensions The technical specification ...

Page 42: ...rophones You must then make sure they are spaced sufficiently apart to avoid that the sound of the first microphone suffers from interference from the second microphone As a rule of thumb the second microphone should be placed three times or longer away from a participant compared to the microphone closest to that participant This is the case for all participants If you cannot fulfill this require...

Page 43: ...een the people s Adjust the camera view using zoom in out to allow the participants to be shown in full size on screen and to keep eye contact with each other at the same eye level s If the participants are sitting too close to the monitor the camera will look down at the participants This may not give a good presentation of the participants at the far end The far end participants The best audio q...

Page 44: ...If the participants are sitting too close to the monitor the camera will look down at the participants This may not give a good presentation of the participants at the far end The microphone The Quick Set C20 is shipped with one microphone Optional you can connect two microphones See the General room guidelines section for how to position the microphones s Place the microphone nearby the meeting p...

Page 45: ...ystem 3 When pressing the Presentation button on the remote control the default presentation source is activated The DVI VGA input is compliant with VESA Extended Display Identification Data EDID and will be able to notify the PC of the supported output formats Troubleshooting if the presentation does not show s On most PC s you must press a special key combination to switch the PC image from the ...

Page 46: ...tation Zoom Press the or on the key to zoom the camera in and out Arrows s Up Down Use the and arrow keys to navigate in the menu s Arrow Right Press the arrow key to expand the selected menu item or to move to the right in a text field s Arrow Left Press the arrow key to go one step back in the menu or to move to the left in a text field Layout Press the key to display the Layout menu then select...

Page 47: ...emUnit AdminPassword Set Password 4 Reboot the codec Setting the menu password Do the following to define a password for the Advanced menus 1 Open the menu on screen and go to Home Settings Advanced Change password 2 The password is a string with 0 255 characters 3 Enter the password and press Save Login to the Advanced menu When a password is set the password is required to get access to the Adva...

Page 48: ...STEM INFO s Upgrade software s Advanced configuration s Wallpaper s Call s Upload certificates s XML files s Logs s Add release key Password protection of the web interface If the codec is password protected with an administrator password a user name and password will be required to get access to the codec from the web interface Read more about password protection of the codec in the previous page...

Page 49: ... the following menu options s System info s 5PGRADE SOFTWARE s Advanced configuration s Wallpaper s Call s Upload certificates s XML files s Logs s Add release key How to upgrade the software on the codec 1 Contact your TANDBERG representative to obtain the software upgrade file 2 Click Browse and locate the upgrade file PKG 3 Click the Upgrade button to start the installation 4 Leave the system t...

Page 50: ...pgrade software s DVANCED CONlGURATION s Wallpaper s Call s Upload certificates s XML files s Logs s Add release key The Advanced configuration defines the system settings and are structured in a hierarchy making up a database of system settings Stay up to date The Advanced configuration are subject to change without notice To stay up to date check our web page for the last version of the document...

Page 51: ...the IP address of the codec From this page you have the following menu options s System info s Upgrade software s DVANCED CONlGURATION s Wallpaper s Call s Upload certificates s XML files s Logs s Add release key The search functionality When searching for words like H323 or SIP all settings beginning with these words included all settings below in the hierarchy will show in the list Search Enter ...

Page 52: ...ded 3 Go to Advanced configuration page and search for Wallpaper From the drop down list select Custom The new wallpaper should now show on the monitor which is connected to the codec If the new wallpaper does not show on the monitor connected to the codec you may have to toggle once between Wallpaper None and Custom to make the change take effect The web interface cont The web interface allows fo...

Page 53: ...r remote administration of the system Open a web browser and enter the IP address of the codec From this page you have the following menu options s System info s Upgrade software s Advanced configuration s Wallpaper s Call s Upload certificates s XML files s Logs s Add release key Hang up Press the Hang up button to end the call Dial Enter the number or address and press the Dial button to dial NO...

Page 54: ... How to upload the certificate 1 Contact your system administrator to obtain the required files PEM format 2 Click Browse and locate the certificate files PEM 3 Enter the Passphrase optional 4 Click the Upload button to install the certificates to the codec The web interface cont The web interface allows for remote administration of the system Open a web browser and enter the IP address of the cod...

Page 55: ...m and process changes Command The Command file gives an overview of the commands available to instruct the system to perform an action and are issued from the API A Command type command is usually followed by a set of parameters to specify how the given action is to be executed Directory The Directory file will be described later Valuespace The Valuespace gives an overview of all the available val...

Page 56: ...tions s System info s Upgrade software s Advanced configuration s Wallpaper s Call s Upload certificates s XML files s OGS s Add release key The Logs page The log files The log files are TANDBERG specific debug files which may be required by TANDBERG in the need of technical support Historical log files Time stamped historical log files Click on a file and follow the instructions in the dialog box...

Page 57: ...ont The web interface allows for remote administration of the system Open a web browser and enter the IP address of the codec From this page you have the following menu options s System info s Upgrade software s Advanced configuration s Wallpaper s Call s Upload certificates s XML files s Logs s DD RELEASE KEY Add Enter the release key and press the Add button The release key Contact your TANDBERG...

Page 58: ...s s RFC 3264 An Offer Answer Model with SDP s RFC 3311 UPDATE method s RFC 3361 DHCP Option for SIP Servers s RFC 3420 Internet Media Type message sipfrag s RFC 3515 Refer method s RFC 3550 RTP A Transport Protocol for Real Time Applications s RFC 3581 Symmetric Response Routing s RFC 3605 RTCP attribute in SDP s RFC 3711 The Secure Real time Transport Protocol SRTP s RFC 3840 Indicating User Agen...

Page 59: ...n of conformity MANUFACTURER TANDBERG Telecom AS PRODUCT NAME TANDBERG Codec C20 TYPE NUMBER TTC7 18 DESCRIPTION Video Conferencing Equipment DIRECTIVES This equipment complies with LVD 2006 95 EC EMC 2004 108 EC HARMONIZED STANDARDS Applied in order to verify compliance with directives EN 60950 1 2006 EN 55022 2006 EN 55024 1998 A1 2001 A2 2003 EN 61000 3 2 2006 EN 61000 3 3 1995 A1 2001 A2 2005 ...

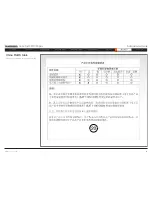
Page 60: ...k Set C20 C20plus Administrator Guide Contents Introduction Getting started About the menus Advanced settings Settings Library Cameras Appendices Contact us Appendices China RoHS table This product complies with the Chineese RoHS ...

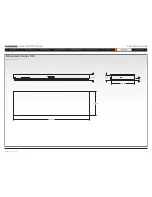
Page 61: ...lus Administrator Guide Contents Introduction Getting started About the menus Advanced settings Settings Library Cameras Appendices Contact us Appendices Dimensions Codec C20 Dimensions in mm 0 0 0 9 3 5 2 7 2 1 0 0 9 0 0 7 2 5 9 6 1 1 0 0 0 3 ...

Page 62: ...n Getting started About the menus Advanced settings Settings Library Cameras Appendices Contact us Appendices 220 0 105 0 20 5 105 9 eye centre 32 2 148 1 114 6 ø82 0 ø79 6 2 5 2 5 62 4 125 4 142 0 4 4 63 0 190 0 14 0 34 5 191 0 106 3 PrecisionHD 1080p camera dimensions Dimensions in mm ...

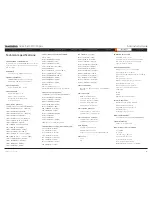
Page 63: ...or Power Management LIVE VIDEO RESOLUTIONS ENCODE DECODE 176 x 144 30 fps QCIF 352 x 288 30 fps CIF 512 x 288 30 fps w288p 576 x 448 30 fps 448p 768 x 448 30 fps w448p 704 x 576 30 fps 4CIF 1024 x 576 30 fps w576p 640 x 480 30 fps VGA 800 x 600 30 fps SVGA 1024 x 768 30 fps XGA 1280 x 1024 30 fps SXGA 1280 x 720 30 fps 720p30 1920 x 1080 30 fps 1080p30 1280 x 768 30 fps WXGA 1440 x 900 30 fps WXGA...

Page 64: ...pporting LDAP and H 350 s Unlimited number for Corporate directory through TMS s 200 number local directory s Received Calls s Placed Calls s Missed Calls with Date and Time POWER s Auto sensing power supply s 100 240 VAC 50 60 Hz s 45 watts max for codec and main camera OPERATING TEMPERATURE AND HUMIDITY s 0 C to 35 C 32 F to 95 F ambient temperature s 10 to 90 Relative Humidity RH STORAGE AND TR...

Page 65: ...ices Contact us Contact us U S HEADQUARTERS TANDBERG 1212 Avenue of the Americas 24th Floor New York NY 10036 Telephone 1 212 692 6500 Fax 1 212 692 6501 Video 1 212 692 6535 E mail tandberg tandberg com EUROPEAN HEADQUARTERS TANDBERG Philip Pedersens vei 20 1366 Lysaker Norway Telephone 47 67 125 125 Fax 47 67 125 234 Video 47 67 126 126 E mail tandberg tandberg com ...

Reviews: