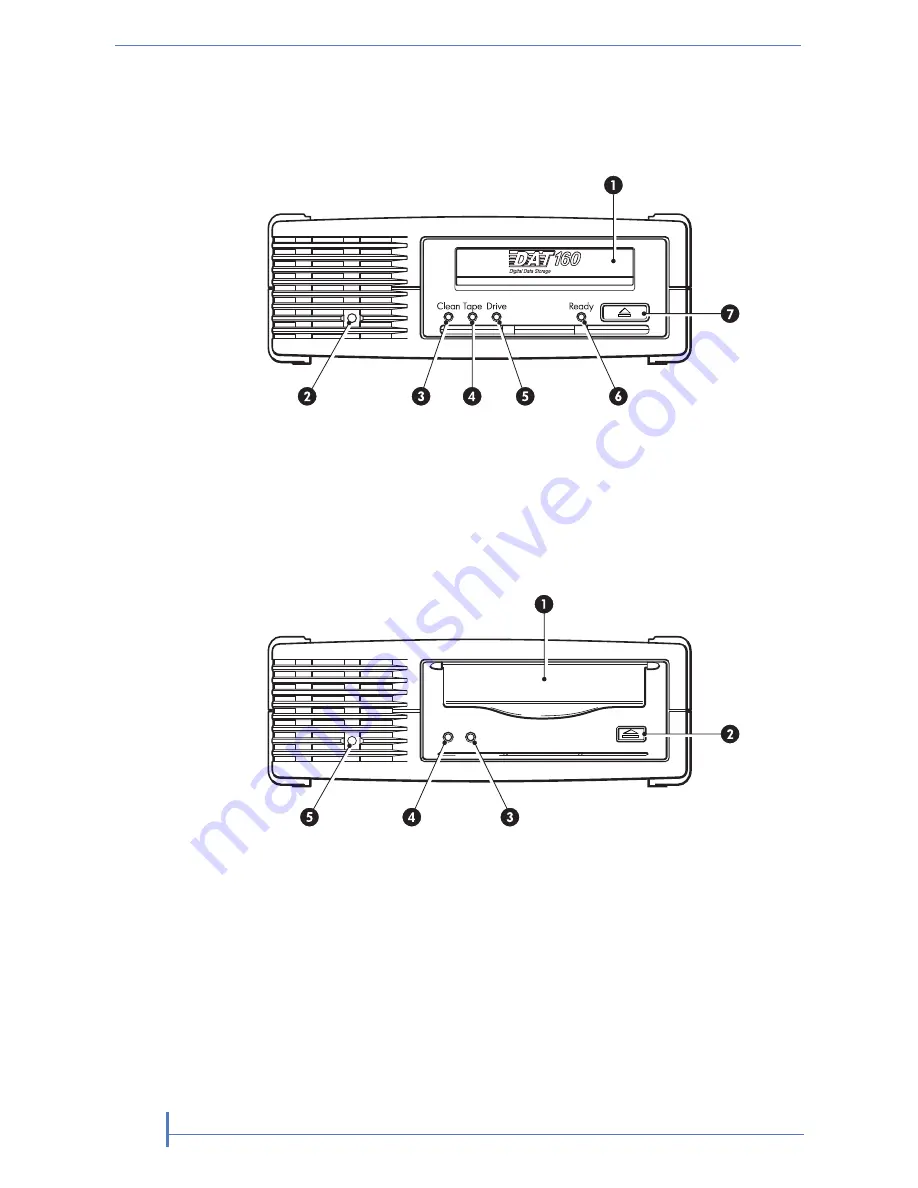
Tandberg Data DAT 72 User Manual Download Page 24

Front panel

5. drive LED

1. cartridge slot

6. ready LED

2. power LED (external drives only)

7. eject button

3. clean LED


4. tape LED

Figure 5-1 Front panel, DAT 160 tape drive

4. tape LED

1. cartridge door

5. power LED (external drives only)

2. eject button

3. clean LED

Figure 5-2 Front panel, DAT 72 tape drive

LED sequences

1018932

DAT USB Tape Drives

24

Chapter 5–Operating your tape drive

Summary of Contents for DAT 72

Page 1: ......

Page 2: ...ntents of this document and specifically disclaims any implied warranties of merchantability or fitness for any particular purpose Further Tandberg Data Corporation reserves the right to revise this p...

Page 3: ...2 Installing an internal DAT tape drive 13 Prepare mounting bay 13 Attach mounting hardware 14 Install drive 15 Attach cables 16 Secure the drive 17 3 Installing an external DAT tape drive 19 Importa...

Page 4: ...llation for optimum performance 38 Check for USB 2 0 port Windows 39 Ensure that the tape drive is the only device on a USB hub Win dows 39 Ensure that the hp_usbstor driver is being used Windows 39 C...

Page 5: ...example 1 mounting hardware used 18 Figure 2 4 Securing drive example 2 no mounting hardware used 18 Figure 2 5 Connecting power and USB cables 20 Figure 3 1 Front panel DAT 160 tape drive 24 Figure...

Page 6: ...I Table 1 Power requirements 11 Table 1 1 LED sequences for DAT 160 25 Table 5 1 LED sequences for DAT 160 continued 26 Table 5 2 Data cartridge compatibility 32 Table 6 1 Cleaning cartridge compatibi...

Page 7: ...wide technical support information please visit the support pages at http www tandbergdata com Before contacting support collect the following information Product model names and numbers Technical sup...

Page 8: ...text Table 1 on page VIII website addresses Blue underlined text http www tandbergdata com Bold text Keys that are pressed Text typed into a GUI element such as a box GUI elements that are clicked or...

Page 9: ...al tape drive on page 11 Drivers on page 11 Backup software on page 12 DAT tape drive models This guide describes how to install and operate the following Tandberg Data DAT USB tape drive models Tandb...

Page 10: ...e LED 3 Drive LED Figure 1 1 Front view of DAT 160 tape drive 1 3 2 3 Eject button 1 Clean LED 2 Tape LED Figure 1 2 Front view of DAT 72 tape drive Which operating systems are supported 1018932 DAT U...

Page 11: ...drive You need one industry standard 5 inch half height bay in which to install the Tandberg Data DAT tape drive For many servers no mounting tray or rails are required Devices simply slide into the...

Page 12: ...For optimum performance it is important to use a backup application that is appropriate for your system s configuration In a direct attach configuration where the tape drive is attached to a standalon...

Page 13: ...rk on a USB 1 1 port but performance will Note be severely degraded See also Verifying USB installation for optimum performance on page 38 Prepare mounting bay You need one industry standard 5 inch ba...

Page 14: ...from a spare 5 inch bay of your server as described in your server s documentation With some servers you may also need to remove the half height device divider Keep any screws for use in Secure the d...

Page 15: ...ys wear an antistatic wriststrap if one is Caution available If not after you have disconnected power from the server and removed the cover touch a bare metal part of the chassis Similarly touch a bar...

Page 16: ...upply The tape drive is connected to a internal USB port on your server Use the schematic on the inside of the server panel to check whether the server has an internal USB port and locate its position...

Page 17: ...USB cable to server s USB port 1 USB cable to tape drive 2 power cable Figure 2 3 Attaching cables Secure the drive Secure the drive as described in your server documentation Ensure blanking plates ar...

Page 18: ...drive into position Figure 2 4 Securing drive example 1 mounting hardware used 1 M3 screws supplied with tape drive Figure 2 5 Securing drive example 2 no mounting hardware used 1018932 DAT USB Tape D...

Page 19: ...fore you start An external DAT drive will operate using any voltage in the range 100 240 volts 0 7 A 50 60 Hz No adjustment is needed A power cord is provided with your DAT tape drive The USB 2 0 cabl...

Page 20: ...3 1 Connecting power and USB cables 3 Plug the USB cable into the USB connector on the server It is important to ensure that you connect your drive to a USB 2 0 port The drive will work on a USB 1 1...

Page 21: ...ile the Ready and Clean or Use Cleaning Cartridge LEDs are off This continues until the drive is reset DAT 72 drives If self test passes both front panel lights should be off If a hard error causes th...

Page 22: ...pplication Check http www tandbergdata com for software compatibility and install any recommended upgrades 6 Carry out a backup and restore test to check that the drive can write data to tape Use a bl...

Page 23: ...5 Operating your tape drive In this chapter Front panel on page 24 LED sequences on page 24 Loading and unloading cartridges on page 28 Removing power from the drive on page 29 23 August 2009...

Page 24: ...eject button 3 clean LED 4 tape LED Figure 5 1 Front panel DAT 160 tape drive 4 tape LED 1 cartridge door 5 power LED external drives only 2 eject button 3 clean LED Figure 5 2 Front panel DAT 72 tape...

Page 25: ...vice Drive may not have power may be faulty or may have been power cycled or reset during a firmware upgrade All LEDs OFF None This is normal The drive is ready for operation Ready is ON None If the d...

Page 26: ...rvice The drive believes the current tape or the tape just ejected is faulty Tape FLASHES Load a new cartridge If the error persists power cycle or reset the drive If the Drive LED remains on call for...

Page 27: ...gnal flashing slowly off or flashing 1 Wait for the current operation to finish then insert a different tape and repeat the operation that was being performed 2 If the media caution signal does not sh...

Page 28: ...r more information about tape drive and cartridge compatibility Note 1 cartridge slot 2 arrow indicates leading direc tion Figure 5 3 Inserting a data cartridge into a DAT 160 external drive 2 DAT 160...

Page 29: ...ompletes any task it is currently performing winds the tape to the beginning and ejects the cartridge The sequence will take about 25 seconds for a write enabled cartridge and 10 seconds for a write p...

Page 30: ...1018932 DAT USB Tape Drives 30 Chapter 5 Operating your tape drive Notes...

Page 31: ...es DAT 160 cartridges can only be used with DAT 160 tape drives they are wider than earlier formats and will not fit into earlier tape drive models DAT 160 cartridges provide optimum performance and m...

Page 32: ...GB read write read write not sup ported not sup ported DAT 160 not suppor ted 72 GB read write read write not sup ported DAT 72 Capacity assumes 2 1 compression Write protecting cartridges If you want...

Page 33: ...rd DDS cleaning cartridge All other DAT tape drives Do not use swabs or other means of cleaning the heads The cleaning cartridge uses a special tape to clean the tape heads A cleaning cartridge can on...

Page 34: ...ansformers Do not drop cartridges or handle them roughly Do not stick more than one label onto the cartridge label area extra labels can cause the cartridges to jam in the drive Stick labels onto the...

Page 35: ...trolled environment You need to make sure there are no other cartridges with sensitive information on them anywhere near the bulk eraser when in use All data will be lost on cartridges that are bulk e...

Page 36: ...1018932 DAT USB Tape Drives 36 Chapter 6 Use the correct media Notes...

Page 37: ...stallation chapter of this guide 2 Check the power connectors and SCSI cabling and USB cabling 3 Are you connected to a USB 2 0 port Are there any other devices attached to the same USB hub controller...

Page 38: ...drive or the host computer Has the drive been moved recently Have any cables been disconnected and reconnected Has the environment changed unusually hot cold damp or dry Has there been dust or dirt ne...

Page 39: ...ormance degradation USB Mass Storage devices like DAT tape drives have the lowest priority of all device types on the USB bus so devices such as webcams should never be connected to the same root hub...

Page 40: ...this command should contain a line similar to st 35933 0 If this line is not present type modprobe st at the command line to load the st driver Problems with cartridges If you experience any problems...

Page 41: ...n on again You may lose data if you force eject a cartridge The tape may also become unreadable because an EOD End of Data mark may not be properly written 3 If the cartridge is still jammed the tape...

Page 42: ...1018932 DAT USB Tape Drives 42 Chapter 7 Troubleshooting Notes...

Page 43: ...SB DAT tape drive should be connected to its host system via a USB 2 0 port Any USB hubs between the tape drive and the system port should also be USB 2 0 compliant To maximize tape drive performance...

Page 44: ...ually among any active bulk transfer devices USB supports many types of devices and three data transfer rates low speed full speed and high speed A keyboard does not need to transfer data to the syste...

Page 45: ...t system s PCI slot creating a new USB host that resides on the network Note If several USB adapters are placed into a system demands on the bandwidth of the system bus will constrain the USB devices...

Page 46: ...1018932 DAT USB Tape Drives 46 Chapter 8 USB Configuration Guide Notes...

Page 47: ...T 160 cartridges 31 DAT tape drive front view 9 24 LEDs 25 loading 28 models supported 9 powering off 29 unloading 29 document conventions VII drive operating 24 drivers installing 12 unix 12 windows...

Page 48: ...uct specification See S software troubleshooting 38 supported operating systems 10 symbols in text VIII T technical support VII text symbols VIII troubleshooting cartridge ejected 41 cartridges 37 gen...

Reviews: