background image


46 


Move  to  the  Smart  Search  and  select  the  desired  channel. 


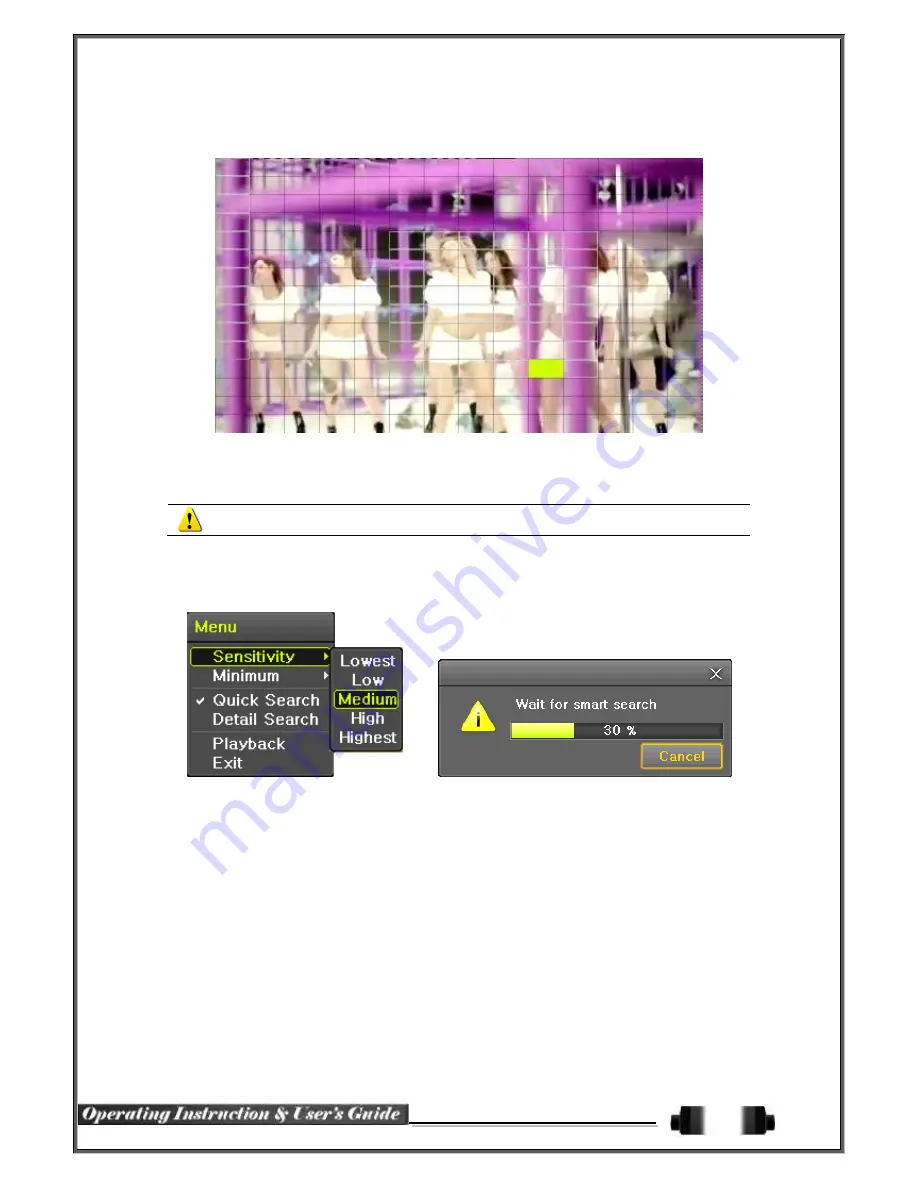
After  shifting  to  the  1  channel  mode,  select  areas  to  be  smart  searched. 


[Figure 5-36. Smart Search Area Designation] 


  The  14  *  15  pixel  mosaic  mode  appears.  In  the  beginning,  all  pixels  are  selected.  Designate  an  a

rea  by  left-click  and  drag  the  pixel  mosaic  pointer(deep  yellow).  Designate  another  area  by  repeatin
g  the  same  way. 


It detects motions in non-designated blocks. 


Right-click  brings  up  the  menu  as  shown  below.  Configure  each  category  and  press  the  Playback  b

utton  to  start  searching.   


[Figure 5-37. Smart Search Motion Detection Window] 


It  may  take  time  during  the  searching.  Start  the  playback  after  searching. 


-

-

  POS Search 

The Text Data recorded needs to be searched in order to Playback 
 

-

-

  Calendar Search 

Move to {

Menu} 

 {Search} 

 {Calendar Search} 

and then a searching window pops up.


-

-

  MULTI TIME 

The  user  can  playback  the  video  recorded  image  of  the  certain  channel  recorded  in  different  time  zones 
simultaneously. The arrangement of the searching result is the past to recent format. 
 

-

-

  MULTI DAY 

The user can playback the video recorded image of the certain channel recorded in different dates simultaneously. 
The arrangement of the searching result is the past to recent format. 


Summary of Contents for Deluxe HD1-16

Page 1: ......

Page 2: ...ldren may cause suffocation Installation Environment of the DVR 1 Maintain the following conditions operating temperature of 5 C 40 C operating humidity of 10 80 2 Install the DVR in a safe place that...

Page 3: ...s instructed to avoid danger 2 Dispose used lithium batteries properly Warning and Caution are indicated as follows Possible injury or product damage Risk of minor injury or product damage Cautions fo...

Page 4: ...21 HD1 Series Remote Controller 22 DX1 MX1 Series Remote Controller 23 Mouse 23 Jog Shuttle 24 Chapter DVR Operation Setup 25 Deluxe Series Storage Installation 25 Blue Series Storage Installation 27...

Page 5: ...t Time Selection 43 Search Playback 43 Playback 44 Playback and Playback Speed Control 44 Smart Search 45 POS Search 46 Calendar Search 46 MULTI TIME 46 MULTI DAY 46 MULTI CHANNEL 47 Panorama Play 47...

Page 6: ...ecording Days 60 HDD Overwrite 60 Local Storage Management 60 Network 62 Ethernet 62 DDNS 62 Port 63 E mail 63 Bandwidth 65 iSCSI 65 System 66 DVR Name 67 ID for Remote Controller 67 ID For Keyboard C...

Page 7: ...tup 36 Figure 5 20 PTZ Control 37 Figure 5 21 PTZ Control Mini Full 37 Figure 5 22 Product Information Window 38 Figure 5 23 Screen Setup Window 38 Figure 5 24 Display Setting Window 39 Figure 5 25 Di...

Page 8: ...Window 63 Figure 6 55 Setup Network Ethernet Window 64 Figure 6 56 Setup Network E Mail Window1 64 Figure 6 57 Setup Network E Mail Window2 64 Figure 6 58 Setup iSCSI Window1 65 Figure 6 59 Setup iSCS...

Page 9: ...Config switch Input 16 8 4 BNC Output 1 HDMI 1 VGA 1 BNC Loop 16 8 BNC N A Spot 1 BNC Multi channel 16 9 4 1 Audio Input 16 8 4 RCA Output HDMI RCA Video Recording Compression H 264 Speed 960H real t...

Page 10: ...age Primary 6 HDD 3 HDD 2 HDD External 2 eSATA 1 eSATA ODD 1 DVD N A Features Jog shuttle Yes N A H W RAID RAID5 Options RAID1 Options N A EOL Register 10K 4Ch Coaxitron Yes DDNS DHCP UPNP Yes CMS VMS...

Page 11: ...rs Privacy zone mask Covert channel Digital single multi zoom Smart search Text detection search Multi time day Index event search playback Panorama playback Data backup to NAS over Ethernet Still ima...

Page 12: ...11 Chapter Installation and connection Names and Features of Each Part HD1 16CH Rear Panel DX1 08CH Rear DX1 16CH Rear...

Page 13: ...RCA 4 HDMI HDMI Output HDMI type C 5 VGA OUT VGA Monitor or LCD Monitor Connection D SUB 15P 6 Ethernet Cable Modem Ethernet 10 100 Base T Network Connection RJ 45 7 CONFIG NTSC PAL HD XGA DIP S W 2...

Page 14: ...13 Installation and Connection Figure 2 1 HD1 16CH Basic Connection and Device Connection Figure 2 2 DX1 08CH Basic Connection and Device Connection...

Page 15: ...14 Figure 2 3 DX1 16CH Basic Connection and Device Connection Figure 2 4 MX1 04CH Basic Connection and Device Connection...

Page 16: ...1 make a connection accordingly Connection Order Connection Device DVR Terminal 1 CCTV Camera Rear Panel Video IN 2 CCTV Audio Rear Panel Audio IN OUT 2 CONFIG SWITCH Setup Rear Panel Left 2ea Switch...

Page 17: ...SPOT Monitor CCTV Monitor Rear Panel SPOT 2 Mike Speaker Rear Panel Audio Input Audio Output 3 LAN Cable Rear Panel Ethernet 4 PTZ Camera Rear Panel Terminal Block 5 Sensor Relay POS Rear Panel Termin...

Page 18: ...17 3 Terminal Block Figure 2 7 HD1 16CH Terminal Block and Description Figure 2 8 DX1 08 Terminal Block and Description Figure 2 9 DX1 16 Terminal Block and Description...

Page 19: ...GND is not connected Sensor Relay POS Connect Sensor Relay POS to the terminal block directly depending on the model Sensor and Relay Type NC Normal Close Normally closed opens when a signal is recei...

Page 20: ...o the USB mouse and USB memory stick 9 ESC Exit the current menu or move to the upper menu 10 SPOT Spot Control PTZ PTZ Pan Tilt Zoom Control CAPTURE Capture the displaying image into USB BACKUP Save...

Page 21: ...e Play back in Monitoring mode 9 ESC Exit the current menu or selects the upper menu 10 USB Port Connection port to the USB mouse and USB memory stick 11 POWER Turn the system power ON or OFF 12 POWER...

Page 22: ...ame by Frame in Playback mode 5 PAUSE Pause in Playback mode 6 Frame by Frame Playback Frame by Frame in Playback mode 7 PLAY Playback Fast Forward in Playback mode 8 MENU Various Modes 9 ESC Exit the...

Page 23: ...reen conversion COPY Copy recorded videos PTZ Shift to the PTZ camera control mode MOVE Move from one category to another or change to the display mode UP DOWN Log Page Up Down C Search Button Playbac...

Page 24: ...Data Schedule System Set up ESC Exit the current menu or Move to the upper menu PREV Move back Reverse PAUSE Pause FORWARD Move forward BACKWARD Playback PLAY Play Mouse The mouse pointer as shown be...

Page 25: ...ed and Direction Control Frame Control Play Direction Control This is available in the playback mode Turning the jog right left plays forward reverse frame by frame Speed and Direction Control This is...

Page 26: ...code are required before conducting HDD installation 2 After installing HDD Do not connect to power supply with the top case opened The top case must be covered before usage Step 2 2 Using a screw dr...

Page 27: ...l can hold HDD up to 6ea 2 HDD power and data terminal should face the inner direction Step 4 7 Connect the power cable and data cable to HDD Step 5 8 Power terminals Connect the power cable into the...

Page 28: ...to reduce static electricity Static electricity may cause a malfunction of the product 3 After installing HDD Do not connect to power supply with the top case opened The top case must be covered befo...

Page 29: ...DD bay 4 Connect HDD to HDD connector on the main board directly without cable Reassemble the top case by reversing 1 to finalizing HDD installation Power ON Check the Power HD1 16 Model 90 250V 50 60...

Page 30: ...up Recording Resolution Recording Quality Continuous Speed Event Speed Audio Text The initial recording setup is Recording Resolution 960H Recording Quality High Continuous Speed Off An image of the c...

Page 31: ...ternal devices For more information check 2 3 Connection of other devices Chapter 5 System Operation 6 2 Definition 6 6 Network 6 7 System Search For more information check 5 6 Search 5 7 Calendar Sea...

Page 32: ...w Recording Event Recording Mode Icon Recording Event Motion Detection Recording Sensor Recording Audio Recording Text Recording Recording Mode Video Recording Audio Recording Text Recording Recording...

Page 33: ...the functions depending on the given authorities For Authorization Setup Move to Menu Setup System 4 User Registration Functions available for Authorization Setup Network Live View the real time image...

Page 34: ...fter the system is booted images will be displayed on a screen divided into 16 9 division depending on the model Except for the basic setting the system follows user s setting on the screen division f...

Page 35: ...Button initiate the Auto Sequence mode Auto Sequence in Basic 1 4 9 Division Mode 1 16 2 3 1 Channel Mode Sequence 4 Channel Mode Sequence 9 Channel Mode Sequence Channel Grouping Channel Grouping is...

Page 36: ...than one channel in Manual Spot and have a sequential image through Spot Move to Menu Miscellaneous Control Spot Sequence TV The TV Monitor can be used to view the same display as the Spot screen Mov...

Page 37: ...4 mode In case of the remote controller and front panel it is available to move to 3 levels by using SELECT button in the remote controller and SELECT button of the front button The yellow box can be...

Page 38: ...r Figure 5 20 PTZ Control Figure 5 21 PTZ Control Mini Full In the PTZ mode there are two function Full and Mini Tour has Tour1 and Tour2 Home Position Time is 1 5 10 User setting 1 60 minutes Preset...

Page 39: ...tion Sharpen Camera Adjustment Select Adjust then it becomes the 1 channel mode and a window pops up as shown below Figure 5 23 Screen Setup Window Moving the camera down right or left excessively may...

Page 40: ...mode and a menu pops up as shown below Figure 5 24 Display Setting Window Screen Saver Monitor connected with DVR can be shut down to protect monitor Menu Miscellane Display Setting Screen Saver Name...

Page 41: ...port 16 channel audios 960H model 8CH model support 8 channel audios and 960H model 4CH model support 4 channel audios Move to the Relay tab and select All H model support 4 channel input Move to the...

Page 42: ...e only available in Multi Channel Calendar Search Search Mode On the real time monitoring screen select Menu Search Calendar Search and then a searching window pops up as shown below Figure 5 30 Searc...

Page 43: ...playback leads to the Multi Time Search The way of the date search is same as the Multi Channel Search The hourly recording status of the selected date is viewed after selecting a desired date Select...

Page 44: ...ect Menu Search POS Search and then a searching window pops up as shown below Year Month Day Text Time Selection Please select date time Time index Text 1 3 and select the start time within the channe...

Page 45: ...he time line listed to play 960H model series provide a variety of the playback Smart Search POS Search Calendar Search Multi Time Multi Day Multi Channel Panorama Play Event Play Zoom Play Playback a...

Page 46: ...three times Fast reverse 4 Press four times Fast reverse 8 Press five times Fast reverse 16 Press six times Fast reverse 32 Press seven times Fast reverse 300 Pressing one more time in x300 leads to...

Page 47: ...yback b utton to start searching Figure 5 37 Smart Search Motion Detection Window It may take time during the searching Start the playback after searching POS Search The Text Data recorded needs to be...

Page 48: ...ckup image data and capture the image into CD External Device Backup Save the recorded data into CD External Device Snapshot Capture and save the current displaying screen Screen Mode Screen division...

Page 49: ...lated to all system operations System Log Viewer In the real time monitoring mode Menu Miscellaneous Log Viewer then Log List Windo w pops up On the activated calendar window select the desired date y...

Page 50: ...recording will be initiated based on the general frame rate Motion When motion is detected the recording will be initiated based on the event frame value Sensor When input signal from an external sens...

Page 51: ...of the data existing at the selected time All channels with existing data at the time of backup are backed up automatically For the remaining backup procedures see 5 33 Common Backup Procedure Backup...

Page 52: ...he start and end time press the Select button after choosing the start and end time Change year month day hour minute second by using arrow keys and press the ESC button Changing the backup time cause...

Page 53: ...ame Version Date Time Move to Menu Setup System 6 Upgrade Setup after insert the backup device With this way the user can upgrade a new device with the current setup values in easy way Log Backup This...

Page 54: ...nu Backup Capture in real time monitoring Playback and Log mode When only one USB2 0 backup device excluding ODD devices is searched the JPG file is stored in the same device If there are no or more t...

Page 55: ...hronize the time of the DVR system with DTS When the DTS time or a zone is changed the change is reflected on DVR series belonging to the network the synchronization signals are broadcasted without pa...

Page 56: ...ne you want to set 2 DST By using the arrow keys and the Select button select Summer Time On the selection window select On Off by using the arrow keys and the Select button 3 Start Time By using the...

Page 57: ...hide a certain area of the real time monitoring screen After selecting PZ Mask over each channel it becomes the 1 channel division mode and designate sections where you don t want to monitor Adjust Ad...

Page 58: ...otion detection doesn t applied The selected area turns brown Select Exit to finish 2 Motion Sensitivity Lowest Low Middle High Highest 3 Sound Sensitivity Lowest Low Middle High Highest 4 Sensor Type...

Page 59: ...eceive email regarding the Word that is set Recording 1 Recording Resolution Used to set the resolution of the recorded channel Resolution by Video Type Type Resolution NTSC PAL CIF 352 240 352 288 D1...

Page 60: ...igure 6 51 Schedule Window Schedule Setup Select one schedule among Schedule1 Schedule2 Schedule3 and Schedule4 1 Selection Tip Select the day and time to be set by using the arrow keys Select after m...

Page 61: ...Recording storage stores data on the hard disk in the real time Five commands can be executed Depending on the S W status however some commands cannot be executed New Returns the status of the selecte...

Page 62: ...he device with a normal one are strongly recommended 3 If there is an active storage device with a warning or a fault a message is displayed on the upper left part of the screen 3 Instruction when add...

Page 63: ...ea Network environment Select Ethernet in Menu Setup Network Select TCP IP Save after filling in IP Address Subnet Mask Default Gateway Primary DNS and Secondary DNS DDNS As part of the DNS system the...

Page 64: ...DynDNS On enter the host name user name registered in DynDNS and password then save them Access to DynDDNS sever http www dyndns org and apply for the user account then register the domain name to use...

Page 65: ...p Network E Mail Window1 This is to set automatic E mail transmission service when an event occurs To use the e mail function E mail in Menu Setup System 9 Alarm or E mail in Menu Setup Action Alarm n...

Page 66: ...low However the transmission rate gets higher Bandwidth Limit You can set the network bandwidth between 40 4000kbps As the value increases the network transmission speed gets faster Select Off if you...

Page 67: ...means that another DVR is currently using the storage The DVR s Mac Address will be shown in DVR Addr Please note that speeds will vary on the network environment Network of over 100Mbps is highly rec...

Page 68: ...s the Mac address It supports up to 20 letters for the system name ID for Remote Controller When multiple devices are used set the remote controller ID to identify input signals from the remote contro...

Page 69: ...ge devices with USB 2 0 port Find and copy the upgrade file to the highest folder in the external storage device or portable storage device supporting USB 2 0 Connect the storage device with an upgrad...

Page 70: ...w select the device by using the arrow keys and the Select button Alarm Alarm is to notify system incidents Video Signal loss HDD full FAN fail HDD fail HDD warning through Buzzer E mail Relay01 Syste...

Page 71: ...m will shift to the real time monitoring mode User Setting The user can enter the time directly The time can be set to 1 60 minutes Selecting the User Setting causes the input window to appear Enter t...

Page 72: ...s CRR 1600i s 7 GE GE GE_KARATEL 8 GSP GSP CYBERSCAN_1 9 HITRON FASTRAX2 FASTRAX2 10 HONEYWELL SCANDOME2 HSDN 251 11 LG LG LG_MULTIX LG_OLD 12 MIKAMI MIKAMI MIKAMI 13 ORIENTAL ORX 1000 ORX 1000 14 PA...

Page 73: ...72...

Reviews: