background image

Manipulation du papier

Guide de démarrage rapide

20

Transport du papier

Le papier chargé (continu/feuille à feuille) peut être transporté de différentes fa-
çons dans l’imprimante.

S’assurer que l’imprimante se trouve en mode Offline (

Pause

); si nécessaire, ap-

puyer sur la touche 

Online

.

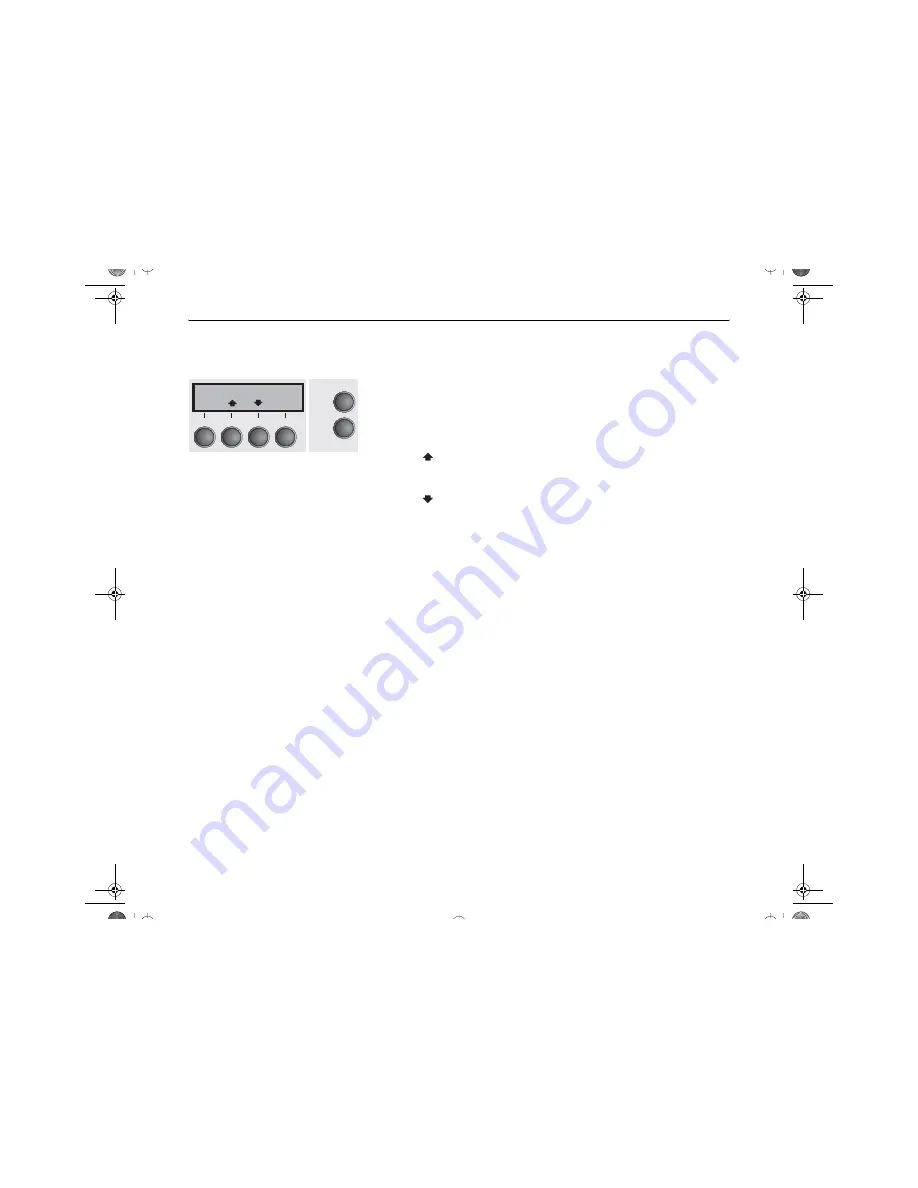
Touche 

Park

 (1): Si du papier continu est chargé dans l’imprimante, il est ali-

menté dans la position de séparation. Si une feuille simple est chargée dans 
l’imprimante, elle est alors éjectée.

Touche 

 (2): Appuyer brièvement sur la touche: le papier est transporté pro-

gressivement vers le haut.
Appuyer longuement sur la touche: transport continu vers le haut.

Touche 

 (3): Appuyer brièvement sur la touche: le papier est transporté pro-

gressivement vers le bas. Appuyer longuement sur la touche: transport continu 
vers le bas.

Touche 

LF/FF

 (4): Appuyer brièvement sur la touche: le changement de ligne 

(

LF

) est activé.

Appuyer longuement sur la touche: le changement de page (

FF

) est activé.

Touche 

Online

: transporte le papier à la position coupe si la fonction coupe 

automatique est activée.

Pause

Tract 1

Online

Setup

Park

LF/FF

2

1

3

4

Quickstart-fr.book  Seite 20  Dienstag, 22. Juni 2004  1:31 13

Summary of Contents for LA550N

Page 1: ...nter Kurzanleitung Matrixdrucker Guide de démarrage rapide Imprimante matricielle Guida di avvio rapida Stampante a matrice Guía de instalación Impresora matricial LA550N LA550W U1 2 multi fm Seite 1 Dienstag 22 Juni 2004 1 42 13 ...

Page 2: ...FCC rules which are designed to provide reasonable protection against such interference in a residential installation However there is no guarantee that interference will not occur in a partial installation If this equipment does cause interference to radio or television reception which can be determined by turning the equipment off and on the user is en couraged to try to correct the interference...

Page 3: ...nstallation 6 Unpacking the printer 6 Placing your printer 7 Checking the printer voltage 8 Connecting the printer 9 Switching on the printer 9 Control panel 10 Online mode 10 Offline mode 10 Setup mode 11 Changing the ribbon cassette 12 Paper handling 15 Changing the paper type 15 Changing the paper type in the Setup menu 16 Loading paper 16 Fanfold paper 16 Single sheets 19 Paper transport 20 Mo...

Page 4: ...ing the first printing line TOF 24 Setting the print head gap 26 Selecting character density and font temporarily 27 Printing out status page 28 Technical data 29 Printer specifications 29 Paper specifications 30 Accessories 30 Quick Start en book Seite 2 Dienstag 22 Juni 2004 1 33 13 ...

Page 5: ...ore starting up your printer in order to prevent injuries and avoid damage to the device Keep this Quick start guide in a place which is easily accessible at all times Place the printer on a solid and even base so that it cannot fall down to the ground Do not expose the printer to high temperatures or direct sunlight Keep all liquids away from the printer Protect the printer from shock impact and ...

Page 6: ...impressive features Drivers For Windows 95 98 ME Windows NT 4 Windows 2000 XP Additional documentation Programming instructions and descriptions of the available options If your CD ROM is be defective or missing please consult your dealer The Online Documentation can be downloaded via the Internet Hardware requirements Minimum hardware requirements PC 486 MHS quad speed CD ROM 15 display screen mo...

Page 7: ...al single sheet feeder open Tractor 1 Rear cover Top cover Bottom cover Front cover Paper support Control panel Power switch Manual single sheet feeder closed Tear edge Printhead Interface connector Printer in fanfold paper mode Printer in single sheet mode Ribbon cassette Latches Quick Start en book Seite 5 Dienstag 22 Juni 2004 1 33 13 ...

Page 8: ...the cardboard box towards you and remove the remaining packaging material Check the printer for any visible transport damage and miss ing items In addition to this Quick start guide the CD ROM at the back of this manual the power cable the ribbon the paper support and the MMJ inter face adapter should be included If you find any transport damage or if any accessories are missing please contact you...

Page 9: ...ing the printer location observe the following additional instructions Never place the printer in the vicinity of inflammable gas or explosive substances Do not expose the printer to direct sunlight If you cannot avoid placing the printer near a window protect it from the sunlight with a curtain When connecting a computer to the printer make sure not to exceed the maxi mum cable length see User gu...

Page 10: ...oltage setting is incorrect since this may result in severe damage You can set the printer to the correct mains voltage yourself To do this cautiously place the printer on its back side Use a suitable object e g a screwdriver but never a pencil to set the slide switch on the left at the bottom of the printer to the correct voltage STOP pu ll to op en pu ll to op en 120 V Front side of printer Back...

Page 11: ...between the printer and the com puter Connect the power cable to the power inlet of the prin ter Connect the power cable plug to a mains socket Switching on the printer The power switch for switching on the printer is located at the front bottom right of the printer pu ll to op en pu ll to op en Quick Start en book Seite 9 Dienstag 22 Juni 2004 1 33 13 ...

Page 12: ...aded paper will be transported to printing position If the printer is set to online mode by pressing the Online key again the printer transports the paper in tear position Please consider that your printer will move paper into Tear position automatically after 1 second of inactivity by default Offline mode Only in this mode is it possible to perform step line or form feeds from the control panel s...

Page 13: ...Sets the Tear position first printing line and print head gap Paprpath key 3 Sets the Paper path Char key 4 Font and number of characters per inch Access to the other menu settings Menu may be depending on the model dis abled by the manufacturer For information on how to enable access and about the available settings refer to the User Guide on the Online CD ROM section En abling the menu Adjust Pa...

Page 14: ...g the cover Press the two slide latches raise the top cover to an angle of 90 degrees relative to the top cover of the printer and remove it Cautiously slide the print head carriage to the left stop viewed from the printer front The print head heats up during printing Let it cool down before touching if necessary STOP Quick Start en book Seite 12 Dienstag 22 Juni 2004 1 33 13 ...

Page 15: ...the arrow in order to take up slack of the ribbon Slightly tilt the ribbon cassette forwards in such a way that it is parallel to the housing top and thread in the ribbon in front of the print head Locate the two projections in the left and right guide rails of the printer and gently press down on both sides until it clicks into place In this way the cartridge is au tomat ically positioned correct...

Page 16: ...slide over the plastic noses on the left and right of the print head into the correct position Press the printer bar cover down until it clicks into place re mount the top cover making sure that the projections on the cover are inserted correctly into the recesses of the printer housing and close it Quick Start en book Seite 14 Dienstag 22 Juni 2004 1 33 13 ...

Page 17: ...is fed to the tear position The text Tear paper off appears in the display After having torn off the paper press any key If a single sheet is loaded in the printer it is ejected Use one of the marked keys to select the desired paper path for example Single 2 The display shown here may vary according to the chosen paper options If you do not make a selection within 5 seconds the menu is closed The ...

Page 18: ... supported paper sizes please refer to page 30 Paper specifications Only use dust free or low dust paper Many paper qualities are suitable for this printer For more information please refer to the User guide on the Online CD ROM Fanfold paper Raise the front cover taking it by the areas marked with ar rows on the left and right Open the right and left tractor flaps You may also want to remove the ...

Page 19: ...ap Open the coloured latch lever and align the tractor so that the first printing posi tion on the paper matches the X mark on the printer housing Lock the lever again Align the right hand tractor to the width of the paper and in sert the paper Make sure that it is inserted by the same length as on the left hand tractor in order to avoid any paper jam Quick Start en book Seite 17 Dienstag 22 Juni ...

Page 20: ...r will bulge and there may be problems in the feeding process Then lock the tractor Switch on the printer The active paper source Front1 tra tor 1 appears in the display The paper is automatically loaded when the printer is in online mode and receives data from the computer Press the Load 4 key to load paper before starting the print out Remove the paper support before starting to print fanfold pa...

Page 21: ... Align the left paper guide with the mark on the left of the sin gle sheet input tray marking the first printing position Adjust the right paper guide to the width of the paper used Insert one single sheet into the input tray as far as possible Press the Online key to set the printer to ready status The sheet is automatically loaded when the printer is in online mode and receives data from the com...

Page 22: ...If a single sheet is loaded it is ejected Key 2 Short keypress Paper is transported upwards step by step Long keypress Continuous transport upwards Key 3 Short keypress Paper is transported downwards step by step Long keypress Continuous transport downwards Key LF FF 4 Short keypress Line Feed LF is effected Long keypress Form Feed FF is effected Key Online Moves Paper to tear position if the auto...

Page 23: ...rinter moves the perforation edge of the fanfold paper to the tear edge of the top cover After having torn off the paper press the Online key The printer returns the paper to the first printing position If a print job is active the printer automatically returns the paper to the first print ing position The tear function can be deactivated completely No Tear Reverse In this condi tion the Tear key ...

Page 24: ...Pause press the Online key if necessary Press the Park 1 key If fanfold paper is loaded in the printer it is fed to the tear position The text Tear paper off appears in the display Then press any key Now remove the paper from the tractor If a single sheet is loaded in the printer it is ejected STOP Pause Front1 Online Setup Park LF FF 2 1 3 4 Quick Start en book Seite 22 Dienstag 22 Juni 2004 1 33...

Page 25: ...up key The printer changes to setup mode Press the Adjust 2 key Press the Tear 4 key Press the 2 or 3 key to move the perforation to the desired position Con firm the input by pressing the Set 1 key Confirm the input again by pressing the Setup key The printer is reset to the initial status The correction made a maximum of approx 1 2 5 cm in each direction will be retained after switching the prin...

Page 26: ...ng line is aligned with the tear edge of the printer The factory setting for the first printing position TOF is 8 72 This is equivalent to the second line from the top Press the 2 or 3 key to move the first printing line to the desired position You can set values from 0 to 220 72 for fanfold paper or for single sheets 12 72 corresponds to a printing line Adjust Paprpath Menu Char Online Setup 2 1 ...

Page 27: ...e Setup key The printer returns to the initial status The setting made will be retained after switching off the printer For more details please refer to the User guide on the Online CD ROM FormAdj 17 72 Set Exit Online Setup 2 1 3 4 Quick Start en book Seite 25 Dienstag 22 Juni 2004 1 33 13 ...

Page 28: ...r changes to setup mode Press the Adjust 2 key Press the Head 1 key Use the 2 or 3 key to set the range within which the automatic gap adjust ment is to be corrected You can select values in the range from 10 to 10 Values from 0 to 10 reduce the distance between the print head and the paper positive values increase the distance Confirm the input by pressing the Set 1 key Press the Setup key The pr...

Page 29: ...you pressed the Font 2 key use the 2 or 3 key to select the desired font Confirm the selection by pressing the Set key You can cancel the selection and leave the setting unchanged by pressing the Exit 4 key Press the Setup key The printer returns to the initial status It is also possible to press the Online key The printer then changes directly to online mode The selection made will not be retaine...

Page 30: ...paper source default is Front1 Keep the key 4 depressed for approx 5 seconds while turning on the printer After completion of the initialization the printer pulls the paper in print position and be gins with the printout The status page contains important informations which facilitates the solution of problems or errors for the service technician Status Print Online Setup 2 1 3 4 Quick Start en bo...

Page 31: ...ng rate 430 pages h 7 2 pages min ECMA 132 Character density 5 6 7 5 8 6 10 12 15 17 1 20 cpi Resolution max horizontally 360 dpi vertically 360 dpi Emulations ESC P2 IBM XL 24e IBM XL 24e AGM DEC PPL 2 Dimensions Narrow printer 424 x 399 x 300 mm B x T x H Wide printer 600 x 399 x 300 mm B x T x H Weight Narrow printer 10 5 kg Wide printer 13 2 kg Power supply USA Canada 120 V 10 60 Hz 2 Europe 2...

Page 32: ...sting Paper weight No of copies Form thickness max 60 120 g m2 1 5 0 60 mm Single sheet feeder Single sheets Single set of forms requires individual testing Paper weight No of copies Form thickness max 80 120 g m2 1 5 0 60 mm Sets of forms Sets of forms can only be processed if the top edge is bound Multi part forms must be loaded with the bound top edge down They must be tested indivi dually for ...

Page 33: ...lblattbetrieb 5 Installation 6 Drucker auspacken 6 Drucker aufstellen 7 Druckerspannung überprüfen 8 Drucker anschließen 9 Drucker einschalten 9 Bedienfeld 10 Online Modus 10 Offline Modus 11 Setup Modus 11 Farbbandkassette wechseln 12 Papierhandhabung 15 Papierart wechseln 15 Papierartwechsel im Menü Setup 16 Papier einlegen 16 Endlospapier 16 Einzelblätter 19 Papiertransport 20 Papier in Abreißp...

Page 34: ...4 Druckkopfabstand einstellen 26 Zeichendichte und Schriftart temporär wählen 27 Statusseite beim Einschalten ausdrucken 28 Technische Daten 29 Druckerspezifikationen 29 Papierspezifikationen 30 Daten zur Langlebigkeit und Umweltverträglichkeit 31 Zubehör 32 Quick Start de book Seite 2 Dienstag 22 Juni 2004 1 39 13 ...

Page 35: ...ie den Drucker in Betrieb nehmen Dadurch schützen Sie sich und vermeiden Schäden an dem Gerät Bewahren Sie diese Kurzanleitung an einem jederzeit zugänglichen Ort auf Den Drucker auf stabilem und ebenem Untergrund so aufstellen daß er nicht zu Boden fallen kann Den Drucker weder hohen Temperaturen noch direktem Sonnenlicht aussetzen Keine Flüssigkeiten mit dem Drucker in Berührung bringen Den Druc...

Page 36: ...i ner Leistungsmerkmale Treiber für Windows 95 98 ME Windows NT 4 Windows 2000 XP weitere Dokumentationen Programmieranleitungen und Beschreibung der Optionen Für den Fall daß die CD ROM fehlerhaft ist oder fehlt wenden Sie sich bitte an Ihren Händler Die Online Dokumentation kann auch aus dem Internet herunter geladen werden Hardwarevoraussetzungen Hardwarevoraussetzungen mindestens PC AT 486 4 f...

Page 37: ...g geöffnet Traktor 1 Hintere Abdeckung Obere Abdeckung Untere Abdeckung Vordere Abdeckung Papierstütze Bedienfeld Netzschalter Manueller Einzelblatteinzug geschlossen Abreißkante Druckkopf Schnittstellenstecker Drucker im Endlospapierbetrieb Drucker im Einzelblattbetrieb Rasthaken Farbbandkassette Quick Start de book Seite 5 Dienstag 22 Juni 2004 1 39 13 ...

Page 38: ...rton herausziehen und die restliche Verpackung entfernen Überprüfen Sie den Drucker auf sichtbare Transportschäden und Vollständigkeit Neben dieser Kurzanleitung muß die CD ROM befindet sich auf der vorletzten Seite die ser Kurzanleitung das Netzkabel das Farbband die Papierstütze und der Schnittstellen MMJ Adapter vorhanden sein Informieren Sie im Fall von Transportschäden oder fehlen dem Zubehör...

Page 39: ...de Punkte Stellen Sie den Drucker keinesfalls in der Nähe von leicht entzündlichen Gasen oder explosiven Stoffen auf Den Drucker keiner direkten Sonneneinstrahlung aussetzen Läßt es sich nicht vermeiden daß das Gerät an einem Fenster steht schützen Sie es mit einem Vorhang vor Sonnenlicht Achten Sie beim Verbinden von Rechner und Drucker darauf daß die zulässige Kabellänge nicht überschritten wird...

Page 40: ...u schweren Schäden führen kann Sie können den Drucker selbst auf die richtige Spannung ein stellen Dazu zuerst den Drucker vorsichtig auf seine Rück seite stellen Anschließend den auf der linken Seite der Druckerunterseite angebrachten Schieberegler mit einem geeigneten Gegen stand z B einem Schraubendreher auf keinen Fall jedoch einen Bleistift verwenden auf die erforderliche Spannung einstellen ...

Page 41: ...inden Sie das Netzkabel wie im Bild gezeigt mit der An schlußbuchse des Druckers Stecken Sie den Stecker des Netzkabels in eine Steckdose Drucker einschalten Der Netzschalter mit dem der Drucker eingeschaltet wird befindet sich von vorne aus betrachtet links unten auf der Vorderseite des Druckers pu ll to op en pu ll to op en Quick Start de book Seite 9 Dienstag 22 Juni 2004 1 39 13 ...

Page 42: ...allel oder seriell an weitere Informationen finden Sie im Benutzerhandbuch auf der Online CD ROM Taste Load 4 Zeigt das an daß kein Papier im Drucker ist oder der Drucker sich in Parkposition befindet In diesem Fall wechselt die Anzeige zwischen Ready und Park Stellung durch Tastendruck wird Papier in Druckposition transportiert Taste Setup Schaltet den Drucker in den Setup Modus Taste Online Scha...

Page 43: ...etup Schaltet den Drucker in den Setup Modus Taste Online Schaltet den Drucker Online Setup Modus In diesem Modus sind folgende Einstellungen möglich Taste Setup Setzt den Drucker in den Setup Modus in dem folgende Einstel lungen gewählt werden können Taste Menü 1 Weitere Menüeinstellungen die werkseitig gesperrt sein kön nen siehe Hinweis unten Taste Adjust 2 Abreißposition erste Druckzeile und K...

Page 44: ...ieglungsschieber drücken die obere Abdeck ung im Winkel von 90 Grad zur Druckeroberseite nach oben klappen und herausnehmen Den Druckkopfschlitten vorsichtig bis zum Anschlag nach links von der Druckervorderseite aus betrachtet schieben Der Druckkopf wird während des Druckens heiß Vor dem Berühren deshalb gegebenenfalls einige Zeit abkühlen lassen STOP Quick Start de book Seite 12 Dienstag 22 Juni...

Page 45: ... Pfeilrichtung drehen um das Farbband zu spannnen Die Farbbandkassette etwas nach vorne neigen so daß sie parallel zur Gehäuseoberseite liegt und Farbband vor Druckkopf einführen Dann mit beiden Zapfen in die linke und rechte Führungsschiene des Druckers legen und vorsich tig auf beiden Seiten nach unten drücken bis sie einrastet Damit befindet sich die Kassette automatisch in der richtigen Positi...

Page 46: ... Plastiknasen links und rechts vom Druckkopf automatisch in die richtige Position Die Druckbalkenabdeckung bis zum Einrasten nach unten drücken die obere Abdeckung wieder einsetzen dabei sich erstellen daß die Zapfen an der Abdeckung richtig in die Aussparungen am Druckergehäuse eingeführt werden und schließen Quick Start de book Seite 14 Dienstag 22 Juni 2004 1 39 13 ...

Page 47: ...rtiert In der Anzeige erscheint Papier abreißen Dann eine beliebige Taste drücken Befindet sich ein Einzelblatt im Drucker wird es ausge worfen Mit einer der markierten Tasten den gewünschten Papierweg wählen in unserem Beispiel Einzel 2 Die hier dargestellte Anzeige kann je nach installierten Papieroptionen unterschiedlich ausfallen Erfolgt innerhalb von 5 Sekunden keine Auswahl verläßt der Druck...

Page 48: ...nden Sie nur staubfreies bzw staubarmes Papier Viele Papiersorten sind für diesen Drucker geeignet Nähere Informationen finden Sie im Benutzer handbuch auf der Online CD ROM Endlospapier Sicherstellen daß der Drucker auf Endlospapierbetrieb ein gestellt ist Gegebenenfalls die Papierart wechseln siehe Papierart wechseln Seite 15 Die vordere Abdeckung an den links und rechts mit Pfeilen markierten S...

Page 49: ...n farbigen Verriegelungshebel öffnen und den Traktor so ausrichten daß die erste Druckposition auf dem Papier mit der Markierung X auf dem Druckergehäuse übereinstimmt Anschließend den farbigen Hebel wieder arretieren Rechten Traktor auf Papierbreite ausrichten und Papier ein legen Darauf achten daß es auf gleicher Höhe wie im linken Traktor liegt da sonst Papierstau auftritt Quick Start de book S...

Page 50: ...wölbt und Probleme bei der Zuführung auftreten können Anschließend Traktor arretieren Den Drucker einschalten Der aktive Einzugsschacht Traktor1 erscheint in der Anzeige Papier wird automa tisch eingezogen wenn der Drucker Online ist und Daten vom Computer erhält Taste Load 4 drücken um Papier vor Druckbeginn zu la den Entfernen Sie vor Druckbeginn mit Endlospapier die Papierstütze Quick Start de ...

Page 51: ...inken Randsteller an der Markierung auf der linken Sei te der Einzelblattzufuhr ausrichten die den Druckbeginn be zeichnet Den rechten Randsteller entsprechend des verwendeten Papierformats einstellen Ein Einzelblatt parallel bis zum Anschlag in die Papier führung einführen Die Taste Online drücken um den Drucker betriebsbereit zu machen Das Einzelblatt wird automatisch eingezogen wenn der Drucker...

Page 52: ...ird es ausgeworfen Taste 2 Kurzer Tastendruck Papier wird schrittweise nach oben bewegt Langer Tastendruck Dauertransport nach oben Taste 3 Kurzer Tastendruck Papier wird schrittweise nach unten bewegt Langer Tastendruck Dauertransport nach unten Taste LF FF 4 Kurzer Tastendruck Zeilenvorschub LF wird ausgelöst Langer Tastendruck Seitenvorschub FF wird ausgelöst Taste Online Transportiert Papier z...

Page 53: ...drücken Der Drucker fährt die Perforationskante des Endlos papiers an die Abreißkante Nach Abreißen des Papiers die Taste Online drücken Der Drucker fährt das Pa pier zurück in die erste Druckposition Liegt ein Druckauftrag vor fährt der Drucker das Papier automatisch in die erste Druckposition Die Tearfunktion kann vollständig deaktiviert werden No Tear Reverse In die sem Zustand ist die Tear Tas...

Page 54: ...ste On line drücken Die Taste Park 1 drücken Befindet sich Endlospapier im Drucker wird es in Abreißposition transportiert In der Anzeige erscheint Papier abreißen Dann eine beliebige Taste drücken Entfernen Sie nun das Papier aus dem Traktor Befindet sich ein Einzelblatt im Drucker wird es ausgeworfen STOP Pause Trak1 Park LF FF Online Setup 2 1 3 4 Quick Start de book Seite 22 Dienstag 22 Juni 2...

Page 55: ...er wechselt in den Setup Modus Die Taste Adjust 2 drücken Die Taste Tear 4 drücken Durch Drücken der Taste 2 oder 3 die Perforation in die gewünschte Posi tion bewegen Die Eingabe durch Drücken der Taste Setze 1 bestätigen Die Eingabe durch Drücken der Taste Setup abschließen Der Drucker geht in die Grundstellung zurück Die vorgenommene Korrektur maximal ca 2 5 cm 1 in jede Richtung bleibt auch na...

Page 56: ...ortransportiert bis die Unterkante der ersten Druckzeile auf Höhe der Abreißkante des Druckers liegt Werkseitig ist die erste Druckposi tion auf 8 72 eingestellt Dies entspricht der zweiten Zeile von oben Durch Drücken der Taste 2 oder 3 die erste Druckzeile in die gewünschte Position bewegen Es können Werte von 0 bis 220 72 für Endlospapier und für Einzelblätter eingestellt werden 12 72 entsprich...

Page 57: ...up drücken Der Drucker geht in die Grundstellung zurück Die vorgenommene Einstellung bleibt auch nach Ausschalten des Druckers erhal ten Weitere Einzelheiten dazu im Benutzerhandbuch auf der Online CD ROM FormAdj 17 72 Setze Exit Online Setup 2 1 3 4 Quick Start de book Seite 25 Dienstag 22 Juni 2004 1 39 13 ...

Page 58: ...drücken Die Taste Kopf 1 drücken Mit Taste 2 oder 3 den Bereich einstellen innerhalb dessen die automati sche Kopfabstandseinstellung korrigiert wird Es können Werte von 10 bis 10 gewählt werden 0 bis 10 verkleinern den Kopfabstand zum Papier positive Wer te vergrößern den Abstand Die Eingabe durch Drücken der Taste Setze 1 bestätigen Die Taste Setup drücken Der Drucker geht in den Ausgangszustand...

Page 59: ...den Wurde die Taste Font 1 gedrückt mit der Taste 2 oder 3 die gewünschte Schriftart auswählen Die Auswahl durch Drücken der Taste Setze 1 bestätigen Durch Drücken der Taste Exit 4 kann die Auswahl ohne Änderung verlassen werden Die Taste Setup drücken Der Drucker geht in die Grundstellung zurück Es ist auch möglich die Taste Online zu drücken Der Drucker wechselt daraufhin direkt in den Online Mo...

Page 60: ...ndardvoreinstellung ist Traktor 1 unbedrucktes Papier eingelegt ist Halten Sie beim Einschalten des Druckers Taste 4 für ca 5 Sekunden gedrückt Nach Abschluß der Initialisierung zieht der Drucker das Papier in Druckposition und beginnt mit dem Ausdruck Die Statusseite enthält wichtige Informationen die es Ihrem Servicetechniker er leichtern ein Problem oder eine Störung zu beheben Statusausdruck O...

Page 61: ...ruckleistung 430 Seiten h 7 2 Seiten min ECMA 132 Zeichendichten 5 6 7 5 8 6 10 12 15 17 1 20 cpi Auflösung maximal horizontal 360 dpi vertikal 360 dpi Emulationen ESC P2 IBM XL 24e IBM XL 24e AGM DEC PPL 2 Abmessungen Schmaler Drucker 424 x 399 x 300 mm B x T x H Breiter Drucker 600 x 399 x 300 mm B x T x H Gewicht Schmaler Drucker 10 5 kg Breiter Drucker 13 2 kg Netzspannung USA Kanada 120 V 10 ...

Page 62: ...e CD ROM Endlospapier Traktor1 Einfachformat Formularsatz muß individuell getestet werden Papiergewicht Zahl der Durchschläge Formularsatzdicke max 60 120 g m2 1 5 0 60 mm Einzelblattzufuhr Einzelblatt Formularsatz muß individuell getestet werden Papiergewicht Zahl der Durchschläge Formularsatzdicke max 80 120 g m2 1 5 0 60 mm Formularsätze Formularsätze können nur in kopfseitig kantenverleim ter ...

Page 63: ...pier ent sprechend DIN 19 309 geeignet Rücknahme von Drucker und Verbrauchsmaterial Unsere Geräte mit Umweltzeichen und Verbrauchsmaterial werden in unserem Recycling Center TallyGenicom Compu terdrucker GmbH Heuweg 3 D 89079 Ulm gebührenfrei ange nommen und können dort persönlich oder auf dem Versandwege angeliefert werden Gewährleistung 1 Jahr eine Erweiterung auf 2 bzw 3 Jahre ist gemäß Service...

Page 64: ...Sie im Benutzerhandbuch auf der Online CD ROM Bestellnummer Farbbandkassetten schmaler Drucker 3 5 Mio Zeichen LA55R KN Farbbandkassetten breiter Drucker 5 Mio Zeichen LA55R KW Zusätzliche Papierstütze 062 217 Quick Start de book Seite 32 Dienstag 22 Juni 2004 1 39 13 ...

Page 65: ... imprimante 7 Vérifier la tension de l imprimante 8 Connexion de l imprimante 9 Mise sous tension de l imprimante 9 Panneau de commande 10 Mode Online 10 Mode Offline 11 Mode Setup 11 Remplacement de la cartouche du ruban encreur 12 Manipulation du papier 15 Changement du type de papier 15 Changement du type de papier dans le menu Setup 16 Chargement du papier 16 Papier continu 16 Papier feuille à...

Page 66: ... impression TOF 24 Réglage de l écartement de la tête d impression 26 Sélectionner temporairement la densité des caractères et la police 27 Impression de la page de statut 28 Données techniques 29 Spécifications de l imprimante 29 Spécifications du papier 30 Accessoires 30 Quickstart fr book Seite 2 Dienstag 22 Juni 2004 1 31 13 ...

Page 67: ... mettre l imprimante en ser vice pour éviter de vous blesser et d endommager l imprimante Veiller à ce que le présent manuel soit toujours parfaitement accessible Placer l imprimante sur un support stable et plat de façon à ce qu elle ne puisse pas tomber Ne pas exposer l imprimante à des températures élevées ou à la lumière directe du soleil Ne pas mettre l imprimante en contact avec des liquides...

Page 68: ...ses capa cités Pilotes pour Windows 95 98 ME Windows NT 4 Windows 2000 XP Autres documentations instructions de programmation et description des opti ons Si le CD ROM est défectueux ou manque contacter votre revendeur La documen tation Online est disponible sur Internet Configuration matérielle requise Matériel requis au minimum PC AT 486 lecteur CD ROM 4 x écran 15 souris Recherche des pannes Le ...

Page 69: ...teur 1 Capot arrière Capot supérieur Capot inférieur Capot avant Guide papier Panneau de commande Interrupteur secteur Alimentation feuille à feuille manuelle fermée Arête de séparation Tête d impression Connecteur d interface Imprimante en mode continu Imprimante en mode feuille à feuille Leviers de verrouillage Cartouche du ruban Quickstart fr book Seite 5 Dienstag 22 Juni 2004 1 31 13 ...

Page 70: ...r Sortir vers vous l imprimante du carton d emballage et enlever les restes de l emballage Vérifier que l imprimante est complète et en parfait état Out re le guide de démarrage rapide le CD ROM à l avant dernière page de ce manuel le câble secteur le ruban encreur le guide papier et l adapteur d inter face MMJ doivent être présents Si des articles ou accessoires manquent ou sont endomma gés conta...

Page 71: ...ur le choix de l emplacement de l imprimante observer ce qui suit Ne jamais placer l imprimante à proximité de sources de gaz aisément inflamma bles ou de substances explosives Eviter d exposer l imprimante à la lumière directe du soleil Si vous devez pla cer l imprimante près d une fenêtre la protéger des rayons du soleil par un ri deau Lorsque vous connectez l imprimante à l ordinateur veiller à...

Page 72: ...e car ceci pourrait entraîner de graves endommagements Vous pouvez régler vous mêmes l imprimante à la tension correcte Pour cela poser d abord l imprimante sur la face arrière avec précaution Régler ensuite le régulateur à coulisse disposé à gauche de la face inférieure de l imprimante avec un objet adéquat p ex un tournevis ne jamais utiliser un crayon à papier à la tensi on nécessaire STOP pu l...

Page 73: ...ble de données Raccorder le câble secteur à la prise femelle de l imprimante comme sur la figure Raccorder le connecteur du câble sec teur à une prise Mise sous tension de l imprimante L interrupteur secteur qui sert à la mise sous tension de l im primante se trouve sur la face avant de l imprimante en bas à droite pu ll to op en pu ll to op en Quickstart fr book Seite 9 Dienstag 22 Juni 2004 1 31...

Page 74: ...EC indique l emulation choisi de l interface active parallèle ou série an pour d autres informations consulter le guide d utilisateur sur le CD ROM Online Touche Load 4 Il n y a pas de papier dans l imprimante ou le papier se trouve en position de parcage Appuyer sur cette touche pour transporter le papier en position d impression Touche Setup commute l imprimante en mode Setup Touche Online commu...

Page 75: ...changement de ligne LF appuyer longuement sur la touche changement de page FF Touche Setup commute l imprimante en mode Setup Touche Online commute l imprimante Online Mode Setup Dans ce mode les réglages suivants sont disponibles Touche Setup Règle l imprimante en mode Setup dans lequel les réglages sui vants peuvent être sélectionnés Touche Menu 1 autres paramètres de menu verrouillés en usine v...

Page 76: ...r les deux leviers de verrouillage relevez le capot supérieur à 90 par rapport à la face supérieure de l impri mante et déposez le Pousser avec précaution le chariot de tête d impression vers la butée de gauche vu de l avant de l imprimante La tête d impression peut chauffer pendant l im pression Il est donc conseillé de la laisser refroidir quelque temps avant d y toucher STOP Quickstart fr book ...

Page 77: ...a flèche pour tendre le ruban encreur Incliner légèrement vers l avant la cartouche du ruban en creur pour qu elle soit parallèle à la face supérieure du carter et introduisez le ruban encreur devant la tête d impression Introduire les deux ergots dans les glissières situées à gauche et à droite de l imprimante Appuyer avec précaution sur les deux côtés jusqu à ce que la cartouche s enclenche De c...

Page 78: ...a tiquement dans la bonne position sur les taquets en plastique à gauche et à droite de la tête d impression Rabattre le capot de la barre d impression jusqu à ce qu il s enclenche Poser le capot supérieur assurez vous que les ergots sur le capot sont introduits correctement dans les en coches du carter de l imprimante et le refermer Quickstart fr book Seite 14 Dienstag 22 Juni 2004 1 31 13 ...

Page 79: ...Couper le papier s affiche Après coupe du papier appuyer ensuite sur une touche de votre choix Si une feuille simple se trouve dans l imprimante elle est alors éjectée Avec une des touches indiquées Insert 2 dans l exemple sélectionner la fonc tion papier désirée L affichage représenté ici peut varier selon les options installées pour le papier Si aucune sélection n est effectuée en l espace de 5 ...

Page 80: ...cations du papier Veuillez n utiliser que du papier sans poussière Plusieurs sortes de papier con viennent pour cette imprimante Pour d autres informations consulter le guide d utilisateur sur le CD ROM Online Papier continu S assurer que l imprimante est réglée sur le mode continu Si nécessaire changer le type de papier voir Changement du type de papier à la page 15 Saisir le capot avant aux endr...

Page 81: ... gauche Ouvrir le levier de verrouillage de couleur et aligner le tracteur de façon à ce que la position du début d impression sur le papier coïncide avec le repère X sur le carter de l imprimante Rebloquer ensuite le levier Ajuster le tracteur de droite sur la largeur du papier et charger le papier Veiller à ce qu il soit à la même hauteur que dans le tracteur de gauche pour éviter un bourrage de...

Page 82: ...e pour éviter alors les problèmes à l alimentation Bloquer ensuite le tracteur Mettre l imprimante sous tension Le bac de chargement ac tif Tract 1 s affiche Le papier est chargé automatiquement si l imprimante est Online et reçoit des données de l ordina teur Appuyer sur la touche Load 4 pour charger le papier avant impression Retirer le guide papier avant de commencer l im pression avec du papie...

Page 83: ...igner le margeur de gauche sur le repère de gauche du gui de feuille à feuille Régler le margeur de droite en fonction du format de papier utilisé Insérer une feuille simple dans le guide papier jusqu à la bu tée Appuyer sur la touche Online pour que l imprimante soit prête à fonctionner La feuille simple est chargée automatiquement si l impri mante est Online et reçoit des données de l ordinateur...

Page 84: ...he 2 Appuyer brièvement sur la touche le papier est transporté pro gressivement vers le haut Appuyer longuement sur la touche transport continu vers le haut Touche 3 Appuyer brièvement sur la touche le papier est transporté pro gressivement vers le bas Appuyer longuement sur la touche transport continu vers le bas Touche LF FF 4 Appuyer brièvement sur la touche le changement de ligne LF est activé...

Page 85: ...ouche Coupe 4 L imprimante déplace l arête de perforation du papier continu sur l arête de séparation Après coupe du papier appuyer sur la touche Online L imprimante ramène le pa pier en position de début d impression Si un travail d impression est actif l imprimante ramène automatiquement le pa pier en position de début d impression La fonction Coupe peut être désactivée complètement No Tear Reve...

Page 86: ... sur la touche Online Appuyer sur la touche Park 1 Si du papier continu se trouve dans l imprimante il est transporté en position de séparation Couper le papier s affiche Appuyer ensuite sur une touche de votre choix Enlever maintenant le papier du tracteur Si une feuille simple se trouve dans l imprimante elle est alors éjectée STOP Pause Tract1 Park LF FF Online Setup 2 1 3 4 Quickstart fr book ...

Page 87: ... sur la touche Setup L imprimante passe en mode Setup Appuyer sur la touche Ajuster 2 Appuyer sur la touche Coupe 4 Appuyer sur la touche 2 ou 3 pour déplacer la perforation dans la position souhaitée Valider le réglage en appuyant sur la touche Valid 1 Valider la sélection en appuyant sur la touche Setup L imprimante revient en po sition initiale La correction effectuée au maximum env 2 5 cm 1 da...

Page 88: ...st transporté jusqu à ce que l arête inférieure de la première ligne se trouve à la hauteur de l arête de séparation La position de la première ligne d im pression est réglée en usine sur 8 72 4 23 mm Ceci correspond à la deuxième ligne en partant du haut Appuyer sur la touche 2 ou 3 pour déplacer la première ligne d impression dans la position souhaitée Vous pouvez régler des valeurs comprises en...

Page 89: ...touche Setup L imprimante revient en position initiale Le réglage effectué reste conservé même après mise hors tension de l imprimante Vous trouverez d autres détails dans le guide d utilisateur sur le CD ROM Online Ligne 1 17 72 Valid Quit Online Setup 2 1 3 4 Quickstart fr book Seite 25 Dienstag 22 Juni 2004 1 31 13 ...

Page 90: ...imante passe en mode Setup Appuyer sur la touche Ajuster 2 Appuyer sur la touche Tête 1 Appuyer sur la touche 2 ou 3 pour régler la plage dans laquelle l écarte ment de la tête d impression doit être corrigé Vous pouvez sélectionner des va leurs entre 10 et 10 Les valeurs de 0 à 10 réduisent l écartement de la tête par rapport au papier les valeurs positives augmentent l écartement Valider la séle...

Page 91: ...L appui sur la touche Quit 4 permet de quitter la sélection sans modification Si la touche Police 2 est actionnée sélectionner la police souhaitée avec la touche 2 ou 3 Valider la sélection en appuyant sur la touche Valid 1 L appui sur la touche Quit 4 permet de quitter la sélection sans modification Appuyer sur la touche Setup L imprimante revient en position initiale Il est éga lement possible d...

Page 92: ...de papier active réglage initial Tract 1 Tenez la touche 4 enfoncée pendant environ 5 secondes À la fin de l initialisation l imprimante tire le papier en position impression et commence par l impression de la page de statut La page du statut contient des informations importantes pour faciliter à votre tech nicien d entretien l élimination d un problème ou d un dysfonctionnement Status Print Onlin...

Page 93: ...x 36 Capacité d impression 430 pages h 7 2 pages min ECMA 132 Densité des caractères 5 6 7 5 8 6 10 12 15 17 1 20 cpi Résolution maximale Horizontale 360 dpi Verticale 360 dpi Emulations ESC P2 IBM XL 24e IBM XL 24e AGM DEC PPL 2 Dimensions Version étroites 424 x 399 x 300 mm L x P x H Version larges 600 x 399 x 300 mm L x P x H Poids Version étroites 10 5 kg Version larges 13 2 kg Alimentation US...

Page 94: ... de formulaires doit être testée individuellement Grammage Nombre de copies Epaisseur de formulaire maxi 60 120 g m2 1 5 0 60 mm Alimentation feuille à feuille Feuille simple Liasse de formulaires doit être testée individuellement Grammage Nombre de copies Epaisseur de formulaire maxi 80 120 g m2 1 5 0 60 mm Liasses de formulaires Seules les liasses de formulaires dont les bords d en tête sont col...

Page 95: ...mballaggio 6 Installazione della stampante 7 Controllare la tensione della stampante 8 Collegamento della stampante 9 Accensione della stampante 9 Pannello comandi 10 Modo Online 10 Modo Offline 11 Modo Setup 11 Sostituzione della cartuccia nastro 12 Modalità di gestione della carta 15 Cambio del tipo di carta 15 Modifica del tipo di carta nel menu Setup 16 Caricamento della carta 16 Moduli contin...

Page 96: ...i inizio stampa Top Of Form TOF 24 Regolazione della distanza della testina di stampa 26 Selezione temporaneamente della densità e del tipo di caratteri 27 Pagina di stato 28 Dati tecnici 29 Specifiche della stampante 29 Specifiche della carta 30 Accessori 30 Quickstart it book Seite 2 Dienstag 22 Juni 2004 1 27 13 ...

Page 97: ... seguenti indi cazioni In questo modo si possono evitare rischi per la propria incolumità perso nale e danni all apparecchio Conservare la presente guida di avvio rapida in un luogo sempre accessibile Collocare la stampante su una superficie piana stabile per evitare che cada a terra Non esporre la stampante ad elevate temperature né alla luce solare diretta Evitare il contatto della stampante con...

Page 98: ... teristiche Driver per Windows 95 98 ME Windows NT 4 Windows 2000 XP altra documentazione Istruzioni di programmazione e descrizione delle opzioni Se il CD ROM è difettoso o non è allegato alle istruzioni per l uso rivolgersi al proprio rivenditore La documentazione online può essere consultata tramite Internet Requisiti hardware Requisiti hardware minimi PC AT 486 CD ROM 4x schermo da 15 mouse Di...

Page 99: ...1 Coperchio posteriore Coperchio superiore Coperchio inferiore Coperchio anteriore Supporto carta Pannello comandi Interruttore di accensione Ingresso fogli singoli manuale chiuso Bordo di strappo Testina di stampa Connettore di interfaccia Stampante configurata per alimentazione moduli continui Stampante configurata per alimentazione fogli singoli Ganci Cartuccia nastro Quickstart it book Seite 5...

Page 100: ... gli altri elementi dell imballaggio Verificare che la stampante non mostri danni visibili dovuti al trasporto e che non manchi nessun componente della dota zione Oltre alle presente guida di avvio rapida nell im ballaggio devono esservi il CD ROM inserito nella tasca della penultima pagina il cavo di rete la cartuccia colore il supporto carta e l adattatore di interfaccia MMJ Se si riscontrano da...

Page 101: ...uogo di installazione della stampante rispettare le seguenti indicazioni Non collocare la stampante in prossimità di gas facilmente infiammabili o di sos tanze esplosive Non esporre la stampante alla luce solare diretta Se la stampante deve essere inevitabilmente installata in prossimità di una finestra proteggerla dal sole con una tenda Al collegamento del PC con la stampante fare attenzione a no...

Page 102: ...causare seri danni E possibile effettuare da soli la regolazione della corretta ten sione per la stampante E necessario innanzitutto posizionare con cautela la stampante sul lato posteriore Successivamente regolare sulla tensione necessaria il regola tore scorrevole posto sul lato sinistro della parte inferiore della stampante con un oggetto adatto ad esempio un caccia vite non utilizzare in nessu...

Page 103: ...one dati Collegare il cavo di rete come mostrato nella figura alla presa della stampante Inserire la spina del cavo di rete in una presa Accensione della stampante L interruttore di rete con il quale si può accendere la stam pante è posto a destra in basso sul lato anteriore della stampante pu ll to op en pu ll to op en Quickstart it book Seite 9 Dienstag 22 Juni 2004 1 27 13 ...

Page 104: ...ata dell interfaccia attiva parallela o seriale per maggiori informazio ni si rimanda al manuale dell utente sul CD ROM online Tasto Load 4 Significa che nella stampante manca la carta o che la carta é in posizione di parcheggio L indicazione sul display passa da così Online a così Parcheggiata Premendo il tasto si trasporta la carta nella posizione di stampa Tasto Setup Commuta la stampante nel m...

Page 105: ...ne del tasto Avanzamento riga per riga LF Pressione prolungata del tasto Avanzamento di una pagina FF Tasto Setup Commuta la stampante nel modo Setup Tasto Online Commuta la stampante nel modo Online Modo Setup In questa modalità si possono effettuare le seguenti impostazioni Tasto Setup Commuta la stampante nel modo Setup in cui si possono effettua re le seguenti impostazioni Tasto Menu 1 Ulterio...

Page 106: ...ursori di regolazione aprire il coperchio superiore a 90 rispetto alla superficie superiore della stampante e rimuoverlo Spostare la testina di stampa fino al fermo di sinistra visto dal lato anteriore della stampante Durante il processo di stampa la testina di stampa tende a surriscaldarsi notevolmente Prima di toc care la testina di stampa attendere quindi qualche istante STOP Quickstart it book...

Page 107: ...o Inclinare lievemente la cartuccia del nastro in avanti in modo da posizionarla parallelamente al lato superiore dell incastel latura e far passare il nastro davanti alla testina di stampa Agganciare quindi i due perni nelle due guide di destra e di sinistra della stampante e spingere delicatamente la cartuccia verso il basso finché non si aggancia In questo modo la car tuccia verrà a trovarsi au...

Page 108: ...e linguette in plastica poste a si nistra e a destra della manopola tendinastro posizionandosi automaticamente nel modo corretto Spingere verso il basso il premicarta in modo da agganciarlo reinstallare il coperchio superiore verificando che i perni si inseriscano correttamente nelle cavità presenti nella carroz zeria della stampante e infine richiuderlo Quickstart it book Seite 14 Dienstag 22 Jun...

Page 109: ...pare l indicazione Strappo carta Dopo avere strappato la carta premere un tasto a piacere Se nella stampante sono caricati fogli singoli ne viene espulso uno Con uno dei tasti indicati dalle frecce selezionare il percorso carta desiderato nel nostro esempio Foglio 2 La visualizzazione qui rappresentata può variare in base alle opzioni di carta installate Se entro 5 secondi non viene effettuata alc...

Page 110: ...i polvere o con un ridotto contenuto di pol vere La stampante è adatta a vari tipi di carta Per maggiori informazioni si ri manda al manuale dell utente sul CD ROM online Moduli continui Verificare che la stampante sia impostata sulla modalità di utilizzo moduli continui Se necessario cambiare il tipo di carta vedere Cambio del tipo di carta pagina 15 Afferrare la copertura anteriore sui punti con...

Page 111: ...lazione colorata e disporre il trasci na moduli in modo che la posizione di inizio stampa sulla carta venga a corrispondere con il contrassegno X presente sull invo lucro della stampante Ribloccare la leva Regolare la posizione del trascinamoduli destro in funzione della larghezza della carta e inserire la carta Fare attenzione a posizionarla alla stessa altezza osservata per il trascinamo duli di...

Page 112: ... incepparsi causando problemi di funzionamento Bloccare quindi il trascinamoduli Accendere la stampante Sul display compare il cassetto car ta attivo Trattor1 trascinamoduli 1 La carta viene auto maticamente trascinata all interno della stampante se quest ultima è nella condizione Online e riceve dati dal com puter Premere il tasto Load 4 per caricare la carta prima dell ini zio della stampa Prima...

Page 113: ...nare il riscontro sinistro in corrispondenza del con trassegno presente sul lato sinistro della guida fogli singoli Regolare il riscontro di destra a seconda del formato carta utilizzato Inserire un foglio nella guida carta fino in fondo Premere il tasto Online per portare la stampante nella condi zione pronta al funzionamento Il foglio viene automaticamente trascinato all interno della stampante ...

Page 114: ...o un foglio singolo questo viene emesso Tasto 2 Breve pressione del tasto la carta si sposta passo passo verso l al to Pressione prolungata del tasto Trasporto continuo verso l alto Tasto 3 Breve pressione del tasto la carta si sposta passo passo verso il basso Pressione prolungata del tasto trasporto continuo verso il basso Tasto LF FF 4 Breve pressione del tasto Avanzamento riga per riga LF Pres...

Page 115: ... il tasto Stp 4 La stampante posiziona il bordo perforato dei moduli continui in corrispondenza della bordo di strappo Dopo avere strappato la carta premere il tasto Online La stampante riporta la car ta nella posizione di inizio stampa Se c è un lavoro nella coda di stampa la stampante porta automaticamente la carta nella posizione di inizio stampa La funzione Stp strappo può essere completamente...

Page 116: ...o pre mere il tasto Online Premere il tasto Park 1 Se nella stampante sono caricati moduli continui questi vengono trasportati nella posizione di strappo Sul display compare l indicazione Strappo carta Premere un tasto a piacere Estrarre quindi la carta dal trascinamoduli Se nella stampante sono caricati fogli singoli ne viene espulso uno STOP Pause Trat1 Park LF FF Online Setup 2 1 3 4 Quickstart...

Page 117: ...emere il tasto Setup La stampante si commuta nel modo Setup Premere il tasto Regolaz 2 Premere il tasto Stp 4 Premendo il tasto 2 o 3 posizionare la perforazione come desiderato Con fermare con il tasto OK 1 Confermare premendo il tasto Setup La stampante torna nella posizione di riposo La correzione impostata max circa 2 5 cm 1 in ogni direzione resta in me moria anche allo spegnimento della stam...

Page 118: ... trasportata nella posizione in cui il bordo inferiore della prima riga di stampa coincide con la bordo di strappo della stampante La posizione di inizio stampa è impostata dalla fabbrica a 8 72 4 23 mm che corrisponde alla secon da riga di stampa dall alto Premendo il tasto 2 o 3 spostare la prima riga di stampa nella posizione desiderata Si possono impostare valori compresi tra 0 e 220 72 per i ...

Page 119: ...up La stampante torna nella posizione di riposo L impostazione effettuata resta in memoria anche allo spegnimento della stam pante Per maggiori dettagli a questo proposito si rimanda al manuale dell utente sul CD ROM online Sel 17 72 OK Esci Online Setup 2 1 3 4 Quickstart it book Seite 25 Dienstag 22 Juni 2004 1 27 13 ...

Page 120: ...Premere il tasto Setup La stampante si commuta nel modo Setup Premere il tasto Regolaz 2 Premere il tasto Test 1 Con il tasto 2 o 3 impostare il campo di correzione per l impostazione au tomatica della distanza della testina di stampa Si possono selezionare valori com presi tra 10 e 10 Confermare l immissione premendo il tasto OK 1 Premere il tasto Setup La stampante torna nello stato iniziale Val...

Page 121: ... il tasto Font 2 selezionare il font desiderato con il tasto 2 o 3 Confermare la scelta premendo il tasto OK 1 Premendo il tasto Esci 4 si pu uscire dalla procedura senza apportare alcuna mo difica Premere il tasto Setup La stampante torna nella posizione di riposo E possibile anche premere il tasto Online In questo caso la stampante si commuta diretta mente nel modo Online La selezione effettuata...

Page 122: ...a fonte di carta valida regolazione di difetto Trat1 Tenere premuto il tasto 4 per ca 5 secondi Dopo che la compi lazione dell inizio lo stampatore tiri la carta nella posizione di stampa e comincia a stampare La pagina di stato contiene importanti informazioni che facilitano i tecnici di as sistenza nella risoluzione di un problema o di un anomalia Status Print Online Setup 2 1 3 4 Quickstart it ...

Page 123: ...condo a 10 cpi matrice 24 x 36 Produttività 430 pagine ora 7 2 pagine min ECMA 132 Densità caratteri 5 6 7 5 8 6 10 12 15 17 1 20 cpi Risoluzione max orizzontale 360 dpi verticale 360 dpi Emulazioni ESC P2 IBM XL 24e IBM XL 24e AGM DEC PPL 2 Dimensioni Stampante più stretto 424 x 399 x 300 mm L x P x A Stampante più largo 600 x 399 x 300 mm L x P x A Peso Stampante più stretto 10 5 kg Stampante pi...

Page 124: ... semplice Modulistica multicopia da testare caso per caso Grammatura carta Numero di copie Spessore modulo max 60 120 g m2 1 5 0 60 mm Alimentazione fogli singoli Foglio singolo Modulistica multicopia da testare caso per caso Grammatura carta Numero di copie Spessore modulo max 80 120 g m2 1 5 0 60 mm Modulistica multicopia I moduli multicopia possono essere gestiti solo se incollati sul bordo sup...

Page 125: ...hojas sueltas 5 Instalación 6 Desembalar la impresora 6 Colocar la impresora 7 Comprobar la tensión de la impresora 8 Conectar la impresora 9 Encender la impresora 9 Panel de mando 10 Modo Online 10 Modo Offline 11 Modo Setup 11 Cambiar el cartucho de cinta 12 Manejo del papel 15 Cambiar tipo de papel 15 Cambar el origen de papel mediante el menú Setup 16 Cargar papel 16 Papel continuo 16 Hojas su...

Page 126: ...ra línea de impresión TOF 24 Ajustar la distancia de cabeza grabadora 26 Selección temporaria de densidad y fuente 27 Página del estado 28 Datos técnicos 29 Especificaciones de la impresora 29 Especificaciones del papel 30 Accesorios 30 Quickstart sp book Seite 2 Dienstag 22 Juni 2004 1 24 13 ...

Page 127: ...o antes de poner la impresora en servi cio Con ésto se protege Ud a si mismo y evita dañar el equipo Guarde la presente guía de instalación en un lugar de fácil acceso en cualquier momento Ponga la impresora sobre una base estable y plana de manera que no pueda caer al suelo No exponga la impresora ni a temperaturas altas ni a la luz solar directa No ponga la impresora en contacto con fluidos Nunc...

Page 128: ...resora y sus característi cas de rendimiento driver para Windows 95 98 ME Windows NT 4 Windows 2000 XP más documentaciones instrucciones para la programación y una descripción de las opciones En el caso que el disco CD ROM esté defecto o no incluido consulte su agente de ventas Se ofrece la presente documentación en el Internet Condiciones de hardware Condiciones mínimas de hardware PC AT 486 CD R...

Page 129: ...erto Tractor 1 Cubierta posterior Cubierta superior Tapa inferior Tapa delantera Apoyo de papel Panel de mando Interruptor de la red Dispositivo de alimentación de hojas sueltas manual cerrado Hoja de corte Cabeza de impresión Conexión de interface Impresora en estado para papel continuo Impresora en estado para hojas sueltas Cartucho de cinta Cierres Quickstart sp book Seite 5 Dienstag 22 Juni 20...

Page 130: ...cia delante y quite el resto del material de embalaje Compruebe la impresora en cuanto a daños evidentes de transporte y en cuanto a integridad Además de la presente guía de instalación deben estar incluidos el disco CD ROM en la página penúltima de este manual el cable de la red el cartucho de cinta el apoyo de papel y el adaptador de interfaz MMJ En caso de daños de transporte o falta de accesor...

Page 131: ...ra preste también atención en los siguientes puntos Nunca coloque la impresora en la vecindad de gases de fácil inflamabilidad o sunstancias explosivas No exponga la impresora a radiación solar directa Si no es posible evitar colo car el equipo cerca de una ventana protéjalo con una cortina contra la luz solar Al conectar el ordenador con la impresora tenga cuidado en que no se exceda la longitud ...

Page 132: ... red está incorrecta por que puede causar daño grave Ud mismo puede poner la impresora a la tensión de alimen tación correcta Para ello primero coloque la impresora en la parte posterior con cuidado Ponga el conmutador corredizo a la izquierda del lado inferi or de la impresora a la posición correcta por medio de un ob jeto apropiado p ej un destornillador pero nunca un lápiz STOP pu ll to op en p...

Page 133: ...or Conecte el cable de la red a la conexión de corriente eléctrica de la impresora según la figura Conecte la clavija de la cable de la red a un enchufe Encender la impresora El interruptor de la red con el cual se enciende la impresora se encuentra a la derecha abajo en el frente de la impresora pu ll to op en pu ll to op en Quickstart sp book Seite 9 Dienstag 22 Juni 2004 1 24 13 ...

Page 134: ...la o serial para más información consul te la guía del usuario en línea en el disco CD ROM Pulsador Load 4 Significa que no hay papel en la impresora o la impresora está en la posición de aparcamiento En este caso la indicación cambia entre On line y Park Position Presione el pulsador para transportar papel a la posición de impresión Pulsador Setup Pone la impresora al modo Setup Pulsador Online P...

Page 135: ...pulsador Avance de línea LF Pulsación larga del pulsa dor Avance de página FF Pulsador Setup Pone la impresora al modo Setup Pulsador Online Pone la impresora al modo Online Modo Setup En este modo se pueden ajustar los siguientes parámetros Pulsador Setup Pone la impresora al modo Setup en el cual pueden seleccio narse los ajustes siguientes Pulsador Menú 1 Opciones adicionales bloqueadas en fábr...

Page 136: ... la cubierta superior a un án gulo de 90 grados relativo al lado superior de la impresora y quite la cubierta Empuje con cuidado el carro de cabeza grabadora a la iz quierda hasta el tope visto del frente de la impresora La cabeza grabadora se pone muy caliente durante la impresión Por lo tanto deje enfriarlo algún tiempo antes de tocarla si fuese necesario STOP Quickstart sp book Seite 12 Diensta...

Page 137: ...l sentido de la flecha para tensar la cinta Incline la caseta un poco hacia delante de manera que esté paralela con el lado superior de la caja e insierte la cinta delante de la cabeza de impresión Insierte el cartucho con las espigas en los rieles guía a la izquierda y la derecha de la im presora y presionar abajo con cuidado hasta que se engatilla Así se posiciona el cartucho correctamente sin m...

Page 138: ...ción correcta por las salientes a la izquierda y derecha de la cabeza de impresión Presionar la cubierta de barra de impresión hacia abajo hasta que engancha reinstalar la cubierta arriba asegurando que se insiertan las espigas de la cubierta correctamente en las aber turas en la caja de la impresora y cerrarlo Quickstart sp book Seite 14 Dienstag 22 Juni 2004 1 24 13 ...

Page 139: ... Luego pulse cualquier pulsador Si se encuentra una hoja suelta en la impresora se la ex pulsa Seleccione el origen de papel deseado con uno de los pulsadores marcados en nuestro ejemplo Sueltas 2 La indicación representada aquí podrá ser diferente de acuerdo con las opciones de papel instaladas Si la selección no se realiza dentro de 5 segundos la impresora sale del menú La impresora vuelve al mo...

Page 140: ...e papel sin polvo o con poco contenido de polvo Hay muchos tipos de papel que se pueden procesar con esta impresora Para más informaciones véase guía del usuario en el disco CD ROM Papel continuo Asegúrese de que la impresora esté en modo de servicio para papel continuo Si fuese necesario cambie el tipo de papel véase Cambiar tipo de papel página 15 Levantar la tapa delantera tomándola en los luga...

Page 141: ...e fijación colorada y ajuste el tractor de manera que la primera posición de impresión en el papel esté alineada con la marca X sobre la caja de impresora Después cierre la palanca de nuevo Ajuste el tractor derecho para alinearlo a la anchura del papel utilizado y coloque el papel Asegúrese de que esté posicio nado igual como en el tractor izquierdo para evitar cualquier atasco de papel Quickstar...

Page 142: ...ondulándose causan do problemas de alimentación Después fije el tractor Encienda la impresora Aparece el origen de papel activo Tractor1 en el visualizador Se carga el papel automatica mente si la impresora está en modo Online y recibe datos del ordenador Presione el pulsador Load 4 para cargar el papel antes del inicio de la impresión Quite el apoyo de papel antes de comenzar la im presión con pa...

Page 143: ...uía lateral izquierda para alinearla a la marca iz quierda del dispositivo de alimentación de hojas sueltas Ajuste la guía lateral derecha al tamaño del papel utilizado Insierte la hoja suelta hasta el tope en el dispositivo de ali mentación de papel Presione el pulsador Online para poner la impresora en esta do listo para el servicio Se carga una hoja automaticamente si la impresora está en modo ...

Page 144: ... 2 Pulsación breve del pulsador Se transporta el papel hacia arri ba por pasos Pulsación larga del pulsador Transporte continuo hacia arriba Pulsador 3 Pulsación breve del pulsador Se transporta el papel hacia aba jo por pasos Pulsación larga del pulsador Transporte continuo hacia abajo Pulsador LF FF 4 Pulsación breve del pulsador Se inicia un avance de línea LF Pulsación larga del pulsador Se in...

Page 145: ...lsador Tiro 4 La impresora posiciona la línea de perforación del papel continuo a la hoja de corte Después de cortar el papel presione el pulsador Online La impresora reposiciona el papel a la primera posición de impresión Si hay una tarea de impresión la impresora posiciona el papel automticamente a la primera posición de impresión La función Tiro puede ser desactivada completamente No Tear Rever...

Page 146: ...ese necesario presione el pulsador Online Presione el pulsador Park 1 Si se encuentra papel continuo en la impresora se transporta a la posición de corte Aparece Tire papel en el visualizador Luego pulse cualquier pulsador Ahora quite el papel del tractor Si se encuentra una hoja suelta en la impresora se la expulsa STOP Pause Tractor1 Park LF FF Online Setup 2 1 3 4 Quickstart sp book Seite 22 Di...

Page 147: ... impresora cambia al modo Setup Presione el pulsador Ajustar 2 Presione el pulsador Tirar 4 Por medio del pulsador 2 o 3 ponga la perforación a la posición deseada Confirme la entrada presionando el pulsador Set 1 Confirme la entrada presionando el pulsador Setup La impresora vuelve al estado inicial La corrección realizada máximo aprox 2 5 cm 1 en cada dirección perma nece también despus de desco...

Page 148: ...ue el borde inferior de la primera línea de impresión esté alineado con la hoja de corte de la impresora Se ha ajustado la primera posición de impresión a 8 72 4 23 mm en fábrica lo cual corresponde a la segunda línea desde arriba Por medio del pulsador 2 o 3 ajuste la primera línea de impresión a la posicóin deseada Se pueden ajustar valores entre 0 y 220 72 para papel continuo y para hojas suelt...

Page 149: ... el pulsador Setup La impresora vuelve al estado inicial La selección realizada permanece también después de desconectar la impresora Para más detalles véase la guía del usuario en el disco CD ROM FormAdj 17 72 Set Salir Online Setup 2 1 3 4 Quickstart sp book Seite 25 Dienstag 22 Juni 2004 1 24 13 ...

Page 150: ...p La impresora cambia al modo Setup Presione el pulsador Ajustar 2 Presione el pulsador Ajust 1 Por medio del pulsador 2 o 3 ajuste la gama dentro de la cual se efectúa la corrección del ajuste automático de la cabeza Puede seleccionar valores entre 10 a 10 Confirme la entrada presionando el pulsador Set 1 Presione el pulsador Setup La impresora vuelve al estado inicial Valores negativos disminuye...

Page 151: ...ont 2 seleccione la fuente deseada con el pul sador 2 o 3 Confirme la selección presionando el pulsador Set 1 Puede cancelar la selección presionando Salir 4 Presione el pulsador Setup La impresora vuelve al estado inicial Alternativamen te puede presionar el pulsador Online Entonces la impresora cambia al modo On line directamente La selección realizada no permanece después de desconectar la impr...

Page 152: ...apel válida va lor básico Tractor 1 Mantenga presionado el pulsador 4 por cerca de 5 segundos Después de que la terminación de la inicialización la impresora tire del papel en la posición de impresión y comience con el listado La página de estado contiene información importante que le facilitará a su técnico de servicio la eliminación de un problema o de una perturbación Status Print Online Setup ...

Page 153: ... matriz 24 x 36 Rendimiento de impresión 430 páginas h 7 2 páginas min ECMA Densidad de caracteres 5 6 7 5 8 6 10 12 15 17 1 20 cpp Resolución máxima Horizontal 360 ppp Vertical 360 ppp Emulaciones ESC P2 IBM XL 24e IBM XL 24e AGM DEC PPL 2 Dimensiones Impresora estrecha 424 x 399 x 300 mm A x P x A Impresora ancha 600 x 399 x 300 mm A x P x A Peso Impresora estrecha 10 5 kg Impresora ancha 13 2 k...

Page 154: ...Copias múltiples requieren pruebas individuales Peso de papel Número de copias Espesor de formulario máx 60 120 g m2 1 5 0 60 mm Alimentación hojas sueltas Hoja suelta Copias múltiples requieren pruebas individuales Peso de papel Número de copias äge Espesor de formulario máx 80 120 g m2 1 5 0 60 mm Formularios en copias múltiples Sólo se pueden manejar formularios del tipo enco lado por los canto...

Page 155: ...ation EPSON EPSON ESC P and EPSON P2 are registered trademarks of SEIKO EPSON Corporation IBM IBM XL 24e and IBM XL 24e AGM are trademarks of International Business Machines Corporation MS DOS is a trademark of Microsoft Corporation Windows Windows 95 Windows 98 Windows ME Windows 2000 Windows XP and Windows NT are trademarks of Microsoft Corporation DEC and DEC PPL 2 are trademarks of Digital Equ...

Page 156: ...mited Rutherford Road Basingstoke Hampshire RG24 8PD England U K Phone 44 870 872 2888 Fax 44 870 872 2889 http www tallygenicom co uk CANADA TallyGenicom 125 Traders Boulevard 9 Missisauga Ontario L4Z 2E5 Canada Phone 1 905 8904646 Fax 1 905 8904567 http www tallygenicom com MALAYSIA TallyGenicom Sdn Bhd Wisma KT Suite 3 02 No 14 Jalan 19 1 46300 Petaling Jaya Selangor Darul Ehsan Malaysia Phone ...

Reviews: