14
14
NOTE!
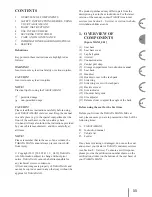
Hold the base of the seat in position, while pulling the
back up.
Step 2 – Release the angle locking mechanism and
fold up
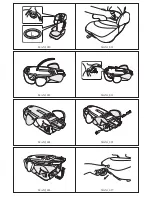
[MAXI_021] Fold the lower section of the seat back
cover upwards, and push the release slider up.
[MAXI_022] At the same time, use your other hand to
fold the seat back down, until it lies
fl
at on the base.
Step 3 – Push the seat together into the transport
position
[MAXI_023] Release the seat back locking mechanism
(as in Step 1 “Pull the seat back up to the highest
position”) and press the back down into the base as far
as possible.
NOTE!
To prevent the seat from folding open, the bottom
edges of the side wings can be secured beneath the
front tip of the armrests.
CAUTION!
Always check that the seat back is locked in place, by
lightly pulling it up, without lifting the lever. If you
hear a click, it is
fi
rmly in position.
Removing the seat back
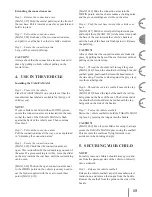
Step 1 – Pull out the seat back
[MAXI_017] Release the seat back locking mecha-
nism and pull the back up as high as possible (see Step
1 of “Folding out and setting up the back”).
Step 2 – Unfasten the cover
[MAXI_024] Unfasten the two straps on the seat base
cover (one strap on each side), positioned on the outer
sides of the armrests. Pull the ends of the cover up.
Step 3 – Remove the safety bolts
[MAXI_025] Press the heads of the safety bolts
together, and remove these from their sockets.
Step 4 – Separate the back and base of the seat
[MAXI_026] Push the axle of the seat back out of its
holders in the base. The back of the seat can then be
lifted off the base.
Attaching the seat back
To attach the back of the TAKATA MAXI to the base,
follow the instructions given in “Removing the seat
back” in reverse order.
3. BASIC INSTRUCTIONS
CAUTION!
Always place the TAKATA MAXI child car seat on
a
fl
at, stable surface.
CAUTION!
Be careful that your
fi
ngers and other body parts do
not get caught in any moving sections of the seat.
Folding out and setting up the back
Step 1 – Release and pull out the back of the seat
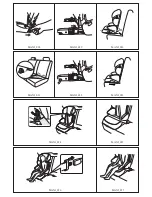
[MAXI_017] Locate the lever on the rear of the seat
back, pull it up, and hold it in position. At the same
time, pull the seat back up as far as possible. You can
now release the lever.
Step 2 – Fold out the seat back
[MAXI_018] Open the seat up until the angle between
the back and base is at least 90°, and you hear a click.
Step 3 – Set the height of the back
[MAXI_019] Release the seat back locking mecha-
nism and adapt the height of the seat back to the size
of the child’s body (see Step 1 of this section).
If frequently folding the seat up and open again, the
size indicator will help you
fi
nd the right height
quickly (there are 11 positions marked from A to L).
WARNING!
Always adapt the height of the seat back to the size of
the child’s body. Ensure that the top of your child’s
head is positioned below the top edge of the headrest.
If the headrest is too low, there is a greater risk of
injury in the case of an accident. At the same time, the
shoulder belt guide should be no more than two
fi
nger
widths above the child’s shoulder.
CAUTION!
Always check that the seat back is locked in place, by
lightly pushing down on it, without lifting the lever. If
you hear a click, it is
fi
rmly in position.
Folding the seat back down
Step 1 – Pull the seat back up to the highest position
[MAXI_020] Release the seat back locking mecha-
nism and pull the back up as high as possible (see Step
1 of “Folding out and setting up the back”).

