background image

How to Use

(3) Reclining/Raising the Backrest

CAUTION

14

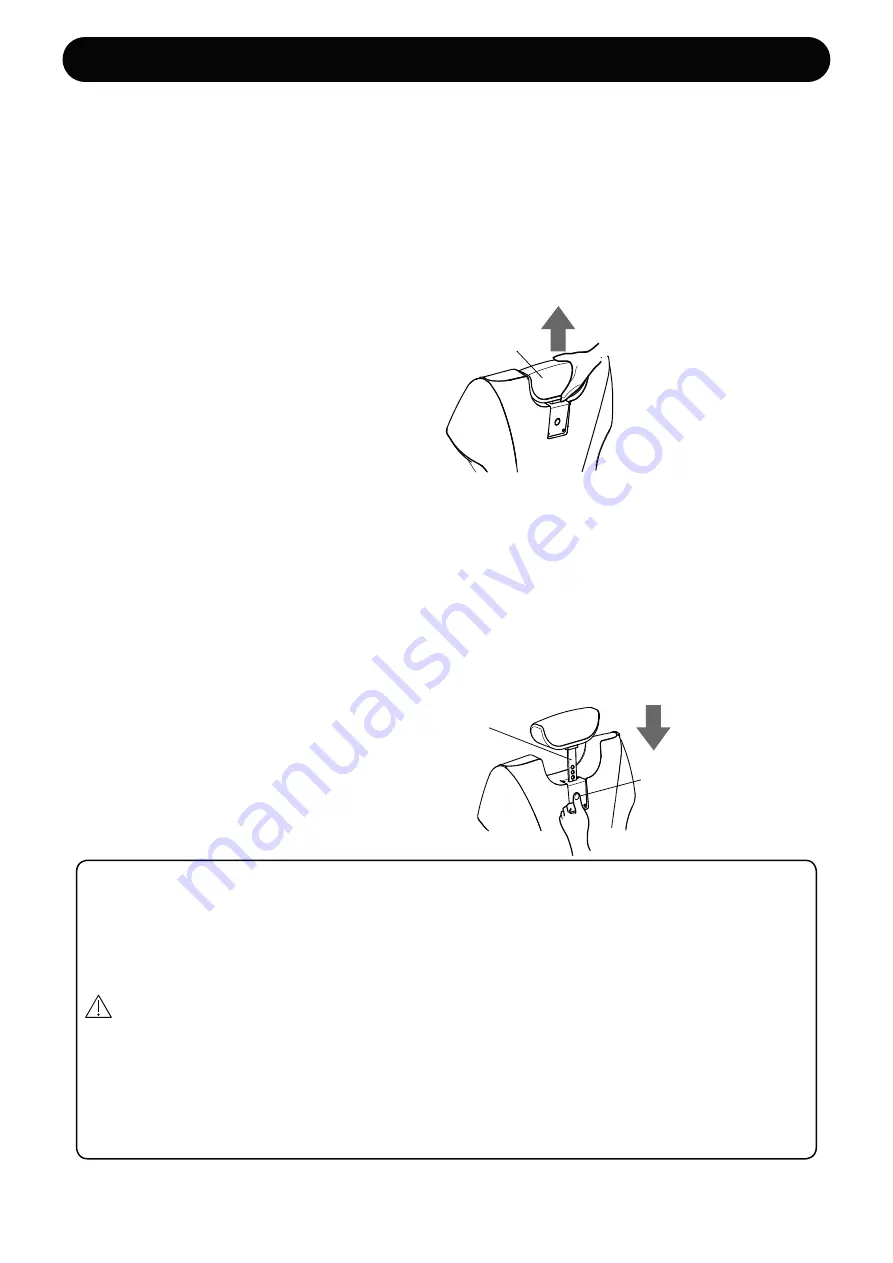
Headrest button

Headrest bar

Headrest

1. Pull out the headrest.

Use the headrest when supporting the customer's head is needed, such as for shaving.

Do not use the headrest if it is not needed, such as for back shampooing.

1  Put your hand in between the headrest and backrest to pull up the headrest.

2  Adjust the headrest to the height of the customer's head.

The headrest can be adjusted in eleven height levels.  The headrest can be pulled up without pressing the 

headrest button.

If you pull up the headrest more than necessary, press the headrest button to lower the headrest and adjust 

it again.

* If the headrest bar comes off the chair body, press and hold the headrest button and insert back the 

headrest bar.

The headrest should be fixed at one of the eleven adjustment positions. The positions where you hear clicks 

when pulling up the headrest are the positions where the headrest can be fixed.

Be careful in pulling up the headrest more than necessary because doing so will make


the headrest to come off the chair.

Check that there are no impediments in the surrounding area when rotating the seat with 

the headrest pulled out.

Be careful not to get water or any chemical on the headrest bar. Wipe off all moisture 

immediately if any water should get on this part. Failure to do so can prevent the

  headrest from being securely fixed because of corrosion or degradation of friction force 

due to rust.

Do not apply excessive force to the headrest or strike it from above when it is pulled out. 

Doing so can result in damage.

Be sure to hold the headrest when lowering it to store it, and be careful that your fingers, 

hands, and other body parts are not pinched in between the headrest and the backrest.

Be sure to always store the headrest when performing a back shampooing. Otherwise, 

the shampoo bowl will interfere with the headrest possibly resulting in breakage.

Summary of Contents for LANCER

Page 1: ...o 15 16 to 17 10 1 Guiding Customers 2 Raising Lowering the Chair 3 Reclining Raising the Backrest 4 Using Preset Functions Power Supply The picture shows AB HPPN Model No AB HPPN AB HPBN L a n c e r...

Page 2: ......

Page 3: ...rious injury This indicates that failure to obey the corresponding warning and the resulting improper operation can result in mild injury or moderate harm and damage This indicates a recommended actio...

Page 4: ...an result in an explosion or fire Lightning rods and telephone dedicated grounding wire Do not connect the earth ground to the following objects Do not allow a customer to lie face down on the chair S...

Page 5: ...raising chair rotation legrest operation or nearby There is a danger of body parts being pinched by the chair r esulting in injury or damage Always be sure to lower the chair to the lowest position an...

Page 6: ...body parts being pinched resulting in injury or damage WARNING Only persons who are certified hairdressers or beauticians can be allowed to use this chair This chair is specially designed for providin...

Page 7: ...ake sure that no feet or hands or other objects will be pinched between the step and floor when raising lowering or rotating the chair Turn off the power switch after you are finished using the chair...

Page 8: ...tomer gets on the step Do not use this chair for any applications other than hairdressing beauty related procedures This product is designed for commercial use in barber shops and beauty salons Only p...

Page 9: ...wspaper or other printed items can result in color transfer Contact with printed clothing such as t shirts jeans and similar items can result in color transfer such as by dye adhering to the leather C...

Page 10: ...ovement type AB HPPN PRIME TYPE Legrest Fixed type AB HPBN BASIC TYPE Step Headrest button Rotation lock switch UP DOWN foot switch Rotation lock switch Power switch Breaker Main Unit 8 Operation manu...

Page 11: ...Preset switch P1 5 Preset switch P2 6 Auto return switch 9 Rotation lock switch UP DOWN foot switch Rotation lock switch These are collectively referred to as Foot Control Base Power switch Breaker Co...

Page 12: ...e manufacturer or its distributors or by a technician with equivalent certification 110 120 220 230 240 V AC 7 A or more The chair must absolutely be grounded in order to prevent electric shock Power...

Page 13: ...rol panel The chair is locked and prevented from rotating When the chair rotation lock is released the chair rotation gets locked automatically in the following cases If the power is turned off chair...

Page 14: ...od ventilation Makes it easy to clean up the cut off hair 1 Pull the cape holder located at the edge of the armrest outward and rotate it forward Pull out the cape holder outward by holding around the...

Page 15: ...the foot control or press the UP DOWN switch of the control panel right or left upwards The chair is raised while stepping on pressing the switch UP DOWN foot switch Up switch 2 Lowering the chair To...

Page 16: ...hear clicks when pulling up the headrest are the positions where the headrest can be fixed Be careful in pulling up the headrest more than necessary because doing so will make the headrest to come of...

Page 17: ...e backrest For the synchronized legrest type the legrest rises when the backrest is reclined Be very careful that the step or the customer s feet will not contact any nearby equipment or other items 3...

Page 18: ...Perform the following procedures to change the preset positions 1 Move the chair to the desired position 2 Turn off the power switch and then press and hold down a preset switch P1 or P2 while you tu...

Page 19: ...c pough sound is emitted to notify you that operation is starting Before using the auto return function make sure that no persons or objects are under the step or in the support arm area and operate i...

Page 20: ...er wipe off the stain immediately by using a soft cloth that has been dabbed with a neutral detergent diluted with water to approximately 10 in order to prevent the stain from soaking in due to the pl...

Page 21: ...Is the power plug correctly inserted Abnormal sound at startup Slow movement of the chair Sound when rotating the chair Such sound is due to the internal hydraulic fluid being cold It is not a functi...

Page 22: ...ing the Preset Function under How to Use p 16 If operation is still not normal it might not be possible to safely use the chair Stop using the chair turn off the power unplug the power plug and contac...

Page 23: ...se p 11 If operation is still not normal it might not be possible to safely use the chair Stop using the chair turn off the power unplug the power plug and contact your closest dealer or Takara Belmon...

Page 24: ...values are indicated Unit mm inch Specifications 22 AB HPPN PRIME TYPE Synchronized legrest type AB HPBN BASIC TYPE Fixed legrest type 960 38 500 20 B ackr est leng th 725 29 685 27 When the cape hold...

Page 25: ...standard period for which the chair can be safely used with no impediments to safety under the standard use conditions for each chair and while performing proper mainte nance and inspection including...

Page 26: ...NOTE...

Page 27: ...NOTE...

Page 28: ...TAKARA BELMONT CORPORATION 2 1 1 Higashishinsaibashi Chuo ku Osaka 542 0083 Japan TEL 81 6 6212 3523 FAX 81 6 6211 5745 BOOK No 1E04K3DE Printed in Japan 1710 Original instruction NOTE...

Reviews: