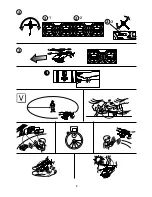
Please check the headings I - V with
the diagrams in pages 2, 3, 4, 5.
I. CONTENTS & FEATURES
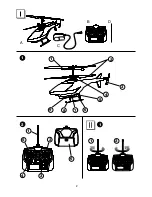
This kit includes:
A. Hoverflash x 1
B. Transmitter x 1
C. Charger x 1
D. Transmitter antenna x 1
The product shown in the figure may
slightly differ from the real ones.
1
Hoverflash
1
Stabilizer
2
Main Rotor
* The rotor has a play structure for
safety, but not completely fixed.
When the rotor starts rotating, the
centrifugal force acts on the rotor
allowing it to operate normally.
3
Tail rotor
4
LED lamp (on top)
5
Body
6
Antenna
* Do not cut the antenna rods.
7
.4V LiPoly battery embedded
8
Skid
9
Charging port / Power switch
(at the bottom)
2
Transmitter
Front
1
Antenna
2
Elevator Stick
3
Switch
4
Rudder trim
5
Throttle stick (left/right)
Rear
6
Battery Door
II. Installation
1
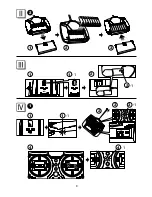
Transmitter Antenna Installation/
Uninstallation
1
Antenna Installation
Turn the antenna clockwise to screw it
in the transmitter body.
The antenna is screw-in type. Securely
screw it in place, otherwise a malfunc-
tion may result from loose antenna
connection.
2
Antenna Uninstallation
Turn the antenna counterclockwise to
remove it. When housing the antenna,
retract it from the root rib for avoiding
bending of the antenna rod.
3
Transmitter Battery Installation
Use eight AA batteries for the
transmitter.
1
Slide open the BATTERY DOOR in
the direction shown in the figure.
2
Insert the BATTERY with correct
polarity (+/-).
Insert AA BATTERIES with the
polarity (+/-) as shown.
3
Replace BATTERY DOOR, following
the removal procedure in reverse.
* When the capacity of the batteries
becomes low, Power LED lamp
changes from steady to blinking.
You need to replace the batteries,
otherwise a malfunction may occur
due to shortened operating
distance.
III. Built-in Battery Charging
Instructions
A rechargeable battery is built into the
helicopter body. Be sure to charge the
battery before you use it. The built-in
LiPoly battery, if not handled properly,
may explode, cause burns or catch fire
resulting in a serious accident.
Read “Handling of LiPoly Batteries and
Charger” and handle the battery
properly.
1
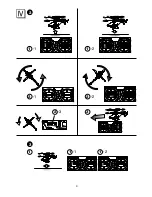
Set the power switch of the
helicopter to “OFF”, insert the
charger connector to the charging
port on the helicopter then plug the
charger to a standard wall outlet.
1
-1 Charging port.
2
LED lamp on charger will light to
show charger is operating.
2
-1 LED lamp
3
When charge is complete, the LED
lamp goes off. Remove the charger
connector from the charging port
on the helicopter then unplug the
charger from the wall outlet.
* Battery charging time varies with
battery level. As a guide, it takes ap-
prox. 1 hour when the battery is near
empty, or 0 minutes if half-empty.
Important:
• To prevent overcharge of batteries,
observe the following instructions:
Do not re-peak a LiPoly battery that
has peaked. The battery, if not used
to fly the helicopter, does not require
recharging in the first one or 2 hours
after a charge.
IV. How to Fly
1
Preparation for Flight
1
Turn on the switch on the heli-
copter body, then the LED lamp
starts blinking. When the LED lamp
changes to steady, the helicopter
becomes ready for flight.
1
-1 LED lamp
2
Completely extend the transmitter
antenna.
3
Turn on the switch on the trans-
mitter. Then, the LED lamp starts
blinking.
3
-1 LED lamp (blinking)
4
Move the throttle stick to the top
position then to the bottom. The
transmitter gets ready when the
LED lamp changes from blinking
to steady. (This procedure aims to
prevent misoperations.)
4
-1 LED lamp (steadily lighting)
5
Stay at least 4 or 5 m (10–15 ft) away
from the helicopter before flying it.
6
Check safety of environment around
you. Now you are ready if no ob-
stacles exist.
2
Transmitter Functions
1
Throttle stick (left) (UP/DOWN)
Moving the throttle stick up allows
the helicopter to ascend, and
moving the stick back makes the
helicopter descend.
1
-1 Up
1
-2 Down
2
Rudder stick (left) (Left / Right)
Moving the rudder stick left allows
the helicopter to turn left, and
moving the stick right makes the
helicopter turn right.
2
-1 Left turn
2
-2 Right turn
2
- Rudder trim
* If the helicopter rotates, adjust the
rudder trim to stop the rotating.
* Move the rudder trim right if the
helicopter rotates rightward, and
move the rudder trim left if the
helicopter rotates leftward.
3
Elevator stick (right)
Moving the elevator stick up allows
the helicopter to fly forward.
3
Fly the Helicopter
Flying an R/C helicopter in air requires
a number of operations to be carried
out concurrently. Get the feeling
through training so that your fingers
naturally move. Though learning all at
once is a tough job, you may find it
easy to learn one by one. You can get
skilled after training though you may
not successfully fly the helicopter at
the beginning.


