background image

Working with Company E-mails and Meeting Appointments  127

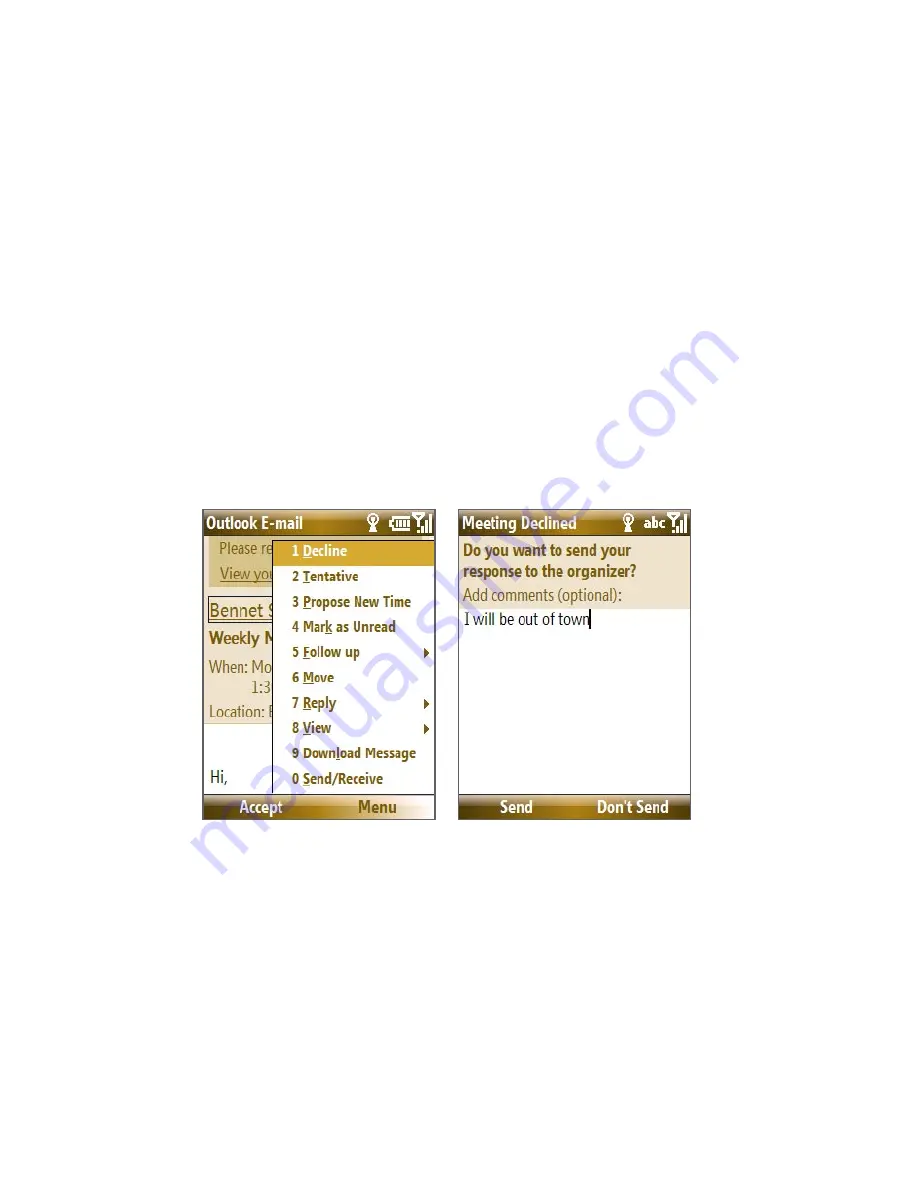
To reply to a meeting request

1. 

When there’s an incoming e-mail with a meeting request, a 

notification message will be displayed on your phone’s Home screen. 

Scroll to 

Outlook e-mail

 and select it.   

2. 

In the Outlook message list, select the e-mail to open it.

3. 

Select 

Accept

 to reply and accept the meeting request, or select 

Menu > Decline

 if you cannot attend the meeting.

Tips


  Before responding, you can check your availability during the time of 

the requested meeting by selecting 

View your calendar

.

  If the time of the meeting conflicts with your other appointments, a 

“Scheduling Conflict” status appears on top of the e-mail.

3. 

Choose whether or not to edit the response e-mail before sending 

and then select 

OK

:


4. 

If you accepted the meeting request, it will automatically be added as 

an appointment in Calendar on your phone.

To view the list of meeting participants

1. 

Select 

Start > Calendar

.

2. 

Open a meeting request that you previously sent, then select 

Attendees

. The list of required and optional attendees will be listed.

Summary of Contents for KII0160

Page 1: ...User Manual...

Page 2: ...Telekom AG Shadow is a trademark myFaves and the myFaves design are service marks of T Mobile USA Inc Microsoft MS DOS Windows Windows NT Windows Server Windows Mobile Windows XP Windows Vista Active...

Page 3: ...420 5 416 797 All other company product and service names mentioned herein are trademarks registered trademarks or service marks of their respective owners T Mobile shall not be liable for technical o...

Page 4: ...ded earthed before connecting this product to the computer The power supply cord of a desktop or notebook computer has an equipment grounding conductor and a grounding plug The plug must be plugged in...

Page 5: ...allowing of the battery Consult the doctor immediately if the battery is swallowed If the battery leaks Do not allow the leaking fluid to come in contact with skin or clothing If already in contact fl...

Page 6: ...plosion or fire resulting in bodily injury or even death EXPLOSIVE ATMOSPHERES When in any area with a potentially explosive atmosphere or where flammable materials exist the product should be turned...

Page 7: ...ternal RF energy Your physician may be able to assist you in obtaining this information Turn the phone OFF in health care facilities when any regulations posted in these areas instruct you to do so Ho...

Page 8: ...e g battery contacts is exposed to water The color of the LDI changes from white to red when the phone s sensitive area is exposed to water LDI The product has been dropped or damaged There are notice...

Page 9: ...an unstable table cart stand tripod or bracket Any mounting of the product should follow the manufacturer s instructions and should use a mounting accessory recommended by the manufacturer Avoid unsta...

Page 10: ...ing Service 23 Chapter 1 Getting Started 25 1 1 Getting to Know your Phone and Its Accessories 26 1 2 Inserting the SIM Card 32 1 3 Installing a microSD Card 34 1 4 Charging the Battery 34 1 5 Turning...

Page 11: ...e Call 55 2 4 In Call Options 56 2 5 Additional Dialing Information 58 Make an emergency call 58 Make an international call 58 Insert a pause or long pause in a dialing sequence 58 Chapter 3 Synchroni...

Page 12: ...e and maintenance options 71 4 2 Adding and Removing Programs 72 4 3 Using Task Manager and Managing Memory 73 4 4 Managing and Backing Up Files 74 Copy files using Windows Mobile Device Center Active...

Page 13: ...1 Messaging 98 6 2 Text Messages 99 Compose and send text messages 99 Receive text messages 99 6 3 Picture Messages 100 Create and send Picture Messages 100 View reply to and block Picture Messages 1...

Page 14: ...s on the Exchange Server 124 Flag your messages 125 Out of office auto reply 125 View a document linked to an e mail message 126 7 3 Managing Meeting Requests 126 7 4 Finding Contacts in the Company D...

Page 15: ...Windows LiveTM contacts 156 Send instant messages 157 Personalize the messenger 159 8 11 Windows LiveTM Search 159 Chapter 9 Experiencing Multimedia 161 9 1 Camera 162 Take a photo or capture a video...

Page 16: ...IDlets MIDlet suite 181 Chapter 10 Using Other Applications 183 10 1 Microsoft Office Mobile 184 10 2 Microsoft Office Word Mobile 184 View documents 184 Edit and send documents 185 10 3 Microsoft Off...

Page 17: ...Welcome to T Mobile Introduction T Mobile Services and Applications Activating Service...

Page 18: ...omer Care The T Mobile Customer Care team offers responsive and knowledgeable customer support 24 hours a day seven days a week In addition you can always access free online help for your device at su...

Page 19: ...iting and call hold Conference calling Call forwarding Note Log on to www my t mobile com to set up international calling See www tmobile com international for rate and other information on internatio...

Page 20: ...t messaging allows you to send receive and reply to short text messages using your device Messages may be sent to and from mobile devices that support text messaging You may be charged for using text...

Page 21: ...y ve numbers on any network even landlines One touch calling text messaging and photo sharing No domestic roaming or domestic long distance charges Personalize contacts with favorite pictures or downl...

Page 22: ...www my t mobile com or contact Customer Care at 1 800 937 8997 to activate international calling features Inform the representative that you want to use T Mobile service voice and data internationally...

Page 23: ...he Service Agreement 1 Have your service agreement and the following information ready for your Activations representative Name home address home phone preferred billing address Note For business and...

Page 24: ...24 Welcome to T Mobile...

Page 25: ...ting the SIM Card 1 3 Installing a microSD Card 1 4 Charging the Battery 1 5 Turning On the Phone 1 6 The Home Screen 1 7 Programs On Your Phone 1 8 Using the Start Menu 1 9 Using the Quick List 1 10...

Page 26: ...26 Getting Started 1 1 Getting to Know your Phone and Its Accessories 11 12 1 3 4 5 6 7 9 14 2 13 10 8...

Page 27: ...e to dial phone numbers enter information and write messages 8 Alt Key Press once to let you type symbols and enter numbers in text fields Press twice for continuous symbol or number entries 9 Symbol...

Page 28: ...28 Getting Started 19 15 22 23 20 16 17 18 21...

Page 29: ...microSD card slot Remove the cover to insert a microSD card 19 Microphone Speak into the microphone when receiving or making a phone call or during voice recording 20 CAMERA Press to open the Camera p...

Page 30: ...ry is not installed or battery is over discharged Flashing green Connected to the network Flashing red Battery very low less than 10 Flashing amber Battery temperature is hotter or colder than the fun...

Page 31: ...o charge the phone 3 Audio Charging cable Allows the use of a travel charger AC adapter while you re using a stereo headset with your phone 4 Stereo headset Provides a volume control slider and a Send...

Page 32: ...remove the battery 1 Hold the phone in one hand facing down in the palm of your hand and then with your thumb press the top of the phone 2 With your other hand press the back cover downwards and slide...

Page 33: ...eel latch 2 Push up the steel latch and then slide out the SIM card Steel latch SIM card Push up the steel latch Replace the battery 1 Align the exposed metal contacts on the edge of the battery with...

Page 34: ...f the slot Remove the cover from here 1 4 Charging the Battery You can charge the battery by using either the AC adapter or the USB cable that came in the box Note You should only use the AC adapter a...

Page 35: ...applications and settings that you frequently use on your phone Press NAVIGATION up down to go through the icons on the Shortcuts Bar left panel of the screen When an icon is selected you can then sc...

Page 36: ...icon T Mobile myFavesSM contacts or photos in your phone 10 Depending on the Shortcuts Bar icon selected this displays the myFaves contact name names of the item associated with the Shortcuts Bar icon...

Page 37: ...tification Message Center Gives you quick access to your text message and Picture Message inbox You can also open Voice Notes and create a new e mail account here To quickly create a new text message...

Page 38: ...usic player right on the Home screen Use the NAVIGATION WHEEL to scroll through the music in your phone and then press CENTER SELECT to play back and pause music While playing back a song select Full...

Page 39: ...re available on the discs that came with your phone Icon Program Description Accessories Calculator Do basic arithmetic and calculations Clear Storage Clear the memory and restore the phone back to fa...

Page 40: ...ncluding Wi Fi GPRS EDGE Bluetooth and ActiveSync turn the phone on or off enable or disable the Direct Push function and more Contacts Keep track of contact information File Explorer Organize and man...

Page 41: ...essenger myFaves Use T Mobile myFavesSM to stay connected to the people who matter most in your life Simply choose any five U S phone numbers you call most often on any network and have them displayed...

Page 42: ...ogram to log off from T Mobile HotSpot t zones Open a WAP browser and visit T Mobile s t zones Web site to purchase ring tones wallpaper or games to personalize your phone You can also manage your acc...

Page 43: ...and send receive instant messages in Live Messenger Windows Media Player Play back video and audio files 1 8 Using the Start Menu The Start menu is located at the bottom left corner of the Home screen...

Page 44: ...Cancel 1 10 Entering Information You can enter text numbers and symbols by using the 20 key QWERTY keyboard When you select a field that requires entering text or numbers the phone automatically sele...

Page 45: ...ter press and then press the corresponding key To enter a number or symbol labeled in brown color press and then press the corresponding key Press to open the Symbol pad Press and hold to open the inp...

Page 46: ...reen select Start Settings More Accessibility 2 In Multipress time out choose the length of the pause between keypresses and select Done XT9 mode To form a word in XT9 mode press the keys that contain...

Page 47: ...ery performance depends on many factors including T Mobile s network configuration signal strength the temperature of the environment in which you operate your phone the features and or settings you s...

Page 48: ...o your phone Turn it back on only when you need to use it 1 12 Shortcut Key The SHORTCUT KEY on the right side of the phone can be configured to open 2 applications that you set By default briefly pre...

Page 49: ...Connecting to wireless network Synchronizing via Wi Fi Battery level Low battery Very low battery Battery charging No battery or battery fault Lowercase text input Uppercase text input caps lock Upper...

Page 50: ...gnal strength Radio connected or no signal Radio off Vibrate call alert Ringer off Speakerphone on Voice call in progress Data call in progress Calls forwarded Call on hold Missed call Dialing while n...

Page 51: ...Chapter 2 Using Phone Features 2 1 Using the Phone 2 2 Making a Call 2 3 Receiving a Voice Call 2 4 In Call Options 2 5 Additional Dialing Information...

Page 52: ...r the phone number by pressing numeric keys on the keyboard Set ring tones You can choose how to be notified for incoming calls reminders new messages alarms and more To set a ring tone for incoming c...

Page 53: ...a list of names and numbers is displayed as your phone searches Contacts Call History Speed Dial and your SIM card to find a matching name or number For example when you press a key such as 5 names t...

Page 54: ...card select Menu Save to SIM Make a call from Call History 1 On the Home screen select Start Call History 2 Select a name or number and press In the Call History screen press CENTER SELECT to view de...

Page 55: ...nts of your SIM card to load 2 Choose the contact you want to call and select Menu Dial 2 3 Receiving a Voice Call When you receive a phone call you have the option to answer ignore or reject it You c...

Page 56: ...Options Note Call Waiting should be enabled and supported for you to be notified of an incoming call when you are using the phone To enable Call Waiting select Start Settings Phone Call Waiting Provid...

Page 57: ...The icon appears at the top of the screen To turn off the Speakerphone during the call select Menu Speakerphone Off Alternatively the speakerphone can be toggled on and off by pressing and holding dur...

Page 58: ...l calls or phone numbers require a pause or long pause in the dialing sequence in order for the call to process successfully 1 On the Home screen select Start Contacts 2 Select the contact and press C...

Page 59: ...our Computer 3 1 About Synchronization 3 2 Setting Up Windows Mobile Device Center on Windows Vista 3 3 Setting Up ActiveSync on Windows XP 3 4 Synchronizing With Your Computer 3 5 Synchronizing via B...

Page 60: ...in this chapter Ways to synchronize After you have installed the synchronization software to your computer synchronize your phone with your computer by using one of the following Connect and synchroni...

Page 61: ...etting Started Disc that came with your phone Set up synchronization in Windows Mobile Device Center 1 Connect your phone to your PC Windows Mobile Device Center configures itself and then opens 2 On...

Page 62: ...u will find the system requirements for ActiveSync 4 5 Install ActiveSync 1 Insert the Getting Started Disc into the disc drive on your PC 2 Click Setup and Installation 3 Select the ActiveSync check...

Page 63: ...er the PC or your phone Start and stop synchronization You can also manually start and stop synchronization either from your phone or PC From your phone 1 After connecting your phone to your PC select...

Page 64: ...out in ActiveSync Options on your phone You can only select or clear these items from Windows Mobile Device Center or ActiveSync on your computer A PC can have sync partnerships with many different Wi...

Page 65: ...nd the computer are turned on and set to Visible mode For more information see Bluetooth in Chapter 8 4 Select Menu Connect via Bluetooth 5 If this is the first time you have connected to this compute...

Page 66: ...edia can be synchronized you must do the following Install Windows Media Player 11 on the PC Windows Media Player 11 works only in Windows XP or later versions Connect your phone to the PC with a USB...

Page 67: ...1 Personalizing Your Phone 4 2 Adding and Removing Programs 4 3 Using Task Manager and Managing Memory 4 4 Managing and Backing Up Files 4 5 Protecting Your Phone 4 6 Restarting Your Phone 4 7 Resetti...

Page 68: ...Start Pictures Videos 2 Select the picture you want to set as the background Select View or press CENTER SELECT for a larger view of the image 3 Select Menu Use as Home Screen 4 Use the NAVIGATION WH...

Page 69: ...hat determine how your phone will alert you to phone events such as incoming calls and notifications To change the current profile 1 On the Home screen scroll down to on the Shortcuts Bar then select...

Page 70: ...ocated on your phone you can use it for a ring tone notification or reminder Sound files in either wav mid wma or MP3 formats can be used 1 Connect the phone to your PC using a USB connection 2 On you...

Page 71: ...at is displayed on the screen In Multipress time out set the length of time between keypresses when entering text in Multipress mode In Confirmation time out set the delay before an unconfirmed action...

Page 72: ...art Settings About To find the phone specification On the Home screen select Start Settings System Information 4 2 Adding and Removing Programs Before you purchase additional programs for your phone m...

Page 73: ...tart Settings More About 2 Scroll down to Available Memory To close running programs in Task Manager Task Manager allows you to close programs currently running on your phone to free up storage space...

Page 74: ...your phone for files that you want to copy to your PC 4 Select and copy the files Ctrl C and then paste them Ctrl V to the destination folder in the PC Copying a file results in separate versions of a...

Page 75: ...e s properties sort the files and more To send a le as an e mail attachment 1 In File Explorer select a file and select Menu Send 2 On the Messaging screen select an e mail account 3 The file will aut...

Page 76: ...o make a note of your personal identification number PIN When the SIM PIN is enabled you must provide this PIN to unlock the phone 1 Select Start Settings Security Change SIM PIN 2 In Old PIN enter th...

Page 77: ...the keyboard is closed open the keyboard Note If a password has been enabled you will be prompted for the password when you unlock the phone To disable the phone lock Select Unlock and then enter the...

Page 78: ...l your data will be deleted it is recommended that you back up your data first before resetting your phone To reset your phone 1 Select Start Accessories Clear Storage 2 Follow the on screen instructi...

Page 79: ...how you want to check for updates Manual or Automatic then select Next Note If you select Automatic choose whether or not to use your data plan to check for updates 4 Select Finish To change Windows U...

Page 80: ...80 Managing your Phone...

Page 81: ...Chapter 5 Organizing Phone Information 5 1 Contacts 5 2 SIM Manager 5 3 T Mobile myFavesSM 5 4 Calendar 5 5 Tasks 5 6 T Mobile Address Book 5 7 Voice Recorder 5 8 Voice Notes...

Page 82: ...identify who is calling you you can assign a custom ring tone to each Outlook contact To assign a custom ring tone scroll down to and select Custom ring tone and select the ring tone you want To assi...

Page 83: ...umber of the contact until the contact is displayed When you press a key such as 5 you find names that begin with G and H as well as phone numbers that start with 5 The next key you press continues to...

Page 84: ...a text message 1 On the Home screen select Start Contacts and then select the contact whose information you want to send 2 Select Menu Send Contact Text Multimedia Select the contact information that...

Page 85: ...one contacts to the SIM card Only one phone number per contact name can be stored on a SIM card When you copy a contact that has several phone numbers to your SIM card SIM Manager saves each number un...

Page 86: ...e name if desired then enter your mobile phone number 4 Select Save When your phone number is stored on the SIM card it will appear on the SIM Manager screen 5 3 T Mobile myFavesSM T Mobile myFavesSM...

Page 87: ...otification icon appears on the bottom right side of the myFaves contact if there is a new message and or missed call from that myFaves contact Notification icons Turn the NAVIGATION WHEEL to go throu...

Page 88: ...d or Anniversary reminder check boxes according to your preference and enter the date 6 Set a Reminder for each event On the day of the reminder a screen will open letting you quickly call send a text...

Page 89: ...2 In the Options menu select one of the following Edit Profile Modify the contact s name phone number or photo Edit Email Add or change the e mail address of the selected contact Replace Contact Repl...

Page 90: ...e To schedule an appointment 1 On the Home screen scroll down to on the Shortcuts Bar then select New Appointment 2 Enter information about the appointment To schedule an all day event in End time sel...

Page 91: ...ect Start Calendar 2 Schedule a new appointment and then scroll down to Attendees and select No Attendees Select Add Required Attendee or Add Optional Attendee to add the contacts you want to send the...

Page 92: ...create a task 1 On the Home screen select Start Tasks 2 Select Menu New Task 3 Enter the necessary task information and select Done Set a Priority for the task This item can be referenced when sorting...

Page 93: ...u need an active connection e g EDGE for you to use T Mobile Address Book To set up T Mobile Address Book 1 Select Start T Mobile Address Book 2 Select Yes to begin the setup process You will then be...

Page 94: ...ing 4 Select Stop to stop recording a voice recording To delete a voice recording 1 On the Home screen select Start Accessories Voice Recorder 2 Select the voice recording to delete and select Menu De...

Page 95: ...ur mouth 3 Select Record to start recording your voice clip You can select Pause to temporarily stop recording When you want to continue recording select Resume 4 Select Stop to stop recording Note Se...

Page 96: ...96 Managing your Phone...

Page 97: ...Chapter 6 Exchanging Messages 6 1 Messaging 6 2 Text Messages 6 3 Picture Messages 6 4 Using Instant Messaging 6 5 Set Up E Mail 6 6 Using E mail 6 7 Using Keyboard Shortcuts...

Page 98: ...ct the message To access your message accounts select Start Messaging and then select the account you want to open Notifications icon on the Shortcuts Bar Messaging screen While in a messaging account...

Page 99: ...text message select Menu Cancel Message If you want to know if your text message was received before sending the message select Menu Message Options and select Request message delivery notification Re...

Page 100: ...ssages You can compose Picture Messages in a combination of various slides where each slide can consist of a photo audio or video clip and or text To start composing a Picture Message 1 On the Home sc...

Page 101: ...cture message folder screen select Menu Send Receive By default messages are automatically downloaded to your phone To view a Picture Message You can view Picture Messages in several ways Press CENTER...

Page 102: ...klist you will not receive future Picture messages from that number To edit the MMS Blacklist on a Picture Message select Menu Options Message Options Menu Edit Blacklist Here you can remove a number...

Page 103: ...message and select Menu Send IM To send message to unlisted buddy 1 At Buddy List select Menu Send IM to 2 Type your buddy s screen name and select OK 3 Type your message and Menu Send IM To block bu...

Page 104: ...t s ICQ number and nickname 3 Select Add To delete contact 1 At contact list scroll to the contact 2 Select Menu Delete User 3 Select Yes To send message to a contact 1 At contact list scroll to the c...

Page 105: ...itive 4 Scroll to Save password and Auto Sign On and press CENTER SELECT to place checks in the check boxes if desired 5 Select Sign In To sign out 1 At contact list select Menu Sign Out 2 Select Yes...

Page 106: ...ted access to your work and personal email Instantly access your e mail from AOL Yahoo Gmail Microsoft Exchange and many more including any POP3 or IMAP4 e mail server Note Restrictions may apply Cont...

Page 107: ...partnership please do so by following the procedures in Chapter 3 3 To set up your company e mail account on your phone Set up your phone to synchronize via a wireless LAN or over the air connection w...

Page 108: ...tions If you are working offline e mail messages are moved to the Outbox folder and will be sent the next time you connect To add an attachment to an e mail 1 In the message that you are composing sel...

Page 109: ...message or Select Menu Download Message To download an attachment In an open message with an attachment to download select the attachment If there is more than one attachment select the other attachme...

Page 110: ...xchange Server 2007 1 Set the message format to HTML To nd out how to set the message format see Customize e mail settings 2 Select Start Messaging select your e mail account and open an HTML e mail t...

Page 111: ...e messages through a remote e mail server Before sending and downloading messages you first need to connect to the Internet or your corporate network 1 Select Start Messaging and select your POP3 IMAP...

Page 112: ...s are immediately delivered when you select Send If you prefer to save outgoing messages to the Outbox folder first clear the check box In this case you will need to manually send messages by selectin...

Page 113: ...rmation type and select Settings 3 Select Menu Advanced 4 In the My e mail addresses text box enter your e mail address 5 Select Done 6 7 Using Keyboard Shortcuts You can use keyboard shortcuts to qui...

Page 114: ...es 4 Press and hold the 0 key until the shortcuts list is displayed Scroll up or down to view the whole list To use a keyboard shortcut Press and hold the respective key For instance to reply to a mes...

Page 115: ...Company E mails and Meeting Appointments 7 1 Synchronizing Your Phone with the Exchange Server 7 2 Working with Company E mails 7 3 Managing Meeting Requests 7 4 Finding Contacts in the Company Direct...

Page 116: ...ection on your phone You need to get the following information from your network administrator and enter them on your phone Exchange Server name must be the Outlook Web Access server name domain name...

Page 117: ...n and select Next 6 Select the check boxes of the types of information items that you want to synchronize with the Exchange Server Tip To change the rules for resolving synchronization conflicts selec...

Page 118: ...n select the E mail check box under Exchange Server Tip To change Exchange Server settings open ActiveSync on your phone and select Menu Configure Server Set up an Exchange Server connection from your...

Page 119: ...s your username password and domain 5 Click Set Up 6 On Windows Mobile Device Center s Home screen click Change content sync settings 7 Select the check box of items you want to synchronize with the E...

Page 120: ...c in Chapter 3 and make sure to select the Synchronize directly with a server running Microsoft Exchange option in the Synchronization Setup Wizard 4 If you have synchronized your phone with your PC b...

Page 121: ...ynchronize wirelessly For more information about connecting to the Internet see Chapter 8 After you finish setting up an Exchange Server connection your phone automatically starts synchronization You...

Page 122: ...ontacts calendar and tasks are also immediately updated onto your phone when these items have been changed or new entries have been added on the Exchange Server To make Direct Push work you need to ha...

Page 123: ...ure will always opt for GPRS EDGE for which you could be charged per your T Mobile s service plan Scheduled synchronization If you do not want to use Direct Push you can set a regular schedule for syn...

Page 124: ...nloading message status appears Wait for the remainder of the message body to be downloaded Tip For information about changing e mail sync options such as the initial download size limit for e mail se...

Page 125: ...low Up and select one of the following options Set Flag Mark the message with a red flag to indicate that it needs follow up Complete Flag Mark the message with a check mark to indicate that the issue...

Page 126: ...o allow access to SharePoint document libraries or internal file servers 1 On the Home screen select Start Messaging 2 Select an e mail account then open a message with a link to a SharePoint document...

Page 127: ...responding you can check your availability during the time of the requested meeting by selecting View your calendar If the time of the meeting conflicts with your other appointments a Scheduling Conf...

Page 128: ...tion to having contacts on your phone you can access contact information from your organization s Company Directory Requirement Access to the Company Directory is available only if your organization i...

Page 129: ...play name E mail address or Office location 7 5 E mail Security Windows Mobile on your phone protects your Outlook e mails through Secure Multipurpose Internet Mail Extension S MIME which allows you t...

Page 130: ...look e mail message that has been digitally signed 2 At the top of the message select View signature status Note You may need to download the rest of the message in order for you to see the name of th...

Page 131: ...ct your e mails from being viewed except by the intended recipients Select Sign messages so that recipients are certain that e mails are sent by you and have not been altered 5 Select Menu Choose Cert...

Page 132: ...e following To allow anyone to read the message select Unrestricted Access To prevent the message from being forwarded printed or copied select Do Not Forward 4 Select Done Tip An IRM protected messag...

Page 133: ...Ways of Connecting to the Internet 8 3 Wi Fi 8 4 GPRS EDGE 8 5 Dial up and Others 8 6 Internet Explorer Mobile 8 7 Using Your Phone as a Modem Internet Sharing 8 8 Bluetooth 8 9 Windows LiveTM 8 10 W...

Page 134: ...off Wi Fi Select Settings Wi Fi to configure Wi Fi on your phone See Wi Fi for details 4 Select to toggle between automatically receiving as items arrive or manually retrieving Outlook e mails See Ch...

Page 135: ...3 Wi Fi Wi Fi provides wireless Internet access over distances of up to 300 feet To use Wi Fi on your device you need access to a wireless access point or hotspot Note The availability and range of yo...

Page 136: ...HotSpot you will see a confirmation screen The icon on the Home screen changes to when you are successfully logged in To log o from T Mobile HotSpot 1 Select Start T Mobile HotSpot HotSpot Status 2 Se...

Page 137: ...ame and password whenever you turn on Wi Fi and try to connect to T Mobile HotSpot Automatic logoff If not selected a message will always display first to confirm whether you want to log off from the...

Page 138: ...i Fi GRPS EDGE or dial up 2 On the Home screen sroll down to on the Shortcuts Bar then select Browse Web 3 Select Menu Favorites HotSpot locator and select Go Note You may need to press one of the SOF...

Page 139: ...the Wi Fi icon the Title bar on the screen to see if you are connected to the Wi Fi network To see the status icons please see Status Indicators in Chapter 1 Notes Wi Fi connects to the default networ...

Page 140: ...network The LEAP Lightweight Extensible Authentication Protocol feature of Comm Manager helps increase security on your phone and ensures that nobody is able to access your network without your permis...

Page 141: ...e if a user name and password are required 1 On the Home screen select Start Settings Connections GPRS New 2 In Description enter a name for the connection 3 In Connects to select The Internet 4 Enter...

Page 142: ...plorer Mobile you must create a URL exception 1 On the Home screen select Start Settings Connections Menu Advanced 2 Select Menu Work URL Exceptions Menu Add 3 In URL Pattern enter the URL name To add...

Page 143: ...ne of the following In the Search bar enter the keyword to use for searching information on the Web then select Select Menu Address Bar enter the Web page address and then select Go Note You may need...

Page 144: ...Menu View and then select the text size and type of view you want to use while browsing a Web page Select Menu Tools to let you send the link via e mail view the page s properties or set Internet Expl...

Page 145: ...mation about setting up a phone dial up connection see Dial up and Others Before using Internet Sharing disconnect your phone from Windows Mobile Device Center or ActiveSync In Windows Mobile Device C...

Page 146: ...Control Panel Network and Sharing Center b Click Manage network connections and then under Personal Area Network double click Bluetooth Network Connection c In the Bluetooth Personal Area Network Dev...

Page 147: ...turn it on and then turn off your phone Bluetooth also turns off When you turn on your phone again Bluetooth automatically turns on To turn on or o Bluetooth on your phone You can enable Bluetooth by...

Page 148: ...ne a message will appear indicating that your phone has connected with the paired device Select OK 7 The name of the paired device is then displayed You may edit and enter a new name for that device t...

Page 149: ...Bluetooth 2 Select Bluetooth and then on the screen select a Bluetooth device 3 Select Menu Delete and then select Yes in the con rmation screen 4 Select Done Connect a Bluetooth hands free or stereo...

Page 150: ...ly 0000 or 1234 If these do not work then refer to headset documentation for the code A message will appear saying that your phone has connected to the headset select OK 6 Enter the display name for t...

Page 151: ...on your computer to visible mode create a Bluetooth partnership then enable your computer to receive Bluetooth beams If your computer has Windows Vista or Windows XP SP2 and your computer s Bluetooth...

Page 152: ...d may be Windows XP C Documents and Settings your_username My Documents Windows Vista C users your_username My Documents Print files via Bluetooth Connect your device to a Bluetooth printer to print c...

Page 153: ...o print contact information procedure 8 9 Windows LiveTM Windows LiveTM gives you full Internet experience on your phone It helps you to find information pursue your interests and get in touch with fr...

Page 154: ...tement After reviewing them select Accept 5 Enter your Windows Live Mail or Hotmail address and password then select Next twice 6 Choose what information you want to synchronize online with your phone...

Page 155: ...Windows Live Messenger settings 4 Select Menu to access and change settings 2 1 3 4 8 10 Windows Live Messenger Live Messenger lets you send and receive instant messages online With this mobile versio...

Page 156: ...ntacts will be added to the contact list on your phone Select OK to add them Signing in may take several minutes depending on your connection speed 3 To sign out select Menu Sign Out Your status chang...

Page 157: ...nstant messages You can send instant messages with emoticons and even talk by sending a voice clip While chatting you can send and receive files directly on a message window You can also start convers...

Page 158: ...ation 6 To end all active conversations select Menu End all conversations To send an instant message with emoticon 1 Select a contact and start a conversation 2 Enter your text message in the text ent...

Page 159: ...s from the contact list Select Menu Add new contact to add a new Live Messenger contact Select Menu Contact options to open a menu where you can view contact properties block the contact remove the co...

Page 160: ...s a list of matched places Use the Navigation Control to browse through the list As you browse the address phone number and estimated distance of a selected item are displayed 4 Select the desired loc...

Page 161: ...Chapter 9 Experiencing Multimedia 9 1 Camera 9 2 Pictures Videos 9 3 Windows Media Player Mobile 9 4 Java Applications...

Page 162: ...ogram go to Task Manager Take a photo or capture a video clip Aim the camera at the subject and then press CENTER SELECT to take the shot When capturing video press CENTER SELECT to start recording pr...

Page 163: ...63 baseline 3gp MMS Video MPEG 4 mp4 H 263 baseline 3gp To change the capture mode On the Camera screen press NAVIGATION right until you see the capture mode icon you want to use on the upper left par...

Page 164: ...can take or remaining duration that can be recorded While recording video this shows the recorded duration 5 Select to open Pictures Videos The Camera Video screen The Recording Status indicator blin...

Page 165: ...nds delays the capturing by the specified time after you press CENTER SELECT Increase or decrease the brightness level When selected press NAVIGATION up or down to adjust the brightness Only available...

Page 166: ...y available in Photo mode When capturing video and Quick Send is enabled the Review screen appears after you stop capturing See The Review screen below for details Select Right SOFT KEY to send the ph...

Page 167: ...capturing a photo or video you will be presented with options that you can do with the captured media file Note The Review screen only appears after a photo or video is captured when Quick Send is di...

Page 168: ...NAVIGATION WHEEL to go to the next page Press CENTER SELECT to open the options associated with the item To change Capture Settings or Advanced settings 1 Press NAVIGATION left right to select either...

Page 169: ...and video files from your PC to your phone using a memory card Insert the memory card into the memory card slot on your phone and then copy them from your PC to the folder you created on the memory ca...

Page 170: ...picture settings and slide show playback preferences Note The available menu options depend on the selected media file When viewing a picture file select Menu Use as Home Screen to set the picture as...

Page 171: ...ternet Explorer 2 In Internet Explorer select Menu Address Bar In the address bar enter http spaces live com then select Go 3 On the Mobile Live Space s Web page select Sign in 4 Enter your E mail and...

Page 172: ...then click Sign In Uploaded picture 9 3 Windows Media Player Mobile You can use Windows Media Player Mobile to play digital audio and video files that are stored on your phone or on a network such as...

Page 173: ...ght hold Rewind a file NAVIGATION left hold About the screens and menus Windows Media Player Mobile has three primary screens Playback screen The default screen that displays the playback controls and...

Page 174: ...You can view the protection status for a file by checking its file properties Menu Properties Synchronize video and audio files Install Microsoft Windows Media Player 11 on your PC to synchronize dig...

Page 175: ...up media synchronization right click Storage Card then click Set Up Sync 5 On the Device Setup dialog box select Sync this device automatically 6 If you created your own playlists select your desired...

Page 176: ...how to play media files To synchronize content manually to your phone 1 If you have not set up synchronization between your phone and PC follow steps 1 to 3 in To synchronize content to your phone aut...

Page 177: ...files copy faster if Windows Media Player is configured to automatically set the quality level for audio files copied to your phone For more information see the Windows Media Player Help Play media Us...

Page 178: ...ayer on your PC you can create playlists and synchronize them with your phone In Windows Media Player Mobile on your phone playlists are available in the Library under the My Playlists category There...

Page 179: ...lications such as games and tools that are specifically designed for mobile devices Java gives you the flexibility of installing and managing additional J2ME applications from the Internet Install and...

Page 180: ...art Applications Java Applications The Java screen appears 2 Select Menu Install Local Files to install the MIDlets on your phone 3 Select the MIDlet MIDlet suite from the list by using the NAVIGATION...

Page 181: ...all All to uninstall all MIDlets To update a MIDlet MIDlet suite Java will search for updates for the selected MIDlet MIDlet suite where it was installed from before 1 On the Java screen select the MI...

Page 182: ...ct Menu New Folder to create a new folder To view protection information of a MIDlet If the MIDlet MIDlet suite is protected by DRM Digital Rights Management there are some restrictions on how you can...

Page 183: ...ns 10 1 Microsoft Office Mobile 10 2 Microsoft Office Word Mobile 10 3 Microsoft Office Excel Mobile 10 4 Microsoft Office PowerPoint Mobile 10 5 Microsoft Office OneNote Mobile 10 6 Adobe Reader LE 1...

Page 184: ...n how to copy files see Managing and Backing Up Files in Chapter 4 10 2 Microsoft Office Word Mobile Microsoft Office Word Mobile gives you editing and viewing capabilities for your Word documents and...

Page 185: ...d in Find What Select Match case and or Whole words only if needed 3 Select Find To close the document Select Menu Close File Edit and send documents In order to edit Word documents or text files you...

Page 186: ...Excel Mobile gives you editing and viewing capabilities for your Excel worksheets To open Excel Mobile Select Start Office Mobile Excel Mobile Note Excel Mobile does not fully support some features su...

Page 187: ...you want to freeze For example if you want to freeze column E and row 4 you should select cell F5 2 Select View Freeze Panes To unfreeze the panes select View Unfreeze Panes To change the zoom ratio...

Page 188: ...Tip You can select multiple cells to delete by selecting Menu Select and then choosing what to select in the worksheet To copy and paste cell contents 1 Select the cell s you want to copy and then sel...

Page 189: ...or Redo Action To save the worksheet 1 Select Menu File Save As 2 Type in the Name you want to use for the edited worksheet and select the Location where you want to save the worksheet 3 Select Save...

Page 190: ...to the previous action or slide of the presentation You can also go to a particular slide in your presentation by pressing the right SOFT KEY to show the Menu and selecting Menu Go to Slide then choo...

Page 191: ...de You can show and activate hyperlinks in slides that you created on Microsoft PowerPoint on your phone 1 Press the right SOFT KEY to show Menu 2 Select Menu Show Links 3 Press CENTER SELECT to activ...

Page 192: ...name a file and set the sort order of the list To create a new OneNote file 1 In OneNote Mobile select New 2 Enter the note by typing in text or by adding pictures or audio You can do the following wh...

Page 193: ...rough a PDF file You can do any of the following Use the NAVIGATION CONTROLS to scroll through the pages Select Menu Go To and select an option to go to a specific page in the PDF file While reading a...

Page 194: ...ce mail Speed Dial uses the next available location by default If you want to place a number in a location that is already used the new number replaces the existing number To retrieve a voice mail mes...

Page 195: ...ner of the screen 1 Select Start Voice Command 2 In Voice Button select the button you want to use and select Done You can set other options in the Voice Command screen To learn about the different op...

Page 196: ...m Name to open programs Use the phrase that you are most comfortable with To request phone status information 1 Hold the phone a few inches away from your mouth 2 Press and hold the SHORTCUT KEY to ac...

Page 197: ...Appendix A 1 Specifications A 2 Regulatory Notices...

Page 198: ...red by the Operating System applications and data the actual available memory is less than what is written Operating system Windows Mobile 6 Standard Display Type 2 6 Transmissive QVGA LCD with white...

Page 199: ...A WAV MP3 codec Ring tone Software polyphonic and standard MIDI format 0 and 1 SMF SP MIDI MP3 AAC AAC WMA WAV and AMR NB Physical Dimension 4 05 inches L x 2 05 inches W x 0 6 inches T Weight 0 23 lb...

Page 200: ...signals Bluetooth connection Expansion slot microSD slot microSD memory card Power supply Battery Li Polymer 920 mAh removable rechargeable battery Talk time Up to 7 hours Standby Up to 175 hours AC...

Page 201: ...und to comply with the limits for a Class B digital device pursuant to Part 15 of the FCC Rules These limits are designed to provide reasonable protection against harmful interference in a residential...

Page 202: ...oduct Use of other accessories may not ensure compliance with FCC RF exposure guidelines The standard incorporates a substantial margin of safety to give additional protection for the public and to ac...

Page 203: ...rom external RF energy Your physician may be able to assist you in obtaining this information Turn your phone OFF in health care facilities when any regulations posted in these areas instruct you to d...

Page 204: ...or dumped with your other household waste You are liable to dispose of all your electronic or electrical waste equipment by relocating over to the specified collection point for recycling of such haz...

Page 205: ...Index...

Page 206: ...51 Bluetooth modem 146 hands free headset 149 modes 147 overview 147 partnerships 148 stereo headset 149 synchronize 65 visible 147 Browsing the Web 143 C Calculator 39 Calendar 40 90 Call History 40...

Page 207: ...verify 130 Direct Push 122 Display time out 72 E E mail 108 security 129 settings POP3 IMAP4 112 Emergency call 58 Encrypt messages 130 131 Enter text and numbers 44 Event notification 69 Excel Mobil...

Page 208: ...55 Live Search 40 159 Live Spaces 170 Lock the phone 76 Lock the phone Password 77 M Make call from Call History 54 from Contacts 53 from Home Screen 53 from Speed Dial 55 Managing Meeting Requests 12...

Page 209: ...40 90 Call History 40 Camera 40 Clear Storage 39 Comm Manager 40 Contacts 40 82 Excel Mobile 41 File Explorer 74 Games 40 Handango InHand 40 HotSpot Settings 42 HotSpot Status 42 Instant Messaging 40...

Page 210: ...d appointments 91 Send messages 108 Settings 41 Set up ActiveSync on PC 62 Set Up E Mail 41 106 Set up Home screen 68 SharePoint 126 Share contact information 84 Shortcuts 113 Shortcut Key 48 SIM Mana...

Page 211: ...0 View and reply to Picture Messages 101 View your appointments 90 Visible Bluetooth 147 Voice Command 42 Voice Notes 42 95 Voice Recorder 39 94 Volume Control 29 W Web browser 143 Wi Fi 135 Windows L...

Page 212: ......

Reviews: