8
A short press
on this button switches the unit to
Pause /
static picture
. Press the
-button to resume
playback.
During DVD playback repeated
short presses
of the
button move on to the next single frame of the
film.
Repeated
long presses
(around 2 seconds) during DVD
playback switch to different slow motion speeds. Press
the
-button to stop slow motion.
The
button ends playback.
A short press on this button starts playback, or resumes
playback after a
Pause
.
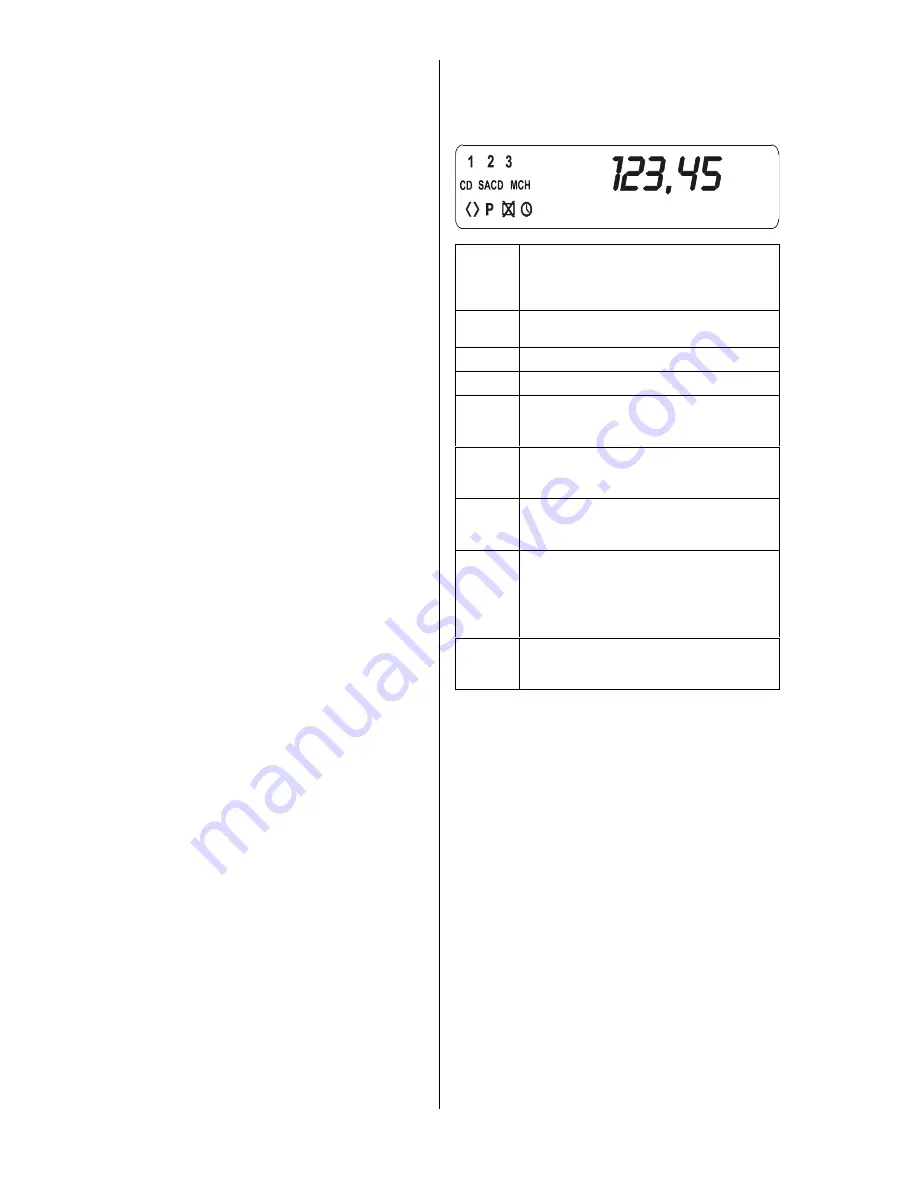
Screen window
All the screen elements of the
SADV 1245 R
are
displayed in a clearly laid-out window on the integral
screen:
1
/
2
/
3
This display area shows the currently active
oversampling algorithm (1...3). If none of the
numbers are lit, the standard algorithm (FIR
Filter) is active.
CD
is lit if a standard audio CD or the CD layer
of a hybrid disc is played
SACD
is lit when a SACD is played
MCH
is lit if a multichannel track is played
This indicator is lit, if the analog output of
the
SADV 1245 R
is switched to high
bandwidth (WIDE-mode).
P
indicates that the P-scan mode (progressive
scan) is active for the YUV component video
output
this indicator is leit, if the video output is
switched OFF (pure high quality AUDIO-
Mode).
123,45
Alpha-numerical display area for indication
of track, time or operation mode.
This area is also used for context depending
messages for example during SETUP
menus.
This indicator is lit, if the WAKE-UP function
is active. (see chapter
'
Preferences /
Functions / Wake Up Timer
'
).
Note:
In case the message
'
OVERHEAt
OVERHEAt
OVERHEAt
OVERHEAt
'
is displayed on the
display, the
SADV 1245 R
has become too hot.
Please make sure that the device is sufficiently supplied
with cooling air and that the air can freely flow around the
case of the device. Read and follow all instructions given
in chapter Setting up the
SADV 1245 R
. Please do not
place the
SADV 1245 R
directly on top of other hot
devices like amplifiers etc.
Summary of Contents for SADV 1245 R
Page 1: ...V1 0 Order No 9103 0325 USER MANUAL SADV 1245 R ...
Page 2: ...2 ...
Page 9: ...9 ...
Page 17: ...17 ...
Page 20: ...20 ...
Page 21: ...21 Menu TOOLBAR overview ...
Page 24: ...24 ...
Page 25: ...25 Menu Preferences overview ...
Page 29: ...29 Menu SETUP overview ...


