background image

53

Setting up


Device approval and conformity with EC directives


In  its  original  condition  the  unit  meets  all  currently  valid
German and European regulations. It is approved for use
as stipulated within the EC.


By  attaching  the 

  symbol  to  the  machine, 

  de-

clares  its  conformity  with  the  EC  directives 

89/336/EEC

,

amended 

by 

91/263/EEC


and 

93/68/EEC

and

73/23/EEC

,  amended  by 

93/68/EEC

  and  the  national

laws based on those directives.


The original, unaltered factory serial number must be pre-
sent on the outside of the unit, and must be clearly legible.
The  serial  number  is  a  constituent  part  of  our  conformity
declaration  and  therefore  of  the  approval  for  operation  of
the  device.  The  serial  numbers  on  the  device  and  in  the
original 

  documentation  supplied  with  it  (in  particular

the  inspection  and  guarantee  certificates),  must  not  be
removed or modified, and must match exactly.


Infringing  any  of  these  conditions  invalidates 

  con-

formity and approval, and the unit may not then be oper-
ated  within  the  EC.  Improper  use  of  the  equipment  ren-
ders  the  user  liable  to  penalty  under  current  EC  and
national laws.


Any  modifications  or  repairs  to  the  unit,  or  any  other
intervention  by  a  workshop  or  other  third  party  not
authorised  by 

,  invalidates  the  approval  and  opera-

tional permit for the equipment.


Only genuine 

 accessories may be connected to the

decoder,  or  such  auxiliary  equipment  which  is  itself  ap-
proved, and fulfils all currently valid legal requirements.

When  used  in  conjunction  with  auxiliary  devices  or  as
part of a system, this unit may only be used for the pur-
poses stated in the section entitled 

'Approved usage'

.


Care of the K6


Always disconnect the unit from the mains supply before
cleaning  it.  The  surfaces  of  the  case  should  be  wiped
clean  with  a  soft,  dry  cloth  only.  Never  use  abrasive  or
solvent-based  cleaners!  Before  switching  the  unit  on

again  check  carefully  that  no  short-circuits  exist  at  the
terminals,  and  that  you  have  not  disturbed  any  connec-
tions.

Switching the remote control address

Switching the K6

If  the 

K6

  responds  to  the  remote  control  commands  in-

tended  for  another  piece  of  equipment  (TV  or  video  re-
corder),it can be switched to an alternative remote control
address. This is the procedure:

Switch  the 

K6

  off,  and  then  on  again.  Immediately  after

switching  on,  press  the 

left-hand  select  button

  under

the  machine’s  front  panel,  and  hold  it  pressed  in  until  a
running script appears on the integral screen.


Select
button

Change

buttons

Release  the  switch,  and  hold  the 

left  select  button

pressed in again until the K6 switches to the next remote
control  address.  The  message  on  the  integral  screen
('

RC-ADR 1'

  or  '

RC-ADR 2'

)  tells  you  the  address

(

RC-ADR

) to which the K6 has now switched.

Switching the remote control address

Now you must set up the address of the 

F6

 RC handset

to match the 

K6

:

Hold  the 

  button  and  the  numeric  button 

pressed  in  simultaneously.  After  about  10  seconds  the
LED will flash. Now press the numeric  button 

  or

.


Pressing  the  numeric  button 

  sets  the  remote

control 

system 

to 

the 

standard 

RC 

address

RC-ADR 1

 ),  whereas  button 

  sets  the  alterna-

tive address (

 RC-ADR 2 

). The LED goes out to confirm

that you have switched the setting.


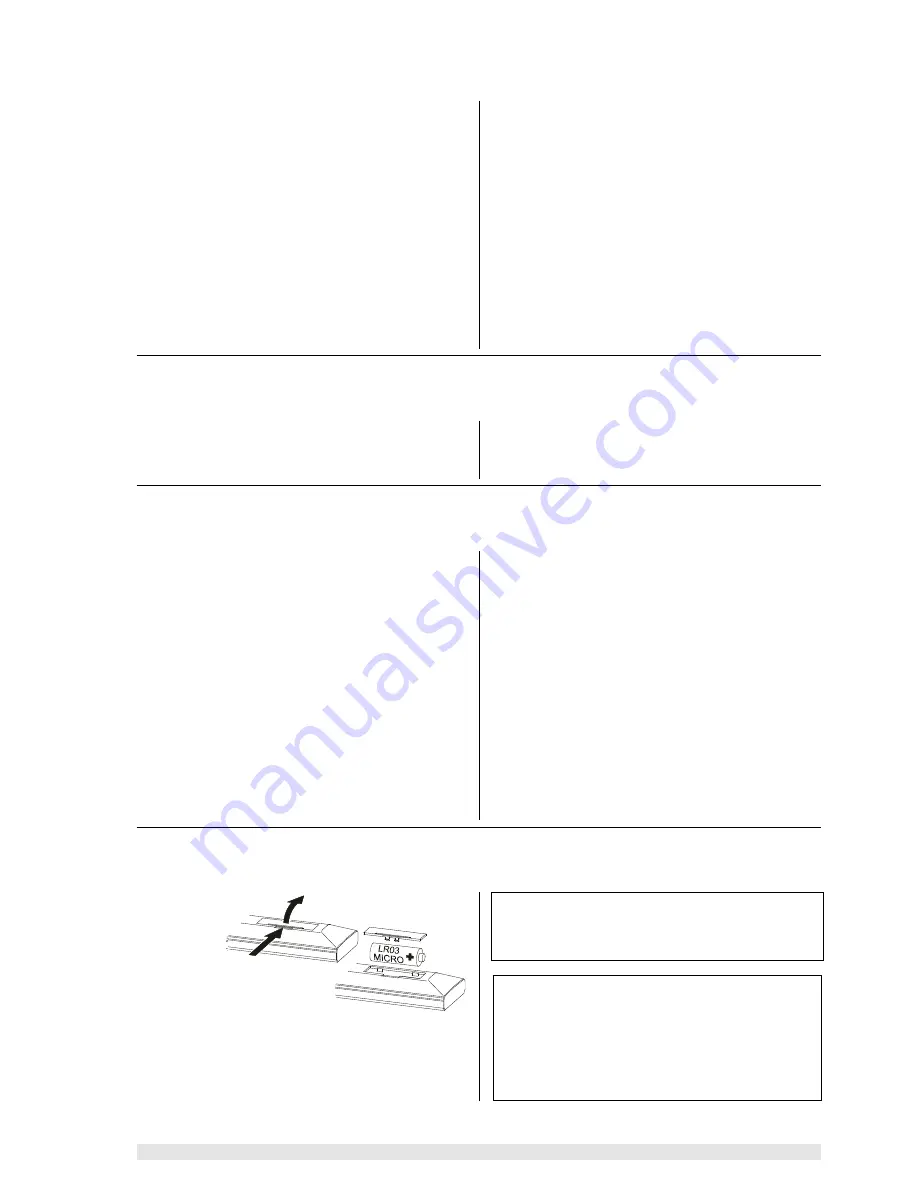
Changing the batteries


To  open  the
battery  com-
partment
disconnect
the  latch  by
pressing  in,
then  lift  the
cover out.


Remove  the
old cells and fit three new dry cells of the 

LR 03 (MICRO)

type  in  the  battery  compartment,  taking  care  to  fit  them
with correct polarity. Please remember that 

all  the  cells

must be replaced

 at the same time.


Note


If  you  have  already  re-set  the  remote  control  system  to
Address  2  (see  above),  you  will  need  to  repeat  the
change procedure after fitting new batteries.


Disposing of exhausted batteries

Exhausted  batteries  must  never  be  thrown  into  the
household waste! They should be returned to the battery
vendor  (specialist  dealer)  or  your  local  toxic  waste
collection point, so that they can be recycled or disposed
in a proper way. Most local authorities provide collection
centres  for  such  waste,  and  some  provide  pick-up
vehicles for old batteries.

Summary of Contents for K 6

Page 1: ...V 6 0 Order No 9103 0264 USER MANUAL K 6...

Page 2: ...ugh these operating instructions It is especially important to ob serve the instructions regarding setting up and operating the equipment and the safety notes We are grateful to you for placing your f...

Page 3: ...earch Slow motion 28 Camera angle Switching audio channels 29 Sub title language Playback variants Repeat Chapter Repeat Title Repeat Disc and Shuffle 30 Disc Menu Function 31 Player Setup Menu Audio...

Page 4: ...e material set top box video recorder to the TV set are not available if the unit is turned off at the primary switch Emergency buttons To the right of the primary switch on the underside of the K6 yo...

Page 5: ...on again a Main display The main display provides context sensitive infor mation regarding the program source or the cur rently active process b Tuner reception mode FM VHF c Tone control settings The...

Page 6: ...elf on automatically at the programmed alarm time press for 2 sec Activates screen angle adjustment The angle is adjusted using the and buttons press again for 2 sec Activates screen brightness adjust...

Page 7: ...ng Press the button briefly to open the Main Menu All changes take effect immediately If the TV set connected to the system is switched on the menu appears on the TV screen At the same time the integr...

Page 8: ...ubwoofer is switched off in the Loudspeaker Menu this menu point in the Main Menu is also set to Off and the subwoofer level cannot be adjusted Note It is essential to set the balance between the othe...

Page 9: ...stereo mode and sound fields The surround receiver remembers the setting for each input and reverts to the mode of operation which was last used when you switch from one input to another Multi channe...

Page 10: ...loudspeakers selected in the Loudspeaker Menu SOUND FIELD SIMULATION The surround processes already described require pro gramme material which is encoded using the appropriate system but the K6 also...

Page 11: ...o grams Calling up additional tuner information Operation With the tuner selected press briefly Brief display of program number and reception fre quency e g P01 98 00 P01 98 00 P01 98 00 P01 98 00 Swi...

Page 12: ...ill be received at opti mum quality when the cross symbol is in the center After carrying out fine tuning the program must be stored again manually see Manual storing of radio pro grams Setting the re...

Page 13: ...s briefly Call up Tuner Menu e g MODE NORM MODE NORM MODE NORM MODE NORM Call up Program Menu PROGRAM PROGRAM PROGRAM PROGRAM Confirm selection e g P01 90 60 P01 90 60 P01 90 60 P01 90 60 Call up Auto...

Page 14: ...he buttons or enter the number directly using the numeric buttons Press the button to clear the Program Press the button to close the Tuner menu Notes If you attempt to clear an invalid Program Number...

Page 15: ...out exchanging pro grams if desired The Tuner Menu and the Program Menu are also displayed on the screen of a TV set connected to the system see illustrations on previous page Explanation All the Tune...

Page 16: ...the station name and in such cases the integral screen displays the tuning indi cator and the reception frequency instead of the station name Other transmitters broadcast the station name as a moving...

Page 17: ...the time of day manually in the Clock menu point by RDS The time of day is read automatically from the RDS signal and accepted by the K6 this only works if a high quality RDS signal is present If you...

Page 18: ...itle language plus dif ferent viewing angles also depending on DVD type are available You will soon discover that the disc player is amazingly simple to operate thanks to the On Screen Display func ti...

Page 19: ...of tracks track times etc then the CD starts playing Notes The drawer can also be opened and closed by moving your hand close to the sensor under the front panel Calling up additional CD player inform...

Page 20: ...a track During playback you can jump from one track to another using the or buttons However you can also enter the number of the desired track directly using the numeric buttons Search To search forwa...

Page 21: ...emble the track select program with the help of the on screen menu Ensure that the TV set is switched on first Selecting tracks Operation with CD inserted but stopped press for 2 sec Switch to program...

Page 22: ...assage press briefly Set start marker e g A A A A 1 1 1 1 or If necessary search for the end of desired passage press briefly Set end marker e g A A A A B 1 B 1 B 1 B 1 press briefly Interrupt play A...

Page 23: ...23 Operation...

Page 24: ...but ton The K6 initially gathers information about the inserted DVD then the DVD starts playing Notes The drawer can also be opened and closed by moving your hand close to the sensor under the front p...

Page 25: ...een shows which passage of the inserted DVD is currently being played The information can be displayed in two different ways 1 Title and Chapter number 2 Title time display of minutes and seconds of t...

Page 26: ...al picture To resume normal playback press the button Ending playback To end playback press the button at any time A select list appears when you stop playback with the last played title rack highligh...

Page 27: ...n is displayed on the screen for 2 seconds every time you press the or button To end the search press one of the buttons or as desired Slow motion Operation With DVD playing press for 2 sec Switch on...

Page 28: ...an be brought up on the screen at any time by a long press approx 2 seconds on the button It stays on the screen for about five sec onds allowing you to select the camera angle Switching audio channel...

Page 29: ...must use the Disc Menu Function to select a different sub title lan guage Playback variants Repeat Chapter Repeat Title Repeat Disc and Shuffle Operation With DVD playing press repeatedly if required...

Page 30: ...playback so that you can change settings Pressing the button to close the Disc Menu Function takes you back to the film Alternative operation press for 2 sec Call up manual menu control system NAV NAV...

Page 31: ...n language provided that it is available on the DVD in the disc drawer If not the sub title display switches to the first available language on the DVD Aspect ratio Default setting 16 9 wide screen If...

Page 32: ...numeric buttons Return to album The picture is displayed Picture mirror Picture rotation Return to chapter page Playing MP3 CDs An MP3 CD can hold up to 32 album directories To select an album directo...

Page 33: ...sections Adjust ments at the TV Set Video Norm Menu and Trou ble Shooting OK OK OK OK OK STOP OK 00 00 00 00 00 00 00 00 00 00 STOP OK 2 40 m 1 80 m 2 10 m 2 40 m 2 40 m 1 80 m STOP OK 00 dB 00 dB 00...

Page 34: ...tant menu point represents an alterna tive to the manual Loudspeaker Menu see below Calling up the Assistant invokes an automated routine for correctly setting up the individual loudspeaker channels o...

Page 35: ...line on the screen you will see the currently set volume following by a flashing indicator informing you which button to press VOL means that the volume is too low VOL means that it is too high The ca...

Page 36: ...ttings satellite for small speakers whose bass re sponse is necessarily limited The low frequency bass signals below 80 Hz of the main channels are mixed onto the subwoofer if present full range for l...

Page 37: ...ow 80 Hz are mixed onto the main loud speakers Note If you switch on the subwoofer in the Loudspeaker Menu you can adjust its level in the Main Menu within the range 10 dB and 10 dB so that its volume...

Page 38: ...ect buttons access the input positions in the following fixed sequence Output channels which are not in use see Loud speaker Menu cannot be edited Main loudspeaker front left FL Center loudspeaker fro...

Page 39: ...output channels which are not in use see Loudspeaker Menu The menu indicates the corresponding input when the hiss sounds from each channel in turn The value can be adjusted using the change buttons...

Page 40: ...06 to 06 Any change you make is immediately audible Use the select buttons to choose the input position you wish to adjust As can be seen in the diagram the select buttons access the input positions...

Page 41: ...tandard Video CVBS This configuration provides the highest quality of all but does require a TV set with automatic RGB CVBS switching RGB priority switching TV sets include this facility RGB capable s...

Page 42: ...tput level of the source device The K6 features an automatic calibration function to carry out this process This is the calibration procedure 1 Select the desired analogue audio or AV source device an...

Page 43: ...y notes This section describes all those matters which are of fundamental importance when setting up and first using the equipment This information is not relevant in daily use but you should neverthe...

Page 44: ...arm up to room temperature so that any condensation evaporates com pletely Before placing the unit on a sensitive surface please check the compatibility of the lacquer and the unit s feet at a non vis...

Page 45: ...de the case Mains voltage is present inside the unit and there is a risk of lethal electric shock Do not exert undue force on the mains connectors Protect the unit from drips and splashes of water nev...

Page 46: ...DIGITAL INPUT OPTISCH and COAXIAL Inputs for digital source devices Both inputs can be assigned to the AV inputs VCR TV B SET TOP BOX TV or AUX AV see Inputs Menu TAPE 2 DIGITAL CINCH Input output soc...

Page 47: ...loudspeakers 2 B Terminals for loudspeakers in adjacent room 2 PRE OUT CONTROL Connection for active loudspeakers to be used as front speakers in the main listening room Note This socket also supplie...

Page 48: ...Setting up 48 Typical wiring diagram Standard arrangement main room Use of banana plugs see the section entitled Rear panel connections...

Page 49: ...49 Setting up Typical wiring diagram Connecting active loudspeakers...

Page 50: ...source devices If you have a source device which generates different video norms but a TV set which is not multi norm ca pable you may have to select the standard video norm for all devices as all eq...

Page 51: ...nection Connecting a digital recorder Connecting an analogue recorder Phono module type PHE MM or MC optional acces sory required Connecting a turn table If a digital output is present Use a Cinch dig...

Page 52: ...his makes it possible to alter the volume in the adjacent room only in the main room you can only alter the volume in that room A TV set in the adjacent room can also be connected to the K6 not in S V...

Page 53: ...and that you have not disturbed any connec tions Switching the remote control address Switching the K6 If the K6 responds to the remote control commands in tended for another piece of equipment TV or...

Page 54: ...oblem No output signal at the loudspeak ers the speaker indicators A B on the integral screen flash Cause 1 The unit is overheating and the protec tion circuit has tripped Remedy Reduce volume and wai...

Page 55: ...Cause Source devices not supplying the switching signal which the TV set re quires to switch over to AV mode Remedy Set television to constant AV opera tion mode Problem Neither on screen menu nor oth...

Page 56: ...up the Inputs Menu and carry out the correct assignment Cause 3 The loudspeakers are switched off Remedy Switch on the speakers using the button Problems in DVD CD mode Problem The disc does not play...

Page 57: ...inks in the cable If necessary fit a new aerial cable Problem After a house move the integral screen still displays the old program names but the stations can no longer be picked up Cause Programs wit...

Page 58: ...tch voltage 9 Gnd Gnd Green In Gnd Gnd Green Out Gnd Gnd 10 Control signal Control signal Control signal Control signal Control signal Control signal 11 Green In Green Out 12 13 Gnd Chroma In Gnd Red...

Page 59: ...for adjacent room Nominal output channel 4 8 80 W 45 W 15 W 10 W Peak output 4 8 90 W 50 W 20 W 15 W Frequency response 0 3dB 2 Hz 150 kHz Slew rate 30 V s Damping factor 300 Total harmonic distortion...

Page 60: ...elektroakustik GmbH Co KG Herford Deutschland Germany Allemagne...

Reviews: