8
installation manual
8. CONNECT THE DRAIN PIPE
8.1 Install The Drainpipe Of The Indoor
●
●
●
●
●
●
The necessary filling amount of refrigerant
Refrigerant volume to be added is calculated according to
outdoor unit installation manual .Be sure to add refrigerant
measuring by a scale. L: The length of the pipe
Please record the quantity added and store it carefully for future
maintenance.
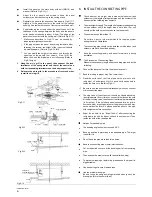
Expel the air with a vacuum pump (Refer to
Fig.7-4
) (Please
refer to its manual for the way of using manifold valve)
Loosen and remove the maintenance nuts of stop valves A
and B, and connect the charge hose of the manifold valve with
the maintenance terminator of stop valve A. (Be sure that stop
valves A and B are both closed)
Connect the joint of the charge hose with the vacuum pump.
Open the Lo-lever of the manifold valve completely.
Turn on the vacuum pump. At the beginning of pumping, loosen
the maintenance terminator nut of stop valve B a little to check
whether the air comes in (the sound of the pump changes, and
the indicator of compound meter turns below zero). Then fasten
the nut.
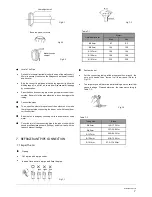
All the stop valves should be opened before test operation.
Each air conditioner has two stop valves of different sizes on
the side of the outdoor unit which operate as Lo-stop value,
respectively. (Refer to
Fig.7-5
)
●
●
●
●
When the pumping has finished, close the Lo-lever of the
manifold valve completely and turn off the vacuum pump.
When you have pumped for over 15 minutes, please confirm
that the indicator of multimeter is on -1.0X10⁵Pa (-76cmHg)
Loosen and remove the square cover of stop valves A and B
to open stop valve A and B completely, then fasten them.
Disassemble the charge hose from the repair-mouth of stop
valve A, and fasten the nut.
-76 cmHg
Lo-lever
Hi-lever
Charge hose
Charge hose
Vacuum pump
Lo-lever
Manifold valve
Multi-meter
Pressure meter
Flare nut
Stopper
Cap
Valve body
Valve stem
Fig.7-4
Fig.7-5
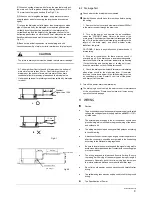
Check all the joints with the leak detector or soap water. (See
Fig.7-6
as a reference illustration)
7.2 Check The Leakage
B
A
D
C
Check-point of indoor unit
Check-point of outdoor unit
A......Lo-stop valve B......Hi-stop valve
C,D..Joints of the connecting pipe to the indoor unit.
Fig.7-6
Be sure to with insulating materials cover all the exposed parts
of the flare pipe joints and refrigerant pipe on the liquid-side and
the gas-side. Ensure that there is no gap between them.
Incomplete insulation may cause water condensation.
7.3 Insulation
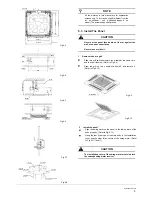
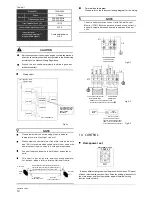
1) The drainpipe can use PVC pipe (external diameter about 37
̚
39mm, inner diameter is 32mm).
2) Joint drainpipe connector to the end side of water pumping pipe,
and fix drainpipe together with water outflow pipe and thermal
insulation tube by clasp of water outflow pipe (attached).
CAUTION
Don’t use forcing strength to crack the water-pumping pipe.
CAUTION
3) Water-pumping pipe and drainpipe from main body must be
wrapped by insulation tube evenly, and bound by tighten band
for obstructing air getting in and coagulation.
4) Prevent from water backflow into unit inside during
shutdown, the drain pipe shall place down side and drain water
to outdoor (drain side), the gradient of the drain pipe should be
higher than (1/100), without salient and water remain.(
Refer to
Fig.8-1 a
)

