background image

Chapter 2: Installation and Setup

11

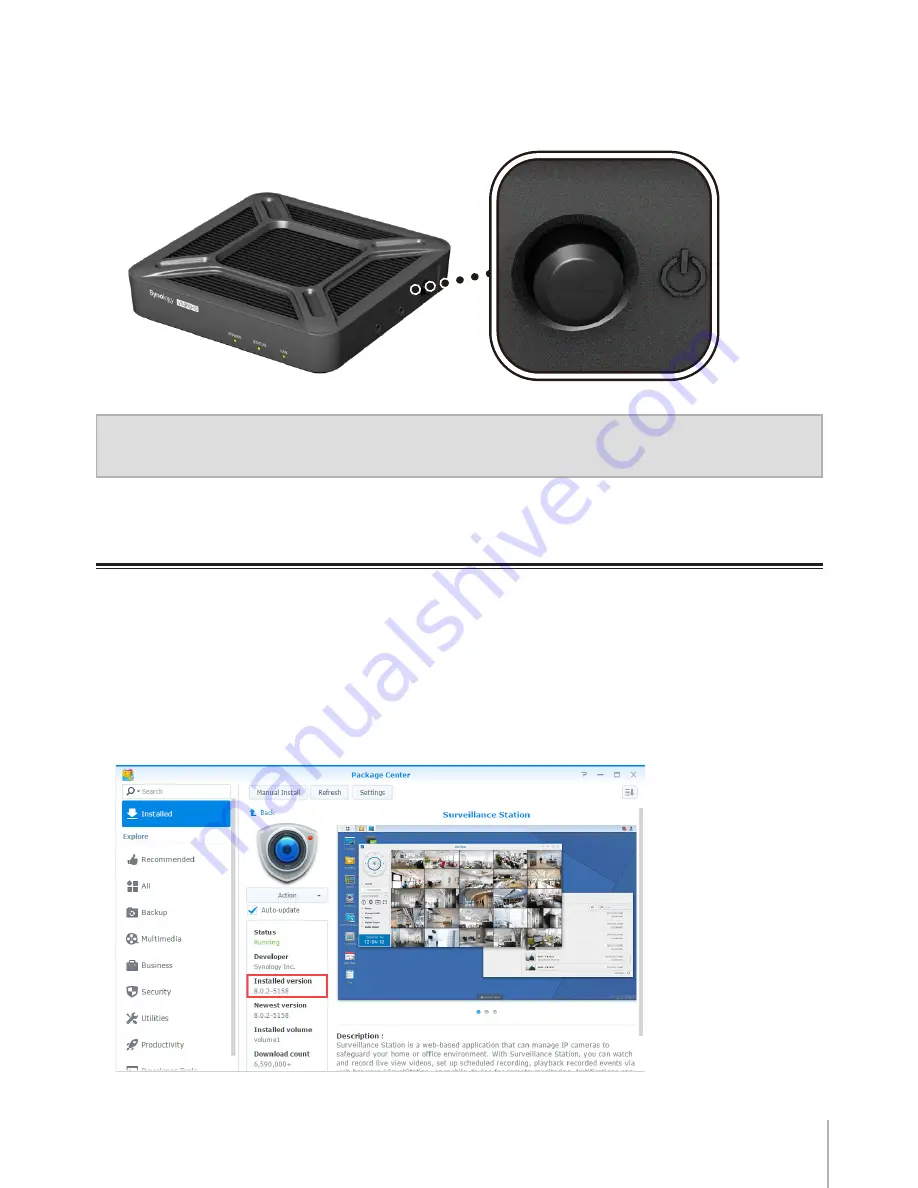
Push the power button on the side panel of VS960HD. After booting up, 

VS960HD will be online and ready to work with your Synology NAS/NVR 

product.

Note:

 Upon powering on, VS960HD may take up to ten seconds to finish booting up. 

During this time, the display is blank.

Check Surveillance Station Software

Before connecting VS960HD to your Synology NAS/NVR product, please make 

sure you have updated Surveillance Station to version 8.0.2 or later on your 

Synology NAS/NVR product in order to utilize all the new features.

To check your Surveillance Station version:

Sign in to your Synology NAS/NVR.

Go to 

Package Center

.

Find and click 

Surveillance Station

. The version number is displayed.

Summary of Contents for VisualStation VS960HD

Page 1: ...Synology VisualStation VS960HD Hardware Installation Guide ...

Page 2: ...tup Tools and Parts for Installation 7 Install Mounting Kit 7 Connect Inputs and Outputs 9 Check Surveillance Station Software 11 Connect VS960HD to your Synology NAS NVR 12 Learn More 12 Appendix A Specifications Hardware 13 Software 14 Other Requirements 14 Appendix B LED Indicator Table Table of Contents Synology_HIG_VS960HD_20170413 ...

Page 3: ...nce Station directly through VisualStation for complete control over your surveillance devices VS960HD can be connected to 2 HDMI displays allowing you to easily operate most features of Surveillance Station without a computer This Hardware Installation Guide will help you complete hardware installation and connect VS960HD to your Synology NAS NVR product Before You Start ...

Page 4: ... Chapter 1 Before You Start Package Contents Main unit x 1 AC power adapter x 1 RJ 45 LAN cable x 1 Hardware installation guide x 1 s11 screws x 5 Mounting plate x 1 Mounting adapter x 1 s10 screws x 10 ...

Page 5: ...more details please refer to Appendix B LED Indicator Table 4 Audio Input Output Right Panel Connect a microphone to Audio Input only for cameras with built in speakers Connect external speakers or earphones to Audio Output 5 Power Button Press to turn VS960HD on or off 6 Power Port Back Panel Connect AC power adapter here 7 LAN Port Connect LAN cable here 8 HDMI 2 Connect HDMI cable here Supports...

Page 6: ...er cord Wipe with damp paper towels Do not use chemical or aerosol cleaners To prevent the unit from falling over do not place on carts or any unstable surfaces The power cord must plug in to the correct supply voltage Make sure that the supplied AC voltage is correct and stable To remove all electrical current from the device ensure that all power cords are disconnected from the power source Risk...

Page 7: ...face with the I O ports facing towards you Attach the mounting plate to VS960HD by installing the included s10 screws in the four spots illustrated below 2 Prepare the monitor by powering it off and removing any connections to it Then place the monitor face down on a flat working surface with the upper edge pointing away from you Attach the mounting adapter to the monitor by installing the include...

Page 8: ...S D 100 In the diagram below the included s11 screws have been installed in accordance with the MIS D 100 type 3 Place VS960HD over the mounting adapter with the I O ports facing towards you Align the screw holes and install the included s10 screws in the four spots illustrated below ...

Page 9: ...ower outlet 2 Connect one end of the LAN cable to VS960HD and the other end to your switch router hub 3 Connect one end of the HDMI cable to VS960HD and the other end to your monitor s In the diagram below one HDMI cable is attached Note VS960HD supports dual displays When two monitors are connected the display can be mirrored or extended ...

Page 10: ... it to the blue USB 3 0 port Skip to the next step if this does not apply to you 5 Connect your USB mouse or joystick to one of the USB ports Skip to the next step if this does not apply to you 6 Connect your USB keyboard to one of the USB ports Skip to the next step if this does not apply to you ...

Page 11: ...p During this time the display is blank Check Surveillance Station Software Before connecting VS960HD to your Synology NAS NVR product please make sure you have updated Surveillance Station to version 8 0 2 or later on your Synology NAS NVR product in order to utilize all the new features To check your Surveillance Station version 1 Sign in to your Synology NAS NVR 2 Go to Package Center 3 Find an...

Page 12: ... Surveillance Station application on VS960HD 2 Sign in to your Synology NAS NVR using an account with the privilege of Surveillance Station To enjoy full experience of Surveillance Station you can use an account belonging to the administrator group Learn More Congratulations Your VS960HD is set up now and you can fully leverage various features powered by Surveillance Station For more information ...

Page 13: ...DMI2 1080p 1920 x 1080 60Hz Audio Input Output 3 5 mm Stereo Audio Jack x 2 Input Output Agency Certifications FCC Class B CE Class B BSMI Class B Language Localization Environment Requirements Line voltage 100V to 240V AC Frequency 50 60Hz Operating Temperature 32 to 104 F 0 to 40 C Storage Temperature 4 to 140 F 20 to 60 C Relative Humidity 5 to 95 RH Note Model specifications are subject to cha...

Page 14: ...6 AMR eMap Yes Snapshot Yes Save to USB drive PTZ Yes For PTZ Cameras Only Patrol Yes For Patrol Cameras Only Log Viewer Yes Firmware Upgrade Yes Via USB drive Note Model specifications are subject to change without notice Please refer to www synology com for the latest information Other Requirements Item VS960HD Surveillance Station Version 8 0 2 or later Supported IP Cameras For a complete list ...

Page 15: ...tic Booting up Shutting down Off Powered off Status Green Static Logged in to a Synology server Orange Static Over temperature Off Not logged in LAN Green Static Gigabit network connected Blinking Gigabit network active Orange Static 10 100 Mbps network connected Blinking 10 100 Mbps network active Off No network ...

Page 16: ......

Page 17: ...Software except and only to the extent that such conduct is expressly permitted by applicable law notwithstanding this limitation d adapt modify alter translate or create any derivative works of the Software e remove alter or obscure any copyright notice or other proprietary rights notice on the Software or Product or f circumvent or attempt to circumvent any methods employed by Synology to contro...

Page 18: ... may not transfer or assign your rights under this EULA to any third party except for that pre installed in the Products Any such transfer or assignment in violation of the foregoing restriction will be void Section 17 Applicable Law Unless expressly prohibited by local law this EULA is governed by and construed in accordance with the laws of the Republic of China R O C or Taiwan without regard to...

Page 19: ...I Products 2 three years after such date for Category II lll Products or 3 two years after such date for Category IV Products or 4 one year after such date for Category V Products or 5 90 days after such date for Refurbished Products except for those sold as as is or with no warranty on Online Store h Web Site means the Synology web site located at www synology com Section 2 Limited Warranty and R...

Page 20: ...FOR AND CUSTOMER HEREBY WAIVES RELEASES AND DISCLAIMS ALL OTHER WARRANTIES OBLIGATIONS AND LIABILITIES OF SYNOLOGY AND ALL OTHER RIGHTS CLAIMS AND REMEDIES OF CUSTOMER AGAINST SYNOLOGY EXPRESS OR IMPLIED ARISING BY LAW OR OTHERWISE WITH RESPECT TO THE PRODUCT ACCOMPANYING DOCUMENTATION OR SOFTWARE AND ANY OTHER GOODS OR SERVICES DELIVERED UNDER THIS WARRANTY INCLUDING BUT NOT LIMITED TO ANY A IMPL...

Page 21: ...ed on a class wide or class action basis The arbitration shall be held in King County Washington U S A by submission of documents by telephone online or in person as determined by the arbitrator at the request of the parties The prevailing party in any arbitration or legal action occurring within the United States or otherwise shall receive all costs and reasonable attorneys fees including any arb...

Page 22: ......

Page 23: ......

Page 24: ...P N 15 05G010020 Printed in Taiwan ...

Reviews: