background image

PAGE 17 

ACCESSORIES 

A) Big Wheel Kit 

 
For those who require the security of extra 
stability while sitting in your chair, we 
provide a big wheel kit option. 
 
The breaking system differs to the smaller 
castors. 
 
To engage the brake, press your foot 
down on the brake plate. 
 
Sliding your foot under the brake plate 
and lifting will release the brake.  

The charger allows you to use the chair in an emergency if the battery is 
flat. Simply connect the charger as specified in the previous section 
 

Powering  the chair off the mains in an emergency 

When recharging use only the charger provided with your chair.  

Ensure the   cable is connected to the socket in the charger and then connect 
the other end to the charge socket at the back of the chair. Marry up the two 
pins from the charger to the two pins in the charge socket from the chair, click 
together, plug the charger into the your electrical supply and turn on to charge. 
A green light will illuminate on the charger when the power is on.  
 
As a safety feature, the mains cable will disconnect from the charger if the chair 
is pulled away whilst still connected to the mains. Simply un-plug from the 
mains supply and re-connect the cable to the charger if this occurs. 

Summary of Contents for Large

Page 1: ...RUCTION MANUAL Low Medium and Large models from January 2014 Symmetrikit is a division of The Helping Hand Company Bromyard Road Ledbury HEREFORDSHIRE HR8 1NS UK Tel 01531 635388 Fax 01531 638059 Email sales helpinghand co uk www helpinghand co uk ...

Page 2: ...al Positions 12 Growth 14 Swing Out Arms 15 Care Instructions 16 Accessories 17 Notes 23 In order for the user to be well supported it is essential that the seating system be adjusted properly to fit The following guide will explain how to simply adjust the chair and give tips on correct settings ...

Page 3: ... in height They can also be tilted swivelled in and out and moved in and out Fold down arms for access The seat width and seat length can be altered Adjustable back height with Kyphotic adjustment Adjustable recline Adjustable headrest Adjustable leg rest Adjustable footrest height and angle True Tilt in Space The chair can be tilted back or forward without altering ankle knee hip back angles Your...

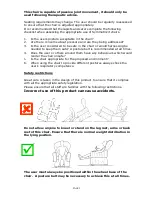
Page 4: ...ide wheels may cause difficulty in moving the chair through narrow doorways This chair is not intended for outdoor use Warning Do not allow children or pets to play with the chair at any time Adequately supervise children in the area near the chair Electric models Always use the isolator switch when the chair is not in use Detach from charger before moving The chair will not operate with the charg...

Page 5: ...ll times 4 Does the user or others around them have any behaviours which would render the chair unsafe 5 Is the chair appropriate for the proposed environment 6 When using the chair to provide different postures always check the user s respiratory competence Safety restrictions Great care is taken in the design of this product to ensure that it complies with all the appropriate safety legislation ...

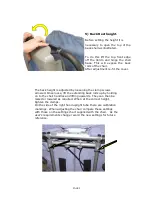
Page 6: ...he seat and anticlockwise to lengthen it When the seat depth is correct the back of the users calf should be around the thickness of two fingers away from front of the leg rest cushion 2 Leg rest settings Before setting the height of the foot rest If fitted it is necessary to open the zips along both sides of the leg rest cover The position of the zips is indicated here ...

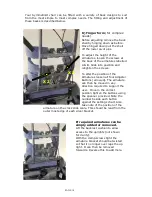
Page 7: ...nd not hanging above it It may be necessary to adjust the angle of the footplate to get the user s foot fully supported The lever to adjust the footplate is underneath the plate and is show in red below To adjust the angle hold the front of the plate with your right hand and reach underneath to the handle Pull the handle back whilst moving the footplate to the required angle It is locked when the ...

Page 8: ...peration as shown below Ensure the area around the leg rest actuator shaft is clear of obstruction before and during operation 4 Leg rest angle Manual To raise the manual leg rest simply lift to the required angle To lower it locate the handle behind the cushion on the left side of the chair Shown here in red Lift the leg rest slightly whilst pulling the lever and then lower to the required angle ...

Page 9: ...justed by loosening the clamp screws arrowed Once loose lift the extending back rods up by holding on to the chair handles and lifting upwards They can then be raised or lowered as required When at the correct height tighten the clamps On the side of the right hand upright tube there are calibration markings When adjusting the chair compare these settings with those on the settings chart supplied ...

Page 10: ... Armatures loosen all four Adjuster Buttons arrowed The armature can then be moved in any direction required to support the user Once in the correct position tighten the buttons using the spanner provided Note the number beside each button against the settings chart Also take note of the position of the armature on the cross slide scale This should be read from the outer most edge of each silver b...

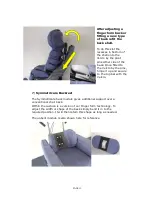
Page 11: ...lcro by the pins hinge it up and secure to the top bar with the Velcro 7 Symmetricare Backrest The Symmetricare back module gives additional support over a conventional chair back Within the cushion is a version of our Finger form technology To adjust the width or shape of the back simply bend it in to the required position It will then retain this shape as long as needed The unbent module is also...

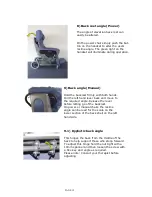
Page 12: ... hand lever back and move to the required angle Release the lever before letting go of the backrest On power or manual chairs the recline angle can be read for the scale on the lower section of the back shell on the left hand side 9 1 Kyphotic back angle This hinges the back from the middle of the back to help support those who stoop forward To adjust this hinge hold the nut tight with a 10mm span...

Page 13: ... desired angle and release the handle On power chairs simply power the chair into the required angle by using the handset The green light on the handset will illuminate during operation 10 1 Tilt in space When tilting the chair keep fingers and hands away from the pivot mechanism 10 2 Tilt in space Ensure the area under the under seat actuator plastic cover and the base tray is clear of obstructio...

Page 14: ...ditional trunk support To adjust this angle remove knob A and loosen knob B By moving the back of the armrest in towards the middle of the chair it is disengaged It can then be moved to the required angle and reengaged in the support To lock tighten both knobs NB You may find it easier to fold the arm out first see next panel 11 Arm rest width adjustment Seat Width To adjust the width between the ...

Page 15: ...he whole arm can easily be swung out of the way To move the arm unscrew the nut towards the back of the chair with your hand After a few turns the arm will start to hinge outwards tucking neatly beside the chair frame Relocating the arm is done by hinging it firmly back up and retightening the nut Ensure that the nut is fully secure before use ...

Page 16: ...wn with a mild disinfectant solution If necessary it can be steam cleaned but it must be thoroughly dried before use Battery maintenance There is a power switch below the arm pivot on the right hand side of the chair which will need to be turned on to allow operation It may be necessary to raise the fabric valance to see it The battery of your chair has been designed to give a good working time be...

Page 17: ...ir off the mains in an emergency When recharging use only the charger provided with your chair Ensure the cable is connected to the socket in the charger and then connect the other end to the charge socket at the back of the chair Marry up the two pins from the charger to the two pins in the charge socket from the chair click together plug the charger into the your electrical supply and turn on to...

Page 18: ...ower tube into the socket provided in the seat frame To remove it simple depress the red knob illustrated below Should it be necessary to change the pommel head size or adjust the height of the pommel first locate screw 1 Once this is loosened the pommel head and the upper bracket can then be moved up down or removed altogether Once in the correct position simply tighten the screw ...

Page 19: ...o fit the standard or padded lap strap first remove the seat cushion and then locate the rear seat mounting straps Take the strap end fittings and attach around the seat mounting using the Velcro fixings provided The main part of the strap can then be fitted through the cam buckles at either end and adjusted for length The side release buckle can then be released ready for use ...

Page 20: ...itional security Remove the seat cushion and locate the rear and side seat mountings Secure the strap with the Velcro fixings ensuring the back labels are on the rear straps The buckle can now be released ready for use Once the client is seated connect the buckle and adjust the strap to suit Refit the seat cushion and pass the strap ends around the sides Check that the strap is fitted correctly by...

Page 21: ...uired Secure the main part of the harness to the chair by passing the wide straps on either side under the seat and joining them with the Velcro provided Replace the seat cushion as shown First remove the seat cushion and fit the rear mounting straps around the lower backrest bar outside the cover Now place the main part of the harness on the seat with the long straps to the back Thread the long s...

Page 22: ...gs should be secured around the lower bar of the backrest using the Velcro provided With the client seated locate the four mounting straps Place the bib in front of the client s chest and secure to the four point lap straps using the cam buckles provided Remove the back cover and locate the headrest hinges A hole must be made in the cover adjacent to these hinges C4 4 Point Chest Harness Standard ...

Page 23: ...PAGE 23 NOTES ...
Page 24: ...PAGE 24 Bromyard Road Ledbury HEREFORDSHIRE HR8 1NS UK Tel 01531 635388 Fax 01531 638059 Email sales helpinghand co uk www helpinghand co uk SCX00010 TILTRITE 2010 USER MANUAL Issue 8 20 01 2014 ...

Reviews: