background image

Symantec Upgrade Installation Guide

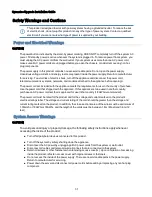
Safety Warnings and Cautions

This product is designed to work with power systems having a grounded neutral. To reduce the risk
of electric shock, do not plug this product into any other type of power system. Contact a qualified
electrician if you are not sure what type of power is supplied to your building.

Power and Electrical Warnings

CAUTION

The power button, indicated by the stand-by power marking, DOES NOT completely turn off the system AC
power. 5V standby power is active whenever the system is plugged in. To remove power from system, you
must unplug the AC power cord from the wall outlet. If your system uses more than one AC power cord,
make sure all AC power cords are unplugged before you open the chassis, or add or remove any non hot-
plug components.

The power supply in this product contains no user-serviceable parts. Do not open the power supply.
Hazardous voltage,current, and energy levels are present inside the power supply. Return to manufacturer
for servicing. To avoid risk of electric shock, turn off the appliance and disconnect the power cord,
telecommunications systems, networks, and modems attached to the appliance before opening it.

The power cord set included with the appliance meets the requirements for use in the country of purchase.
Use the power cord that shipped with the appliance. If this appliance is to be used in another country,
purchase an AC power cord set that is approved for use in that country (18 AWG recommended).

The power cord must be rated for the product and for the voltage and current marked on the product's
electrical ratings label. The voltage and current rating of the cord should be greater than the voltage and
current rating marked on the product. In addition, the cross-sectional area of the wires must be a minimum of
1.00mmð or 18AWG or 18AWG, and the length of the cords must be between 1.8m (6 feet) and 3.6m (12
feet).

System Access Warnings

CAUTION

To avoid personal injury or property damage, the following safety instructions apply whenever
accessing the inside of the product:

n

Turn off all peripheral devices connected to this product.

n

Turn off the system by safety shutting down the appliance.

n

Disconnect the AC power by unplugging all AC power cords from the system or wall outlet.

n

Disconnect all cables and telecommunication lines that are connected to the system.

n

Retain all screws or other fasteners when removing access cover(s). Upon completion of accessing
inside the product, refasten access cover with original screws or fasteners.

n

Do not access the inside of the power supply. There are no serviceable parts in the power supply.
Return to manufacturer for servicing.

n

Power down the server and disconnect all power cords before adding or replacing any non hot-plug
component.

31

Summary of Contents for ASG-S400-20

Page 1: ...ASG S400 20 to 30 Upgrade Kit Product Installation Guide...

Page 2: ...AR PURPOSE OR NON INFRINGEMENT ARE DISCLAIMED EXCEPT TO THE EXTENT THAT SUCH DISCLAIMERS ARE HELD TO BE LEGALLY INVALID SYMANTEC CORPORATION SHALL NOT BE LIABLE FOR INCIDENTAL OR CONSEQUENTIAL DAMAGES...

Page 3: ...e the S400 Series Rear Cover 13 Remove the S400 Series Airduct 14 Install the ASG S400 Memory Modules 15 Install an S400 Series Processor and Heatsink 18 Install the S400 Series Airduct 22 Reinstall t...

Page 4: ...the upgrade kit 1 Verify the contents of the upgrade kit 2 Gather the required tools for installation 3 Prepare the appliance for upgrade kit installation Archive the configuration settings running o...

Page 5: ...continuing with the installation If any items are missing please contact your Symantec Support contact for assistance Model Upgrade Kit Contents ASG S400 20 to ASG S400 30 Upgrade Kit Hard Disk Drive...

Page 6: ...upgrade kit Symantec recommends the following tools and items Item Description Required Tools 2 Phillips head screwdriver Recommended Items Mechanical lift if moving the appliance to a separate worksp...

Page 7: ...e this archive Create a back up of your SGOS configuration using SSH Console session The archive generated in this procedure includes the showable keyrings on the appliance 1 In your terminal emulatio...

Page 8: ...cords after the appliance has been properly shut down To gracefully shutdown the appliance using the shutdown command 1 Review the safety warnings before proceeding See Safety Warnings and Cautions o...

Page 9: ...ese carriers should not be removed when the appliance is in operation For information on where to install hard disk drives refer to the S400 Series HDD configuration table 1 Pull the appliance out of...

Page 10: ...Symantec Upgrade Installation Guide 4 Close the appliance bezel 10...

Page 11: ...ap to your wrist and to the chassis Ensure that the appliance is on an ESD safe work surface or ground the unit appropriately Symantec does not assume responsibility or liability for damage resulting...

Page 12: ...Symantec Upgrade Installation Guide cover rest on top of the front chassis cover 12...

Page 13: ...YS observe proper electrostatic discharge ESD conventions Attach an ESD protective wrist strap to your wrist and to the chassis Ensure that the appliance is on an ESD safe work surface or ground the u...

Page 14: ...s and Cautions on page 31 before servicing your appliance ALWAYS observe proper electrostatic discharge ESD conventions Attach an ESD protective wrist strap to your wrist and to the chassis Ensure tha...

Page 15: ...Safety Warnings and Cautions on page 31 before servicing your appliance ALWAYS observe proper electrostatic discharge ESD conventions Attach an ESD protective wrist strap to your wrist and to the cha...

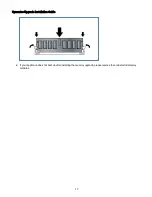
Page 16: ...o https www bluecoat com support support policies recycling blue coat products 2 To install the new memory align the notch in the DIMM with the DIMM slot Be aware that the memory module can only be in...

Page 17: ...Symantec Upgrade Installation Guide 4 If your appliance does not boot up after installing the memory upgrade please remove then reinstall all memory modules 17...

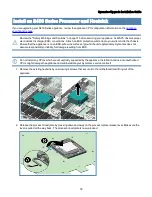
Page 18: ...ce is on an ESD safe work surface or ground the unit appropriately Symantec does not assume responsibility or liability for damage resulting from ESD Do not install any CPUs which are not explicitly s...

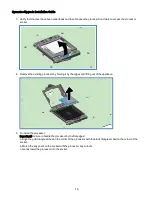
Page 19: ...r by holding it by the edges and lifting out of the appliance 5 To install the processor Important Be sure to handle the processor by the flat edges a Align the gold triangle etched on the corner of t...

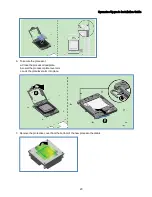
Page 20: ...tion Guide 6 To secure the processor a Close the processor load plate b Lower the processor plate lever arm c Lock the plate lever arm into place 7 Remove the protective cover from the bottom of the n...

Page 21: ...movement of the heatsink after setting it in place 9 Press down on the processor heatsink and secure by tightening the screws using an alternating pattern to distribute the load across the mounting s...

Page 22: ...e servicing your appliance ALWAYS observe proper electrostatic discharge ESD conventions Attach an ESD protective wrist strap to your wrist and to the chassis Ensure that the appliance is on an ESD sa...

Page 23: ...WAYS observe proper electrostatic discharge ESD conventions Attach an ESD protective wrist strap to your wrist and to the chassis Ensure that the appliance is on an ESD safe work surface or ground the...

Page 24: ...ings and Cautions on page 31 before servicing your appliance ALWAYS observe proper electrostatic discharge ESD conventions Attach an ESD protective wrist strap to your wrist and to the chassis Ensure...

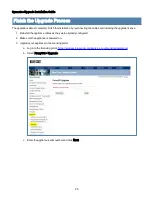
Page 25: ...ing the upgrade license 1 Reinstall the appliance cables as they were originally configured 2 Make sure the appliance is powered on 3 Upgrade your appliance in the licensing portal a Log in to the lic...

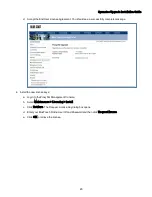
Page 26: ...omplete message 4 Install the new license keys a Log in to the ProxySG Management Console b Select Maintenance Licensing Install c Click Retrieve The Request License Key dialog box opens d Enter your...

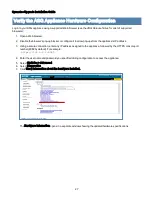
Page 27: ...from the appliance s IP address 3 Using a secure connection enter any IP address assigned to the appliance followed by the HTTPS console port number 8082 by default For example https 192 0 2 2 8082 4...

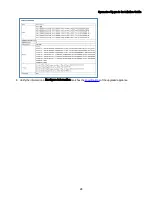
Page 28: ...Symantec Upgrade Installation Guide 8 Verify the information in Hardware Information matches the specifications of the upgraded appliance 28...

Page 29: ...r installing an upgrade kit n The appliance powers on but does not finish booting Resolution Verify that components have been correctly installed n Reseat all DIMMs by removing then reinstalling into...

Page 30: ...antec Upgrade Installation Guide Appendices Safety Warnings and Cautions 31 Appliance Specifications 33 Hard Disk Drive Status LEDs 38 S400 Series Hard Drives 39 S400 Hard Drive Configuration Table 40...

Page 31: ...ase Use the power cord that shipped with the appliance If this appliance is to be used in another country purchase an AC power cord set that is approved for use in that country 18 AWG recommended The...

Page 32: ...e the system only with the chassis covers installed Operating the system without the covers in place can damage system parts To install the covers 1 Check first to make sure you have not left loose to...

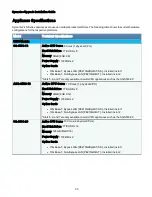
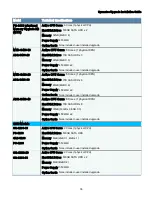
Page 33: ...led in slot 2 Slots 5 6 and 7 are only available on multi CPU appliances such as the SG S500 20 ASG S500 10 Active CPU Cores 10 Cores 1 physical CPU Hard Disk Drives 1TB HDD x 8 Memory 96GB 8GB X 12 P...

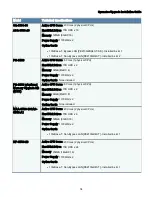
Page 34: ...ply 1100Watt x 2 Option Cards None included PS S500 w optional Memory Upgrade Kit MUK Active CPU Cores 8 Cores 1 physical CPU Hard Disk Drives 1TB HDD x 2 Memory 64GB 8GB X 8 Power Supply 1100Watt x 2...

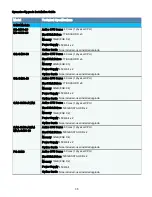
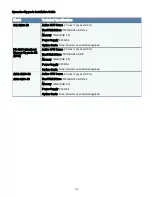
Page 35: ...CPU Hard Disk Drives 1TB SAS HDD x 8 Memory 32GB 8GB X 4 Power Supply 450 Watt x 2 Option Cards None included user installed upgrade CAS S400 A1 A2 Active CPU Cores 4 Cores 1 physical CPU Hard Disk Dr...

Page 36: ...U Hard Disk Drives 1TB SAS HDD x 6 Memory 48GB 8GB X 6 Power Supply 450 Watt x 2 Option Cards None included user installed upgrade ASG S400 40 Active CPU Cores 8 Cores 1 physical CPU Hard Disk Drives...

Page 37: ...user installed upgrade PS S200 w optional Memory Upgrade Kit MUK Active CPU Cores 2 Cores 1 physical CPU Hard Disk Drives 500GB SATA HDD Memory 16GB 8GB X 2 Power Supply 350 Watt Option Cards None inc...

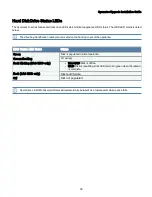
Page 38: ...on the front top cover of the appliance HDD Status LED Color Status Green Disk is populated normal operation Green flashing I O activity Red blinking SAS HDD only l Non RAID Disk is offline l RAID Dis...

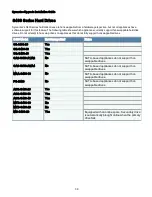
Page 39: ...ble drives S400 Model Hot Swappable Notes SG S400 20 Yes SG S400 30 Yes SG S400 40 Yes CAS S400 A1 A2 No SATA based appliances do not support hot swappable drives CAS S400 A3 A4 No SATA based applianc...

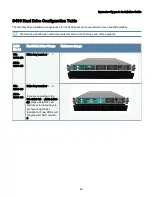
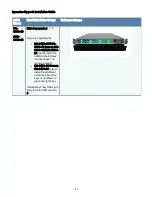
Page 40: ...fication numbers are also located on the front top cover of the appliance S400 Model Hard Disk Drive Usage Reference Image SG S400 20 ASG S400 20 Drive bay number 1 3 SG S400 30 ASG S400 30 Drive bay...

Page 41: ...re upgrading the l SG S400 40 ASG S400 40 from an SG S400 30 ASG S400 30 please install the additional hard drives into drive bays 7 8 shown in green l SG S400 40 from an SG S400 20 please install the...

Reviews: