background image

5.


CYLINDER HEAD/


VALVE 

5-7 


VALVE/VALVE GUIDE 

INSPECTION 

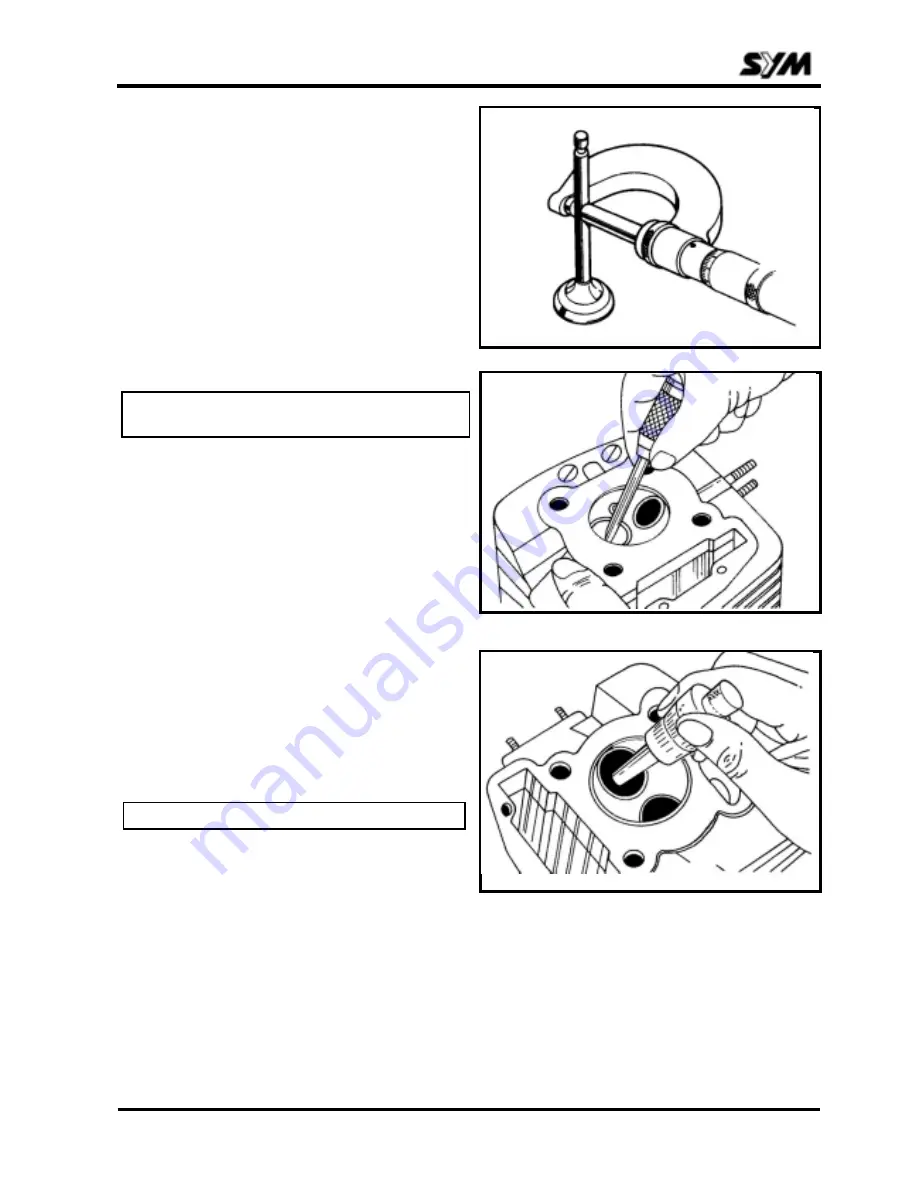
Inspect valves for scratches, burning or wear. 
Check the valve movement in the guide. 
Measure the valve stem O.D.


Service limit: 
                                    Intake: 

5.42mm 

                 Exhaust:

5.40mm 


NOTE: 


Guide I.D. service limit 

Intake: 

5.50mm 

Exhaust : 

5.50mm 


Measure the valve guide I.D. and calculate the stem to 
guide clearance. 
Service limit: 
                              Intake:    0.08mm 
              Exhaust:  0.10mm 
If the stem to guide clearance exceeds the service 
limit, replace the valve or guide to fit.


NOTE: 


Remove any carbon buildup before checking the valve 
guide I.D. 

The guide must be reamed when replacing a new one.

Summary of Contents for NCA250

Page 1: ...the SANYANG NCA250 All information illustrations directions and specifications included in this publication are base on SANYANG NCA250 SANYANG reserves the right to make changes at any time without n...

Page 2: ...ALLATION 4 CYLINDER HEAD VALVE 5 CYLINDER PISTON 6 CLUTCH OIL PUMP GEAR SHIFT 7 A C GENERATOR 8 CRANK SHAFT CRANK CASE TRANSMISSION 9 CARBURETOR 10 HEADLIGHT STEERING FRONT WHEEL FRONT FORK 11 REAR WH...

Page 3: ...s and lubricants or those equivalent When parts are to be reused they must be inspected carefully to make sure they are not damaged or deteriorated and in good usable condition 7 Upon assembling check...

Page 4: ...t Compression ratio Oil capacity Intake valve opens closes Exhaust valve opens closes Valve clearance IN EX Idle speed Air cooled 4 stroke O H C engine Double cylinders 15 inclinde from vertical 53 x5...

Page 5: ...20 180 220 400 500 80 120 400 500 80 120 80 120 80 120 150 250 100 150 FRAME TIGHTEN LOCATION Q TY THREAD DIA mm TORQUE kgf cm Front wheel nut Rear wheel nut Rear fork pivot nut Engine hanger nut Hand...

Page 6: ...d carburetor clogged float chamber fuel tube clogged gasoline cover air hole clogged fuel filter clogged fuel filter screen clogged gasoline auto fuel cup faulty spark plug faulty fouled spark plug CD...

Page 7: ...C Generator fualty valve seat cylinder piston worn gasket leak valve timing incorrect piston ring worn remove and clean remove dirt spark plug improper heat range spark plug clearance misadjustment no...

Page 8: ...oosen screw rich mixture tighten screw no air inlet has air inlet carburetor gasket has air inlet insulator plate gasket poor carburetor locking nut loose insulator plate gasket torn vacuum tube crack...

Page 9: ...r adjustment valve seat faulty normal abnormal check auto fuel cup for fuel supplied too little fuel in the fuel tank fuel tube fuel filter clogged air hole on the fuel tank colgs auto fuel cup faulty...

Page 10: ...ge red wire and frame body grounding with mult meter terminals normal abnormal after engine starter measure the voltage between voltage regulaton rectifier red wire and green wire connected with frame...

Page 11: ...ark plug cap slack check CDI unit plug for slack normal abnormal plug poor contact Check the resistance between the wires terminals of CDI unit normal abnormal Check related portions normal abnormal u...

Page 12: ...TEST 2 6 VALVE CLEARANCE 2 7 IGNITION TIMING 2 8 CAM CHAIN TENSION ADJUSTMENT 2 9 THROTTLE GRIP ADJUSTMENT 2 10 IDLING SPEED ADJUSTMENT 2 11 FRAME AIR CLEANER 2 12 CLUTCH ADJUSTMENT 2 12 BRAKE ADJUSTM...

Page 13: ...I I 11 Screws nuts I I 12 Spark plug I R 13 Clutch I I 14 Frame of lubrication L 15 Exhaust muffler I I 16 Carburetor I I 17 Ignition timing I I 18 Emission I I 19 Idle speed I I 20 Gasoline system I...

Page 14: ...r free play 10 20mm Drive chain stack 10 20mm Front brake lever free play 10 20mm Rear brake pedal free play 20 30mm Throttle grip free play 2 6mm SPECIAL TOOL Valve clearance adjuster TORQUE VALVES R...

Page 15: ...vel is near the lower mark fill the crankcase to the upper level mark with the recommended grade oil OIL REPLACEMENT NOTE Remove the drain bolt and drain the engine oil NOTE Fill the crankcase up to t...

Page 16: ...ually inspect the spark plug electrodes for wear The center electrode should have square edges and side electrode should have a constant thickness Discard the spark plug if there is apparent wear or i...

Page 17: ...9 5kg c 1kg c Low compression can be caused by Improper calve adjustment Valve leakage Blown cylinder head gasket Worn piston rings or cylinder Worn piston High compression can be caused by Carbon de...

Page 18: ...ompression stroke Inspect the intake and exhaust valve clearance by inserting a feeler gauge between the adjusting screw and valve stem valve clearance Intake 0 08mm Exhaust 0 10mm Adjust by loosening...

Page 19: ...ion timing with a timing light Timing is correct if the index mark aligns with the F mark within 3 at 1500rpm Ignition timing 10 BTDC 1500rpm Ignition coil continuity test Check the resistance of the...

Page 20: ...XT 4 ONI 5 ONZ no sparks no sparks no sparks sparks sparks sparks no sparks no sparks CAM CHAIN TENSIONER ADJUESTER The cam chain tension is kept by the tensioner push rod that is compressed by the sp...

Page 21: ...2 INSPECTION ADJUSTMENT 2 10 CARBURETOR THROTTLE GRIP FREE PLAY Check throttle grip free play Free play 2 6mm THROTTLE GRIP ADJUSTMENT Loosen the lock nut and turn the adjuster to adjust ADJUSTER NUT...

Page 22: ...rew to obtain the idling speed of 1100rpm Turn the air screw to the maximum speed then turn the stop screw to obtain the specified idling speed Idling speed 1500 100 rpm NOTE Turn the air screw clockw...

Page 23: ...the air cleaner element NOTE Clean the cleaner element periodically Refer to maintenance schedule Assemble air cleaner element in reverse order of disassemble CLUTCH ADJUSTMENT CLUTCH LEVER FREE PLAY...

Page 24: ...DJUSTMENT FRONT BRAKE LEVER FREE PLAY Measure the brake free play at the tip of the brake lever Free play 10 20mm BRAKE PAD WEAR INSPECTION Check for brake pad wear by operating the bake lever Check t...

Page 25: ...djuster clockwise for decreasing the clearance counterclockwise for increasing the clearance CAUTION Keep the adjuster at the right position DRIVE CHAIN ADJUSTMENT Place the motorcycle on its side sta...

Page 26: ...ack and free wheel rotation Lubricate the drive chain with chain lubricant WHEEL RIM Stand the motorcycle check the tires for cuts imbedded nails or other sharp objects Check the tire pressure One rid...

Page 27: ...n them to the specified torque TORQUE Front fork top bridge bolt 100 140 kgf cm Frint fork bottom bridge bolt 240 300 kgf cm Axle nut 600 800 kgf cm REAR SUSPENSION Check for abnormal noises and leaks...

Page 28: ...battery fluid level if the fluid level nears the lower level mark fill with distilled water to the upper level mark Clean the battery terminals with warm water Check the specific gravity of the batte...

Page 29: ...the headlight bolts loosening Fasten the bolts after adjustment STOPLIGHT SWITCH The stoplight should come on when the brake pedal is depressed 20mm from the standard pedal position If the action is...

Page 30: ...3 LUBRICATION SYSTEM 3 0 CAM SHAFT OIL LINE OF CAM SHAFT PISTON OIL FILTER OIL ORIFICE OF CRANKSHAFT OIL PUMP MAIN SHAFT COUNTER SHAFT...

Page 31: ...1 Oil filter clogged 2 Oil pump damaged OIL PRESSURE TOO HIGH 1 Oil filter or line clogged 2 Oil not recommended NO OIL PRESSURE 1 Oil level too Iow 2 Oil pump damaged SERVICE INFORMATION NOTICE Inspe...

Page 32: ...nerator Clutch Oil pump Cam shaft Rocker arm Shift spindle Cam chain tensioner The following parts must be serviced with the engine removed off the frame Cylinder head Cylinder Piston Crankshaft Trans...

Page 33: ...ct the fuel tubes and all connect tubes Remove the right and left side covers Remove the gear change pedal and left crank case rear cover Disconnect the A C generator wire of the connector and remove...

Page 34: ...rate the carburetor pipe and the cylinder head by removing the attaching bolts Remove the crankcase breather tube Loosen the rear wheel axle nut Loosen the drive chain adjusting nut and push the rear...

Page 35: ...ces jack or padded block under the engine before removing the front engine hanger Disconnect the starter motor wire Remove the 10mm bolts of the rear engine hanger Remove the engine NOTE Prevent damag...

Page 36: ...e engine Notice the following items during installation Route all wire harnesses and cables properly Adjust the throttle grip free play P2 10 Adjust the clutch lever free play P2 12 Adjust the drive c...

Page 37: ...ER HEAD INSTALLATION 5 14 CAM SHAFT INSTALLATION 5 15 TROUBLE SHOOTING LOW COMPRESSION 1 Valve Incorrect valve clearance Burned or bent valves Incorrect valve timing Broken valve spring 2 Cylinder hea...

Page 38: ...gf cm Cylinder 6mm bolt 140 180 kgf cm Cam sprocket 80 120 kgf cm SPEClFICATIONS ITEM STANDARD SERVICE LIMIT IN 32 382mm 31 25mm below Cam lift EX 31 987mm 30 87mmbelow Camshaft Runout 0 02mm Rocker a...

Page 39: ...d cylinder head side Remove the cylinder head cover Remove the crankshaft hole cap and the timing inspection hole cap Rotate the generator rotor counterclockwise and locate the piston at the T D C of...

Page 40: ...ADJUSTMENT 5 4 CYLINDER HEAD REMOVAL Remove the 6mm bolts Remove the dowel pins Remove cam chain tensioner Remove the cylinder head Remove the rocker arm shaft Remove the rocker arms HOLDER BOLT CAM...

Page 41: ...ce limit Inlet 31 25mm Exhaust 30 87mm ROCKER ARM INSPECTION Inspect the rocker arm I D and the rocker arm for wear damage or clogged oil holes Rocker arm I D Service limit 10 1mm ROCKER ARM SHAFT INS...

Page 42: ...ith a valve spring compressor CYLINDER HEAD INSPECTION Remove gasket from cylinder head with a scraper Check the cylinder head for crack Check the cylinder head for warpage with a straight edge and a...

Page 43: ...Exhaust 5 40mm NOTE Guide I D service limit Intake 5 50mm Exhaust 5 50mm Measure the valve guide I D and calculate the stem to guide clearance Service limit Intake 0 08mm Exhaust 0 10mm If the stem to...

Page 44: ...e valve guide from the combustion chamber side with a 5mm valve guide remover NOTE When driving out the valve guide do not damage the cylinder head Install the new valve guide from the top of the cyli...

Page 45: ...lue to each valve face Insert each valve into the guide and rotate them two cycles Remove the valve and inspect the face CAUTION If the valve face is burned or damaged or unevenly replace the valve In...

Page 46: ...instruction manual Remove any roughness from the seat by applying 4 5 kg pressure turning the cutter left and right NOTE Add engine oil to the face when operating Using a 45 degree cutter remove any r...

Page 47: ...degree cutter remove 1 4 of the existing valve seat material Remove the bottom 1 4 of the old seat by using a 60 degree cutter Finish the seat to the proper width by using a 45 degree cutter 32 o CUT...

Page 48: ...h with a 45 degree cutter If the contact area is too low on the valve the seat must be raised using a 63 5 degree cutter then finish with a 45 degree cutter After cutting the seat apply lapping compou...

Page 49: ...compress the valve spring more than necessary NOTE Install a new valve stem seal when assembling Lubricate each valve stem with the engine oil then insert them into the guides Install the valve sprin...

Page 50: ...r head gasket surface of any gasket material Install the new gasket O ring and dowel pins and chain guide NOTE Do not allow dust and dirt to enter the cylinder Install the cylinder head NOTE Support t...

Page 51: ...Install the cylinder head nuts TORQUE 280 300 kgf cm CAUTION The cap nut of the four holder nuts must be installed at the left front side Install the 6mm bolts Install the cam chain chain tensioner I...

Page 52: ...9 CYLINDER INSTALLATION 6 10 TROUBLE SHOOTING LOW COMPRESSION 1 Worn cylinder or piston rings EXCESSIVE SMOKE 1 Worn cylinder piston or piston rings 2 Improper installation of piston rings 3 Scored or...

Page 53: ...econd 0 015 0 040mm 0 12mm Top 0 10 0 25mm 0 5mm Second 0 25 0 40mm 0 5mm Piston ring End gap Oil ring 0 20 0 70mm Piston O D 52 55 52 60mm 52 55mm Piston pin bore 15 002 15 008mm 15 05mm Connecting r...

Page 54: ...cam chain guide Remove the cylinder NOTE Avoid the chain falling into the crankcase during removing the cylinder Remove the dowel pins and gasket Clean the cylinder gasket surface of any gasket materi...

Page 55: ...I D NOTE According to the right picture measure the cylinder runout Service limit ITEM NCA250 Runout 0 05mm Taper 0 05mm I D 53 015mm PISTON REMOVAL Remove the piston pin clip with pliers Press the p...

Page 56: ...ring to ring groove clearance Service limit Top ring 0 13mm Second ring 0 12mm Remove the piston rings Inspect the piston for damage or cracks Inspect the piston groove for wear Insert each piston rin...

Page 57: ...skirt Service limit 52 55mm NOTE Measure the piston O D at a point from the bottom Calculate the piston to cylinder clearance Service limit 0 11mm Measure the piston pin bore I D Service limit 15 07m...

Page 58: ...TION Install the piston rings NOTE Space the piston ring end gaps 120 degree apart Avoid piston and piston ring damage during installation All rings should be installed with the markings facing up Aft...

Page 59: ...6 CYLINDER PISTON 6 8 TOP RING SECOND RING OIL RING...

Page 60: ...ston pin clip NOTE Position the IN mark on the piston to the carburetor side Do not let the piston pin clip fall into the crankcase NOTE Use new piston pin clip whenever disassembling Do not align the...

Page 61: ...g the cylinder gasket surface during this operation Install the cylinder NOTE Avoid piston and piston rings damage during installation Install the cam chain guide plate Install the cylinder gasket and...

Page 62: ...CLUTCH SPINS WHEN ACCELERATING 1 No free play 2 Discs worn 3 Spring weak CLUTCH DISENGAGED MOTORCYCLE CREEPS 1 Too much free play 2 Plates warped EXCESSIVE LEVER PRESSURE 1 Clutch cable kicked damage...

Page 63: ...he frame COMMON TOOLS 22mm wrench socket Air wrench TORQUE VALUES Right crankcase cover 80 120 kgf cm Clutch lock nut 16mm 500 600 kgf cm Step bar 180 200 kgf cm SPECIFICATIONS ITEM STANDARD SERVICE L...

Page 64: ...REMOVAL Drain oil from the engine Disconnect the clutch cable Remove the right crankcase cover CLUTCH CLUTCH REMOVAL Remove the clutch bearing Remove the 16mm lock nut with the wrench socket and air w...

Page 65: ...lutch center friction disc clutch plate and pressure plate CLUTCH FRICTION DISC INSPECTION Measure the friction discs replacing them if they are discolored or worn Service limit 2 5mm CLUTCH CENTER CL...

Page 66: ...TION Check the plates for warpage on a surface plate using a feeler gauge Service limit 0 2mm CLUTCH SPRING INSPECTION Measure the clutch springs free length Service limit 27 9mm CLUTCH OUTER INSPECTI...

Page 67: ...Install the clutch outer 20mm washer NOTE When installing the washer it should fit with the main shaft groove Install the clutch pressure plate friction discs clutch plates and clutch center Install...

Page 68: ...bolts in a crisscross pattern in two or three steps TORQUE 500 700 kgf cm Install the dowel pins and gasket Install the right crankcase cover Connect the clutch cable Fill the crankcase with the reco...

Page 69: ...6mm screws remove the oil pump OIL PUMP DISASSEMBLY Remove the oil pump drive gear Remove the oil pump drive gear and oil pump plate OIL PUMP INSPECTION Measure the inner to outer rotor clearance of t...

Page 70: ...p upper clearance Service limit 0 11mm OIL PUMP ASSEMBLY Install the inner and outer rotors into the oil pump body Install the oil pump drive shaft Install the oil pump drive gear Install the oil pump...

Page 71: ...otating freely OIL PUMP INSTALLATION Install a O rings Install the oil pump to the right crankcase GEARSHIFT LINKAGE GEARSHIFT LINKAGE DISASSEMBLY Remove the clutch 7 3 Remove the gearshift pedal Remo...

Page 72: ...damage GEARSHIFT LINKAGE ASSEMBLY Install the four 10mm rollers Align the hole of the gearshift cam with the roller then install the gearshift cam Install the gearshift drum stopper NOTE After instal...

Page 73: ...the clutch Install the primary drive gear Install the oil pump drive gear Install the drive gear Install the oil through pin Install the oil pump RIGHT CRANKCASE COVER INSTALLATION Install the right...

Page 74: ...OR 8 1 TROUBLE SHOOTING 8 1 LEFT CRANKCASE COVER REMOVAL 8 2 GENERATOR ROTOR REMOVAL 8 2 GENERATOR ROTOR INSTALLATION 8 3 LEFT CRANKCASE COVER INSTALLATION 8 4 STARTER MOTOR REMOVAL 8 4 STARTER MOTOR...

Page 75: ...he left crankcase rear cover NOTE Generator stator is in the left crankcase cover it can be removed by removing the attaching screws GENERATOR ROTOR REMOVAL Remove the left crankcase cover Remove the...

Page 76: ...heck the stator for continuity GENERATOR ROTOR INSTALLATION Reverse the procedure of removal to assembly NOTE Check wire for security in its place Do not interfere the wire with the rotor Install and...

Page 77: ...the left crankcase cover Install the left crankcase rear cover Install the gearshift pedal STARTER MOTOR REMOVAL Disconnect the starter motor wire connector Remove the starter motor attaching bolts Re...

Page 78: ...8 A C GENERATOR 8 5 STARTER MOTOR GEAR SET 1 Starter driven gear 2 Washer 3 Starter reduce gear 4 Starter motor 1 2 3 4...

Page 79: ...CRANKSHAFT INSTALLATION 9 11 CRANKCASE ASSEMBLY 9 11 TROUBLE SHOOTING HARD TO SHIFT 1 Shift fork bent 2 Shift fork shaft bent TRANSMISSION JUMPS OUT OF GEAR 1 Gear dogs worn 2 Shift fork bent or damag...

Page 80: ...l 6 3 Clutch oil pump Gearshift linkage removal 7 3 Left crankcase cover removal 8 2 SPECIAL TOOLS Bearing driver Bearing driver pilot SPECIFICATIONS ITEM STANDARD SERVICE LIMIT I D 12 000 12 018mm 12...

Page 81: ...CASE SEPARATION Remove the right crankcover and interial parts 7 3 7 13 Remove left cover and interial parts Remove the left crankcover all 6mm attaching bolts Separate the left crankcase from the rig...

Page 82: ...e Remove the crankshaft CRANKSHAFT INSPECTION Measure the connecting rod big end side clearance with a feeler gauge Service limit 0 60mm Follow the arrow indicated direction to measure the connecting...

Page 83: ...d big end with engine oil before installation Runout Service limit 0 01mm Measure the connecting rod small end I D Connecting rod small end I D Service limit 15 08mm CRANKSHAFT BEARING INSPECTION Spin...

Page 84: ...t drum Remove the shift forks SHIFT FORK AND SHIFT FORK SHAFT INSPECTION Check the shift fork for wear bending or damage Measure the shift fork I D Service limit 12 02mm Measure each shift fork claw t...

Page 85: ...MISSION 9 7 Measure the shift fork shaft O D Service limit 11 976mm SHIFT DRUM INSPECTION Check the gearshift drum for wear or damage Disassemble the transmission gears Check each gear for wear or dam...

Page 86: ...h compressing air if necessary Check the crankcase bearings replace them if they have excessive free play or noisy BEARING INSTALLATION Install the bearings into the left right crankcase with special...

Page 87: ...ISSION ASSEMBLY NOTE Before assembling coat each gears with engine oil Assemble the gears of the countershaft and mainshaft NOTE Seat the snap ring in the ring groove properly Counter shaft Main shaft...

Page 88: ...nstall the crankshaft assemblies in the right crankcase Install the mainshaft and countershaft assemblies in the right crankcase NOTE Keep the thrust washers in place during installation Install the m...

Page 89: ...age the shift fork guide pin with the drum groove by raising the shift fork After assembling check each part for moving freely CRANK CASE ASSEMBLY Install the gasket and dowel pins Install the left cr...

Page 90: ...ERVICE INFORMATION 10 2 CARBURETOR REMOVAL 10 3 THROTTLE VALVE DISASSEMBLY 10 3 FLOAT FLOAT VALVE JETS DISASSEMBLY 10 4 FLOAT FLOAT VALVE JETS ASSEMBLY 10 6 FLOAT LEVEL ADJUSTMENT 10 6 THROTTLE VALVE...

Page 91: ...leaner clogged 7 Air leaking into intake pipe 8 Fuel contaminated LEAN MIXTURE 1 Carburetor jets clogged 2 Float chamber vent clogged 3 Fuel filter clogged 4 Fuel line restricted 5 Float level too Iow...

Page 92: ...t the all connect tubes Drain fuel from the carburetor WARNING Keep away from flames or sparks Wipe up spilled gasoline at once Loosen the carburetor band THROTTLE VALVE DISASSEMBLY Disconnect the thr...

Page 93: ...ARNING Avoid damage to the vacuum membrane INSPECTION Inspect the jet needle for wear or damage Inspect the vacuum piston for damage Inspect the vacuum membrane for damage ASSEMBLY Install the vacuum...

Page 94: ...he float chamber body WARNING Pour the float chamber gasoline into the tank Pull out the float pin remove the float and float valve FLOAT VALVE INSPECTION Inspect the float valve surface for wear or d...

Page 95: ...the jets Remove the air screw NOTE Before removing air screw record the number of relations until it rests lightly so it can be returned to its original position Check each part for damage Blow open a...

Page 96: ...ASSEMBLY Install the stop screw the main jet main jet holder and slow jet NOTE Do not damage jets at the time of assembly FLOAT LEVEL ADJUSTMENT If the float level is too high or too low bend the floa...

Page 97: ...le cable NOTE Make sure that the throttle cable is pulled tightly CARBURETOR INSTALLATION Reverse the procedure of removal to install the carburetor Then adjust the followings Throttle grip free play...

Page 98: ...ary circuit 2 High tension cord broken 3 Faulty ignition coil 4 Faulty A C generator 5 Faulty C D I unit ENGINE RUNS BUT ROUGHLY 1 Primary circuit C D I unit failure Faulty A C generator Faulty igniti...

Page 99: ...on system Be sure that the battery is fully charged before diagnosing troubles in the ignition system Also refer to the following pages Spark plug 2 5 Ignition timing adjustment 2 8 SPECIFICATIONS Spa...

Page 100: ...ignition coil Remove the ignition coil IGNITION COIL TEST Check the ignition coil output using a tripolar tester NOTE Follow the instructions described in the user manual Check the primary circuit it...

Reviews: