background image


9


  USE OF BUTTONS   


Light Switches 

When the switch is turned to this position as 
the engine is being started, headlight, rear light, 
instrument panel light, and position light will 
come on. 

When the switch is turned to this position as 
the engine is being started, rear light, 
instrument panel light, and position light will 
come on. 

When the switch is turned to this position, all 
lights will go off. 


Electrical Starter Button 

This is a starting motor button (switch) for engine starting. 
With the main switch "ON", press this button while holding the front or rear brake lever will 
start the engine. 


High/Low Beam Switch 

This is the high and low beam of headlight switching switch.    Press this switch to switch between 
  high and low beams. 

This is for high beam. 

This is for low beam. (Please turn to low beam when riding in city) 


Passing Switch 

Turn ignition switch “ON” and press this button down. Then, the high beam of headlight 
will come on immediately to warn the driver of the vehicle ahead that you intend to 
overtake him/her. (For overtaking, high beam indicator will come on at this time) This 
button will return to original position after releasing. 

Light Switches 

Electrical 
Starter Button 

High/Low 
Beam Switch 

Turn Signal 
Switch 

Horn Switch 

Passing switch 


Note: 

Position Light Function

:  

This light can indicate the motorcycle’s 
position when the motorcycle is 
running in dim, rainy, or foggy 
weather.


 CAUTION: 


Release this button immediately after engine has been started, and never press the button 
again to avoid damaging the engine. 


This mechanism is a safety design. The engine can only be started after the front or rear brake 
lever (pedal) has been applied. 


Do not use light system. Turn headlight and turn signal lights to the “OFF” position when the 
engine is being started. 

PASSING 


Summary of Contents for AK12U Series

Page 1: ...tion and Maintenance before Riding 14 Routine Inspection 14 Engine Oil Inspection and Change 14 Fuel Inspection 15 Transmission Oil Inspection and Change 15 Inspection and Adjustment of Brake Free Pla...

Page 2: ...there is an Abnormal Condition or a Trouble 22 Diagnosis when Engine does not Start 22 12 C D I Electrical Ignition System 22 13 Suggestions on Engine Fuel 22 14 Transmission Oil 22 15 Cautions for Ri...

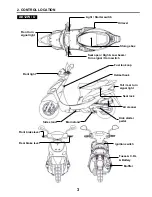
Page 3: ...el tank cap Helmet hook Side stand Main stand Kick starter pedal Light Starter switch Seat open High Low beam Turn signal Horn switch Storage box Muffler Fuses C D I Battery Front turn signal light Fr...

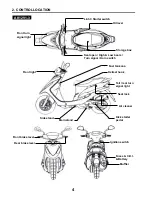
Page 4: ...Low beam Turn signal Horn switch Storage box Front turn signal light Front light Seat lock Fuel tank cap Helmet hook Side stand Main stand Kick starter pedal Tail rear turn signal light Air cleaner Fr...

Page 5: ...ge In order to maximize your motorcycle s performance a periodical inspection and maintenance should be completely carried out We recommend that after riding your new motorcycle for the first 300 kilo...

Page 6: ...ign requirements SYM Genuine Spare Parts were made from the same high quality materials used for the original motorcycle No parts would be sold to the market until they could meet the designed specifi...

Page 7: ...3 Speedometer Indicates driving speed Odometer Indicates total accumulated distance traveled High Beam Indicator This indicator comes on with high beam headlight is turned on Turn Signal Indicator The...

Page 8: ...nd can not be started in this position Ignition switch key can be removed Steering handle lock position Turn the steering handle to left and press ignition switch key down and then lightly turn it to...

Page 9: ...ow beam when riding in city Passing Switch Turn ignition switch ON and press this button down Then the high beam of headlight will come on immediately to warn the driver of the vehicle ahead that you...

Page 10: ...the saddle down and it will be locked automatically After the saddle has been locked check to make sure it has been locked properly by lightly lifting the saddle STORAGE BOX This box is located under...

Page 11: ...ecause the motorcycle is tend to pulled to one side Engine Brake Return the throttle valve handle back to its original position and apply engine brake It is necessary to apply both brake and engine br...

Page 12: ...ck the engine oil and fuel volume are adequate or not before starting engine To start engine the main parking stand must be firmly on the ground and the brake is applied on the rear wheel to prevent t...

Page 13: ...ehicles behind When stop completely 3 Press the turn signal switch back to its original position and turn the ignition switch key to OFF position to shut off the engine 4 Get off the motorcycle from l...

Page 14: ...emove the dipstick after engine stopped for 3 5 minutes Wipe oil off the dipstick and then insert it into the guide tube again Do not rotate it Remove the dipstick and check whether oil level is in be...

Page 15: ...d or not at disassembly 110 c c at change 90 100 c c OIL REPLACEMENT Stop the engine and use the main stand to support your motorcycle on a level ground Remove the infusion bolt and drain bolt drain o...

Page 16: ...g or any parts interference may have damage the brake lines If so bring your motorcycle to your SANYANG dealer for repairing or service CAUTION When free play is between 10 20 mm check brake indicator...

Page 17: ...being careful not to let foreign materials fall into the reservoir 3 Remove the diaphragm plate and the diaphragm 4 Add brake fluid to upper level 5 Install the diaphragm plate and the diaphragm and...

Page 18: ...found Adjust nut Lock nut 2 6 mm Check Items 1 Check throttle valve cable to see if it can be moved smoothly from a closed position to a wide open position 2 Rotate steering handle from side to side...

Page 19: ...f and ignition switch key removed Visual check front shock absorbers for damage Operate steering handle up and down and check front shock absorbers for noises due to bends Check the bolts and nuts of...

Page 20: ...ycle to your dealer for an inspection if a fuse is blown by unknown causes CHECKING THE SPARK PLUG Remove the cap of spark plug cable remove the spark plug using the spark plug wrench in the tool kit...

Page 21: ...in reverse order of disassemble Element Screw CAUTION Dust deposit is one of the major causes of reducing output horsepower and increasing fuel consumption Change the air cleaner element more frequent...

Page 22: ...ve items and engine still can not be started 12 C D I ELECTRICL IGNITION SYSTEM The charge and discharge principle of a condenser is adopted for the C D I system to supply electrical energy created by...

Page 23: ...pping or fall especially in rainy days when the road is wet and slippery Drive with extreme caution during rainy days The brake distance in rain day or on wet road will longer than that on a dry road...

Page 24: ...on time I I 19 Valve clearance I I 20 Shock absorbers I I 21 Front rear suspension I I 22 Main side stands I I L 23 Crankcase Blow by system PCV I I 24 Clutch weight I 25 Brake mechanism brake pad I I...

Page 25: ...5 10 4PR Rear tire 100 90 10 56J 3 5 10 4PR Wheel Steel Tire pressure Front STD 1 75 kg cm 2 Rear STD 2 0 kg cm 2 for 1 person 2 25 kg cm 2 for 2 person Front brake Disk type 160 mm Disk type 180 mm...

Reviews: