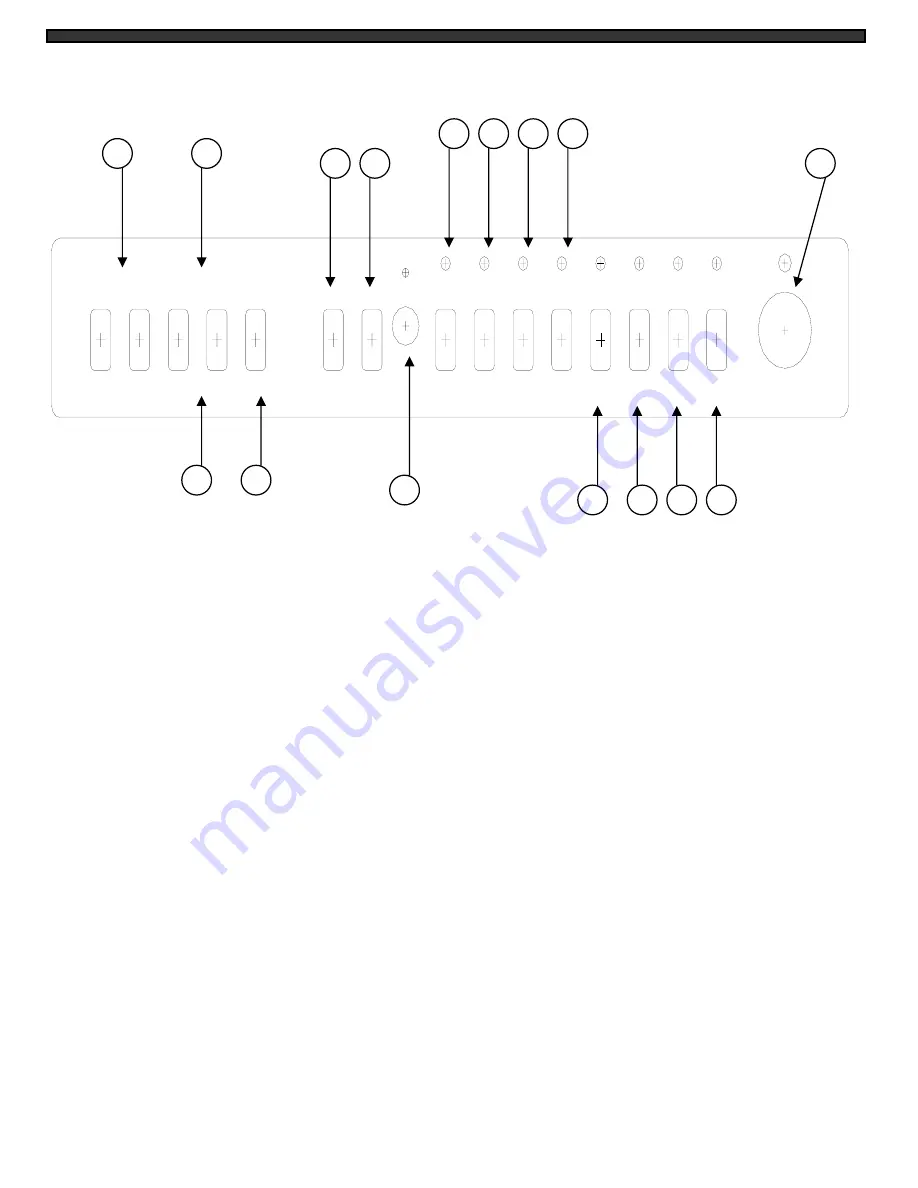
MONITOR CONTROLS - FRONT PANEL
-6-
1. SetUp/
/
– This button selects the following Functions: Bright, Tint, Color, Sharpness and
Contrast. Use UP/DOWN arrow keys to move around and change functions.
2. Setting
– This button controls the Functions mentioned above. Press this button and use the
volume keys “
” and “
” to control.
Volume
– Decreases/Increases volume sound. Press “
” to decrease the sound level. Press “
”
to increase the sound level.
3. Mode
– This button consists of Mode 1, Mode 2 and User Mode which will decrease/increase the
image lighting – for example, Mode 1 is used better in the day and Mode 2 is used better at night.
4. Talk
– In Full screen mode, by pressing and holding this button the user has the ability to talk to a
specific camera location. This button must be pressed the entire time while talking. To listen to the
camera location release the talk button. Note: This feature is only available with the wired cameras,
which have two-way audio feature.
5. Audio Sel
– This buttons selects a channel to hear a specific camera location in Quad Mode. A
microphone icon will appear on the specific camera, press again and the icon will move to next
channel.
6. Infra-Red Receiver
– Receives signal from remote control to the monitor.
7. Channel 1
– Displays Full Screen of Camera 1.
8. Channel 2
– Displays Full Screen of Camera 2.
9. Channel 3
– Displays Full Screen of Camera 3.
VOLUME
SETTING
SETUP
MIC
MODE
TALK AUDIO
SEL
ENTER
CH1
CH2
CH4
CH3
VCR
MENU
AUTO3
ZOOM
STAND-BY
PIP
AUTO2
QUAD
AUTO1
6
2
2
3
1
11
12
15
13
14
10
9
8
7
4
5


