


– 25 –
ES
✄
Español
Conexiones
1
Ajuste del reloj
5
Conmutación VCR/DVD
3
Instalación de las pilas
del control remoto
2
Activación de la unidad
por primera vez
4
2
3
1
CHANNEL
STOP
REV
FWD
SKIP
H
G
SKIP
OUTPUT
DVD
DISC IN
OPEN/CLOSE
PLAY
STOP/EJECT
PLAY
REC/OTR
VCR
POWER
F.FWD
REW
VIDEO
AUDIO
POWER
DISPLAY
VCR
DVD
PAUSE
SLOW
VCR/TV
SKIP/CH.
PLAY
STOP
REC/OTR
MENU
SETUP
TOP MENU
MODE
ZOOM
SUBTITLE
T-SET
ANGLE
ENTER
RETURN
SEARCH
MODE
REPEAT
A-B
OPEN/CLOSE
/EJECT
SPEED
AUDIO
CLEAR/
C. RESET
1
2
3
4
5
6
7
8
9
0
+10
REV
SKIP
H
OUTPUT
DVD
VCR
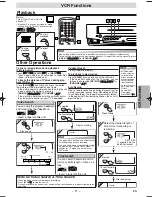
Botón OUTPUT
Luz
DVD OUTPUT
Luz
VCR OUTPUT
Botón DVD
Botón VCR
Pulse
[VCR]
en el control remoto.
(Compruebe que está encendida la luz
VCR OUTPUT.)
MODO VCR
Pulse
[DVD]
en el control remoto.
(Compruebe que está encendida la luz
DVD OUTPUT.)
MODO DVD
2
2
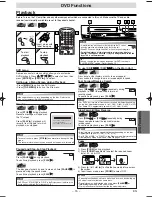
SELEC. IDIOMA
ENGLISH
FRANCAIS
B
ESPAÑOL
[ON]
1
1
Encienda el televisor y sin-
tonice al canal 3.
• Si el canal 3 se está utilizando para una trans-
misión, vea la sección “RF Output Channel”.
3
3
CA 01
AJUSTE AUTO
No
No
Espere unos minutos.
Después del escaneo
• El sintonizador se detiene en el canal
memorizado más bajo.
• Puede seleccionar sólo los canales memo-
rizados en esta unidad con
[SKIP/CH.
G
G
/
K
K H
H
/
L
L
]
(o
[CHANNEL
K
K
/
L
L
]
).
• Si aparece nuevamente "AJUSTE AUTO"
en la pantalla de TV, verifique las conex-
iones de cable. Presione nuevamente
[
B
B
]
.
Si
Si
Pulse
MENU
para salir.
Conecta el cable de la caja de canales de cable o la
caja de satélite en la toma ANT-IN de la unidad?
SI
Pantalla del televisor
Control Remoto
VCR
VCR
VCR
1
1
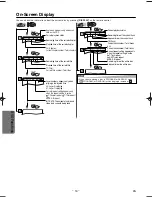
- M E N U -
PROGRAMAR
AUTOREPETIR [OFF]
AJUSTE CANAL
B
AJUSTE DE RELOJ
SELEC. IDIOMA
AJUSTE DE RELOJ
MES DIA
AÑO
1 0 / – –
– – – –
HORA MINUTO
AM/PM
– – : – –
– –
AJUSTE DE RELOJ
MES DIA
AÑO
1 0 / 0 3
– – – –
HORA MINUTO
AM/PM
– – : – –
– –
Seleccione el mes actual.
Seleccione el día actual.
• Si no se ha ajustado el reloj,
aparece la pantalla AJUSTE
DE RELOJ cuando pulse
[MENU]
. En este caso, vaya
al paso 2).
VCR
VCR
VCR
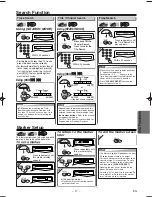
AJUSTE DE RELOJ
MES DIA
AÑO
1 0 / 0 3
2 0 0 5
HORA MINUTO
AM/PM
– – : – –
– –
AJUSTE DE RELOJ
MES DIA
AÑO
1 0 / 0 3 LUN 2 0 0 5
HORA MINUTO
AM/PM
0 5 : – –
– –
AJUSTE DE RELOJ
MES DIA
AÑO
1 0 / 0 3 LUN 2 0 0 5
HORA MINUTO
AM/PM
0 5 : 4 0
– –
AJUSTE DE RELOJ
MES DIA
AÑO
1 0 / 0 3 LUN 2 0 0 5
HORA MINUTO
AM/PM
0 5 : 4 0
P M AM
B
PM
Seleccione el año actual.
Seleccione "AM" o "PM".
8
8
Para salir de la pantalla AJUSTE DE
RELOJ
Seleccione la hora actual.
Seleccione los minutos actuales.
Consulte la “Basic TV Connection”
en la página delantera antes de
utilizar esta unidad.
Canal de salida RF
Si el canal 3 se está utilizando para
una transmisión.
1)Programe su televisor al canal 4.
2)Inserte una cinta pregrabada en esta
unidad.
3)Pulse
[OUTPUT]
en la unidad para
que se encienda la luz VCR OUT-
PUT.
• Si aparece ruido en la pantalla de
TV, presione
[VCR/TV]
en el mando
a distancia.
4)Pulse una vez
[PLAY
B
B
]
.
5)Después de unos segundos, pulse
[PLAY
B
]
en la unidad durante 3
segundos.
• El canal de salida RF cambiará del
canal 3 al canal 4 y podrá ver una
imagen reproducida.
• Cuando no aparezca una imagen en
la pantalla del televisor, repita el
paso 4).
6)Pulse
[STOP
C
]
para parar la repro-
ducción.
2
2
3
3
4
4
5
5
6
6
7
7
Consejo
Consejo
• Si pulsa sólo
[OUTPUT]
en el panel
frontal NO cambía el modo del control
remoto. DEBE seleccionar también el
modo correcto en el control remoto.
o
POWER
MENU
o
o
o
o
o
o
o
NO
Español
H9805UD_EN/SP.qx3 2005.06.10 15:18 Page 25