background image

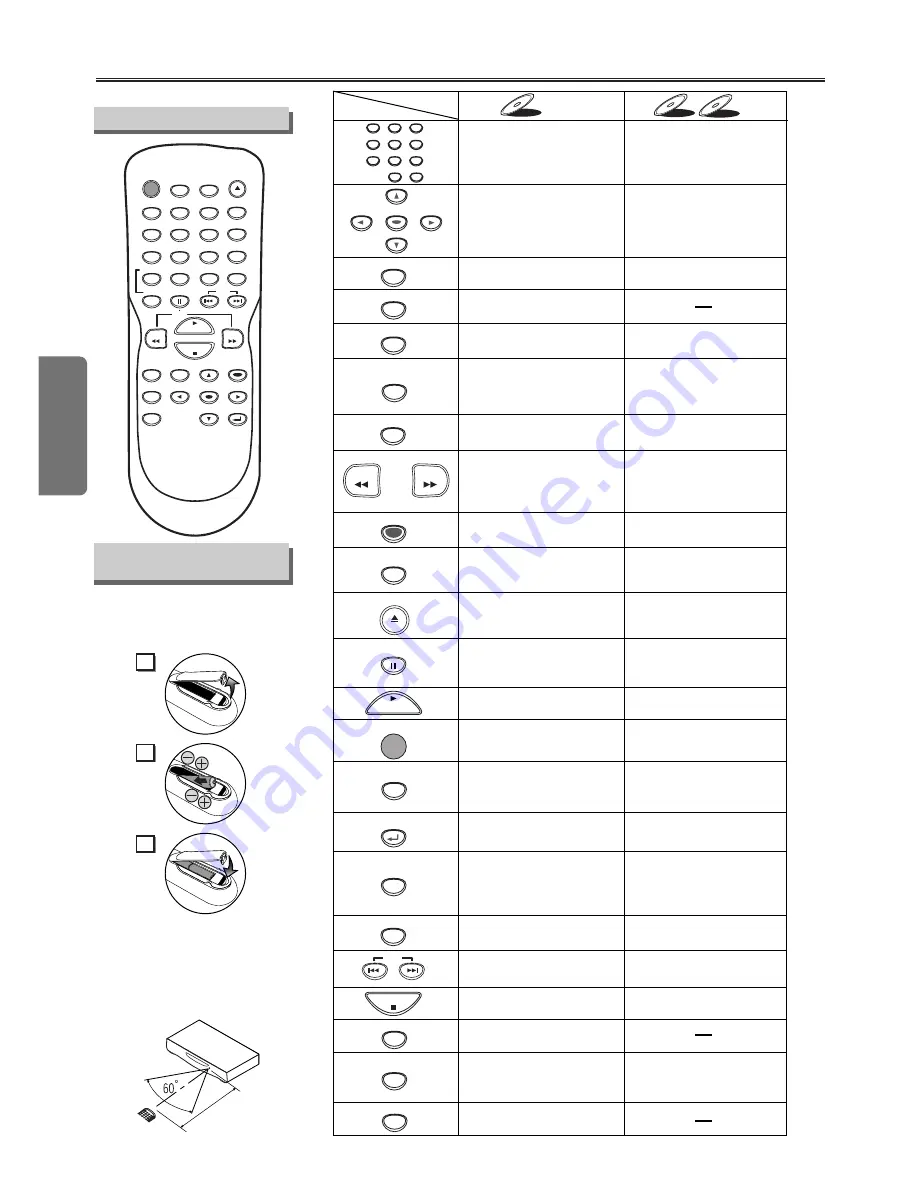
About the Remote Control

Setup

– 8 –

EN

To turn the unit on or off.

To turn the unit on or off.

To display the current disc 
mode.

To display the current disc 
mode.

To open or close the disc 
tray.

To open or close the disc 
tray.

To select chapter or title 

  directly.

To select track directly. 

To select camera angles on 
a disc.

To select subtitles on a disc.

To select audio languages on 
a disc.

To select STEREO, 
L-CH or R-CH.(CD)

To repeat between your 
chosen point A and B.

To repeat between your 
chosen point A and B.(CD)

To play a chapter or title 
repeatedly. 

To play a track or disc 

  repeatedly. (CD)

To play a track, group 

  or disc repeatedly. (MP3)

To set black level on/off.

To set virtual surround on/off.

To arrange the playing
order or play randomly.

To set virtual surround on/off.

To call up the Menu
 on a disc.

To call up the Top Menu 
on a disc.

To enlarge DVD video image.

To return to the previous 
operation in the DVD
setup menu.

To search chapter, title or time.

To rapidly return to
a location of disc.

Search the markers.

To search track.

To search time. (CD)

To rapidly return to 
a location of disc.

Search the markers. (CD)

To clear the markers.

To clear the markers.(CD)

To remove status No. 

in program input.

To clear the numbers  

entered incorrectly.

To clear the numbers 
entered incorrectly.

To search forward/backward 
through a disc.

To begin slow forward

   /reverse playback during
   the pause mode.

To search forward/backward 
through a disc.

To call up the MP3 menu.

   (MP3)

To advance playback 
one frame at a time.

To pause disc playback.

• 

To pause disc playback.

• 

To stop playback.

• 

To stop playback.

• 

To return to the top file of the

   highest hierarchy in the 
   program and MP3 menu. 
   (MP3)

• 

To skip chapters.

• 

To skip tracks.

• 

To begin disc playback.

• 

To begin disc playback.

To call up the DVD setup 

  menu.

To call up the DVD setup 

   menu.

To move the cursor and 
determine its position.

To move the cursor and 
determine its position.

POWER

DISPLAY

MENU

TOP MENU

ZOOM

SUBTITLE

MODE

ANGLE

SEARCH

MODE

REPEAT

A-B

AUDIO

CLEAR

1

2

3

4

5

6

7

8

9

0

+10

PAUSE

PLAY

STOP

SETUP

DVD-V

DVD-V

CD

CD

CD

MP3

MP3

MP3

Button

(Alphabetical order)

Disc

ENTER

RETURN

REV

FWD

OPEN/CLOSE

SKIP

To return to the previous 
operation on the DVD setup 
menu.

2

1

3

Installing the Batteries
for the Remote Control

Install two AA batteries
(supplied) matching the polarity indi-
cated inside battery compartment of
the remote control.

Remote Control

Keep in mind the following when using
the remote control:
• Make sure that there is no obsta-

cle between the remote and the
remote sensor on the unit.

• Use within the operating range

and angle, as shown.

POWER

AUDIO

SUBTITLE

ANGLE

REPEAT

CLEAR

A-B

PAUSE

SETUP

TOP MENU

MENU

ENTER

MODE

ZOOM

RETURN

SLOW

SKIP

OPEN/CLOSE

DISPLAY

SEARCH

MODE

1

2

3

4

5

6

7

8

9

0

+10

PLAY

REV

FWD

STOP

Within about 

23 f

eet (7m)

Remote

control

Summary of Contents for DVL120E

Page 1: ...6 To return the All Selections of SET UP except for PARENTAL to the Default Setting 16 Information Troubleshooting Guide 17 Specifications 18 Language List 18 Limited Warranty 18 Espa ol 19 Quick Use...

Page 2: ...quipment does cause harmful interference to radio or television reception which can be determined by turning the equipment off and on the user is encouraged to try to correct the interference by one o...

Page 3: ...of the polarized plug 13 Power Cord Protection Power supply cords should be routed so that they are not likely to be walked on or pinched by items placed upon or against them paying particular attent...

Page 4: ...ure condensation may occur inside the unit when it is moved from a cold place to a warm place or after heating a cold room or under conditions of high humidity Do not use this unit at least for 2 hour...

Page 5: ...them back Even if they are played back the sound or video quality will be compromised DVD Video 1 2 4 6 1 2 3 4 5 6 1 2 3 4 5 6 4 6 4 5 6 or DVD R DVD RW DVD R DVD RW Audio CD CD R CD RW Digital video...

Page 6: ...ages 14 15 Set DOLBY DIGITAL to OFF in the AUDIO menu for con necting to an MD deck or DAT deck Refer to pages 14 15 Dolby Digital decoder MD deck or DAT deck AUDIO OUT COAXIAL R L Y S VIDEO OUT COMPO...

Page 7: ...oaxial digital audio cable here through the coaxial digital audio in jack of a decoder or audio receiver POWER SKIP SKIP PLAY STOP OPEN CLOSE Lights up when the inserted disc is being played back Disp...

Page 8: ...backward through a disc To begin slow forward reverse playback during the pause mode To search forward backward through a disc To call up the MP3 menu MP3 To advance playback one frame at a time To pa...

Page 9: ...button Resume message will appear on the TV screen Press the PLAY button play back will resume from the point at which playback was stopped To cancel resume press the STOP button one more time during...

Page 10: ...repeat TR Track Current track number Total tracks Current repeat setting appears only when the repeat setting is active T Track repeat A All Tracks repeat A B A B repeat DISPLAY DISPLAY DISPLAY DISPL...

Page 11: ...ly until this screen appears For single digit tracks 1 9 press a single number e g track 3 press 3 To play track 26 press 10 2 6 of the Number buttons Using the SEARCH Using the SEARCH MODE MODE b but...

Page 12: ...r power is turned off To repeat the current track in the program press the REPEAT but ton repeatedly until TRACK appears during playback To repeat the entire program press the REPEAT button repeatedly...

Page 13: ...ing CD playback CD CD CD 1 1 STEREO AUDIO PLAY Each time you press the AUDIO button Stereo Sound mode Camera Angle This unit allows you to select a subtitle language if available during DVD play back...

Page 14: ...CK ENTER ENTER ENTER SETUP SETUP PARENTAL PASSWORD Please enter a 4 digit password SETUP AUDIO DRC DOWN SAMPLING DOLBY DIGITAL ON ON ON SETUP DISPLAY TV ASPECT STILL MODE ANGLE ICON AUTO POWER OFF PAN...

Page 15: ...IGHT 4 3 LETTERBOX AUTO ON OFF TV ASPECT 4 3 LETTERBOX STILL MODE AUTO ANGLE ICON ON AUTO POWER OFF ON PANEL DISPLAY BRIGHT 4 3 LETTERBOX AUTO OFF ON TV ASPECT 4 3 LETTERBOX STILL MODE AUTO ANGLE ICON...

Page 16: ...e played back Levels 7 to 2 Only DVD softwares intended for general use and chil dren can be played back Level 1 Only DVD softwares intended for children can be played back with those intended for adu...

Page 17: ...control directly at the sensor on the front of the player the remote control Reduce the distance to the player Replace the batteries in the remote control Re insert the batteries with their polaritie...

Page 18: ...ship as follows DURATION PARTS FUNAI CORP will provide parts to replace defective parts without charge for one 1 year from the date of original retail purchase Two 2 years for Picture Tube Certain par...

Page 19: ...reproducir repetidamente una canci n o disco Disco compacto Para reproducir repetidamente una canci n grupo o disco MP3 Para llamar el Men en un disco Para llamar el men inicial en un disco Para ampl...

Page 20: ...o play a track group or disc repeatedly MP3 To set black level on off To set virtual surround on off To arrange the playing order or play randomly To set virtual surround on off To call up the Menu on...

Reviews: