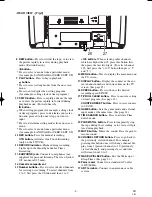


- 21 -
EN
9I03
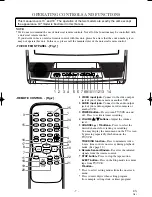
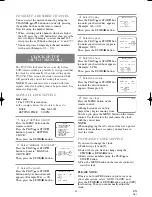
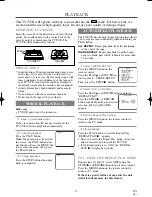
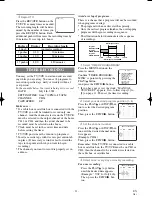
Push(es)
Display
Recording length
1 push
(normal recording)
2 pushes
0:30
30 minutes
3 pushes
1:00
60 minutes
17 pushes
8:00
480 minutes
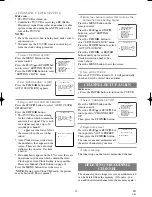
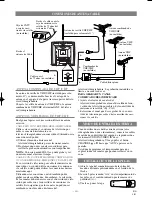
3
Begin OTR
Press the REC/OTR button on the
TV/VCR as many times as needed.
The recording length will be deter-
mined by the number of times you
press the REC/OTR button. Each
additional push will increase the recording time by
30 minutes. It is set up to 8 hours.
OTR(2 : 30)
SP
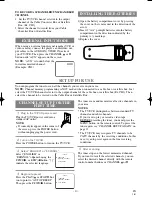
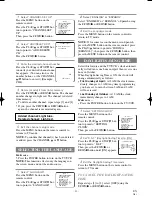
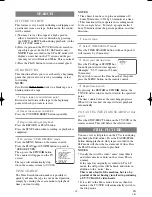
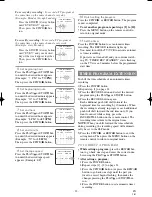
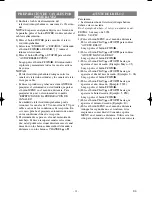
Avoid over lap of programs ...
There is a chance that a program will not be recorded
when programs overlap;
•
The program with an earlier start has priority.
•
Once the earliest program finishes, the overlapping
programs will begin recording in sequence.
•
The illustration below demonstrates the sequence
of recordings.
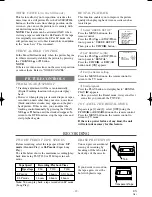
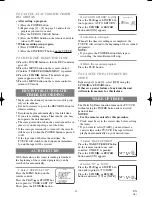
1
Select “TIMER PROGRAMMING”
Press the MENU button on the
remote control.
Confirm “TIMER PROGRAM-
MING” is pointed by pressing the
PLAY/
K
button.
And press the F.FWD/
B
button.
•
If you have not yet set the clock, “MANUAL
CLOCK SET” appears. If so, follow stops [3] to
[8] on page 11. Then set the timer recording.
2
Select your desired program position (1~8)
Press the PLAY/
K
or STOP/
L
but-
ton to select the desired program
position.
Then, press the F.FWD/
B
button.
3
Set the channel number
Press the PLAY/
K
or STOP/
L
but-
ton until the desired channel num-
ber appears.
(Example: CH61)
Then, press the F.FWD/
B
button.
Remember: If the TV/VCR is connected to a cable
box or satellite box, the TV/VCR must be on CH3 or
CH4, then the channel to be recorded is selected on
the cable box or satellite box.
4
Select once, every day or weekly recording
For once recording :
Press the PLAY/
K
(up) button
until the desired date appears.
(Example: “7/04” for July 4th).
Then, press the F.FWD/
B
but-
ton.
TIMER RECORDING
9:00AM
10:00AM
12:00PM
Program 1
10:00AM-11:00AM
Program 2
9:00AM-10:00AM
Program 3
9:30AM-12:00PM
11:00AM
Recording Sequence
*Recording period is SHADED
You may set the TV/VCR to start and end a record-
ing while you are away. You can set 8 programs to
record on specific days, daily or weekly within a 1
year period.
In the example below, the timer is being set to record:
DATE:
July 4th, 2003
SETTING TIME: from 7:30PM to 8:50PM
CHANNEL:
CH61
TAPE SPEED:
SP
Make sure ...
•
If a cable box or satellite box is connected with the
TV/VCR you will be limited to record only one
channel. And the channel selector on the TV/VCR
must be selected to the output channel of the boxes
CH 3 or CH 4 and then the actual channel to be
recorded must be selected on the boxes.
•
Clock must be set to the correct time and date
before setting the timer.
•
TV/VCR power must be turn on to program it.
•
Insert a cassette tape with its erase prevention tab
in place. (If necessary, rewind or fast forward the
tape to the point at which you want to begin
recording.)
•
The channel you want to record is properly set in
advance.
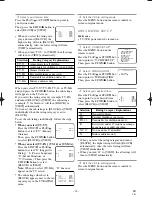
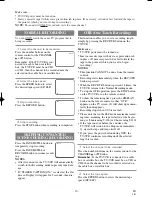
– M E N U –
B
TIMER PROGRAMMING
PICTURE CONTROL
SETTING CLOCK
CHANNEL SET UP
USER’S SET UP
V-CHIP SET UP
LANGUAGE [ENGLISH]
CAPTION [OFF]
ZERO RETURN
TIME SEARCH
– TIMER PROGRAMMING –
CH DATE
BEGIN END
- -
-/- - - - -
-:- -
-:- - - -
- -
-/- - - - -
-:- -
-:- - - -
- -
-/- - - - -
-:- -
-:- - - -
B
- -
-/- - - - -
-:- -
-:- - - -
- -
-/- - - - -
-:- -
-:- - - -
- -
-/- - - - -
-:- -
-:- - - -
- -
-/- - - - -
-:- -
-:- - - -
- -
-/- - - - -
-:- -
-:- - - -
– TIMER PROGRAMMING –
CH DATE
BEGIN END
- -
-/- - - - -
-:- -
-:- - - -
- -
-/- - - - -
-:- -
-:- - - -
- -
-/- - - - -
-:- -
-:- - - -
B
61
-/- - - - -
-:- -
-:- - - -
- -
-/- - - - -
-:- -
-:- - - -
- -
-/- - - - -
-:- -
-:- - - -
- -
-/- - - - -
-:- -
-:- - - -
- -
-/- - - - -
-:- -
-:- - - -
– TIMER PROGRAMMING –
CH DATE
BEGIN END
- -
-/- - - - -
-:- -
-:- - - -
- -
-/- - - - -
-:- -
-:- - - -
- -
-/- - - - -
-:- -
-:- - - -
B
61 7/04
FRI
-:- -
-:- - - -
- - -/- -
- - -
-:- -
-:- - - -
- -
-/- - - - -
-:- -
-:- - - -
- -
-/- - - - -
-:- -
-:- - - -
- -
-/- - - - -
-:- -
-:- - - -
T5401/7401UB.QX33 02.12.13 11:08 AM Page 21


