background image

Manual Version 1.0

7

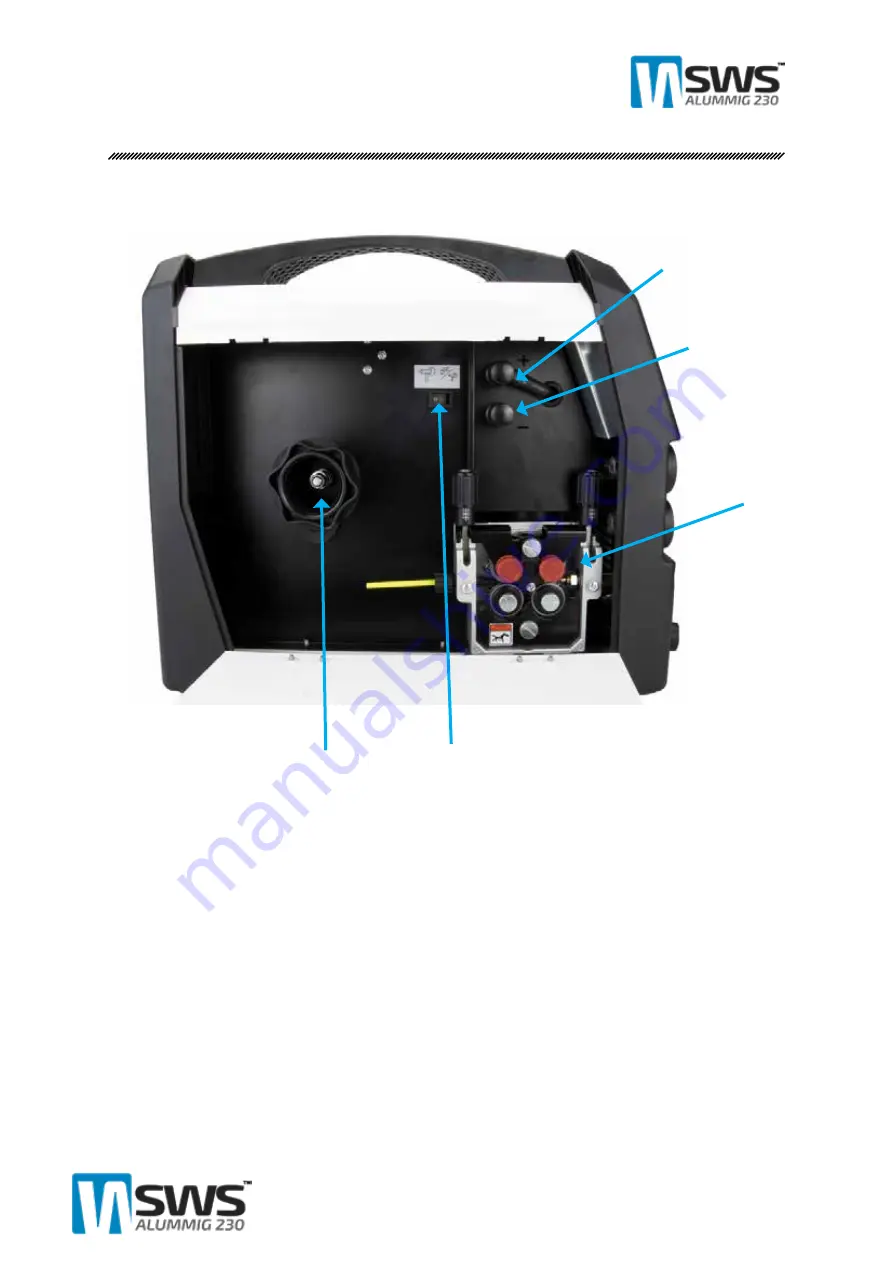
SIDE DOOR

1

2

3

5

4

1. MIG Torch EP Terminal - Electrode positive terminal with this connected the MIG torch 
is positive (EP) the ground lead goes to (-) port
2. MIG Torch EN Terminal - Electrode negative terminal with this connected the MIG 
torch is negative (EN) the ground lead goes to (+) port 
3. Wire feeding unit 
4. MIG wire spool carrier 200mm Diameter rolls only
5. Select spool gun or MIG torch and push pull torch operation  

Summary of Contents for ALUMMIG 230

Page 1: ...ALUMMIG Dual Pulse MIG Welder Operating Manual www swswelding com au ...

Page 2: ...which we do business Our goal has always been to provide an outstanding product that not only stands out from the competition but also reflects the quality we strive for in every aspect of our business philosophy From our second to none customer service excellence to technical support we work hard at what we do so that you can too We know you will enjoy using this machine The ALUMMIG 230 is manufa...

Page 3: ... faulty please contact SWS so a qualified technician can diagnose any issues and the equipment can be returned to make warranty repairs if necessary Australia New Zealand For service in Australia and New Zealand the customer should contact the Australian Customer Service line on 03 5766 2331 Return to SWS If you qualify for a warranty claim you will not be liable for any postage costs along with p...

Page 4: ...utionary Digital Display Large high visibility durable display allows easy viewing from a distance and continually provides you with necessary feedback for optimum welds Dual Pulse When welding thin gauge materials and joints like thin sheet metal and outside corners pulse allows you to focus the arc increase travel speed and minimise warpage Superior Duty Cycle Make bigger longer welds with ease ...

Page 5: ...torcycle custom Industries shops Automotive customs shops Automotive Components and Repairs Motorcycle Components and Repairs Technical Schools Aerospace Agriculture Farming Building and Construction Home Repair Workshops Input Voltage Hz 1 Phase 230V 15 15 Amp Plug 50 60 Hz Minimum Generator 6 6kW 8 5kVA at 0 8 PF Duty Cycle 40 C AMB TIG MMA 40 230A 100 140A Welding Current Range TIG MMA 10 230 A...

Page 6: ... welding or cutting arc or both to take fumes and gases away from your breathing zone and the surrounding area ARC RAYS Can injure eyes and burn skin Protect your eyes and body Use an approved welding plasma cutting helmet and filter lens and wear protective clothing Protect bystanders with suitable screens or curtains FIRE HAZARD Sparks spatter can cause fires Make sure therefore that there are n...

Page 7: ...ps The machines purpose Relevant safety precautions Arc welding and or hand held plasma cutting 2 The user must make sure that No unauthorized person in the vicinity of the working area of the equipment when it is used No person is unprotected when the arc is started 3 The workplace must Be suitable for the purpose Be free from weather 4 Personal safety equipment Always wear approved personal safe...

Page 8: ...pecial care not to damage any components Use compressed air set at no more than 70 Psi to carefully blow out all dust and debris Warning There is extremely dangerous voltage and power levels present inside this product Do not attempt to open or repair unless you are a qualified electrical tradespersons and you are qualified in training in power measurements and troubleshooting techniques If major ...

Page 9: ...vious screen 5 Wire Feed Fast feed use when installing new wire rolls 6 Gas Check Check gas flow and or use as purge function 7 Rotary Encoder Select and change functions 8 DCEP Port Direct current electrode positive port 9 DCEN Port Direct current electrode negative port 10 MIG EURO Port MIG Torch port 11 Switch Port Connect the TIG torch Spool gun or Push Pull gun 12 Gas Outlet Connect the TIG t...

Page 10: ... MIG torch is positive EP the ground lead goes to port 2 MIG Torch EN Terminal Electrode negative terminal with this connected the MIG torch is negative EN the ground lead goes to port 3 Wire feeding unit 4 MIG wire spool carrier 200mm Diameter rolls only 5 Select spool gun or MIG torch and push pull torch operation ...

Page 11: ...t the ground cable 2 For EP Electrode Positve MIG welding connect the ground cable 3 Connect the MIG torch and use retaining nut to secure 4 If using a spool gun or push pull gun connect into socket 5 If using GAS connect the Gas line here to regulator 6 Select the chosen MIG welding mode ...

Page 12: ...Manual Version 1 0 9 MMA SETUP 1 2 1 Connect the MMA Torch 2 Connect the Ground cable 3 Select MMA welding mode ...

Page 13: ...nual Version 1 0 10 GTAW SETUP 1 2 3 4 1 Connect the ground cable 2 Connect the TIG torch cable 3 Connect the TIG torch switch wire 4 Connect the TIG torch gas line 5 Connect the GAS line from regulator 5 ...

Page 14: ... the program then the machine adjust parameters accordingly for best results Single Pulse The Pulse is set synergically and you can choose from a variety of preset programs Dual Pulse Pulse Frequency and ratio can be set to further fine tune the welding characteristics You can choose from all common welding consumables From the main menu you can choose from GMAW GTAW or MMA welding modes The scree...

Page 15: ...lding Parameters Dual Dynamic Percentage of dual pulse peak and base current utilised 10 to 10 Dual Frequency Sets the pulse frequency from 0 0 5 0 Hz 1 Hz is 1 pulse per second Inductance Adjust the rate of current rise following the short circuit state thicker metals generally use higher inductance settings Run In Speed This slows down the speed in which the wire is fed into the work piece If wi...

Page 16: ...meters release for main welding parameters pull and hold for last welding parameters Tack Set the welding on time in seconds for consistent tack welds This parameter can be found in the MIG welding mode screens parameter box once selected The torch trigger modes can be used to change the welding amperage and voltage while welding This can be useful for when welding aluminum to use higher values at...

Page 17: ...nd dual pulse program modes When in manual mode the machine works as a regular MIG with the wire feed speed to amperage ratio set at factory specifications From the programs menu you can select all common welding wires and the machine will calculate the correct wire speed to amperage ratio along with voltage inputs ...

Page 18: ...Manual Version 1 0 15 GMAW PROGRAMS SINGLE PULSE ...

Page 19: ...Manual Version 1 0 16 GMAW PROGRAMS SYNERGIC ...

Page 20: ...fore welding starts Gas Post Flow Time of gas flow after the welding stops Pulse Frequency Pulses Per Second at the peak amps Pulse Peak Time Time spent at the peak amps setting Pulse Peak Current Pulse peak current The GTAW welding mode uses lift arc to establish the arc This is done by pressing the trigger switch then lifting the tungsten off the work piece with the torch the arc will then start...

Page 21: ...art current to help arc starts Arc Force Temporary increase of the output current during welding when the arc is too short Antistick Helps prevent rod sticking VRD Reduces the output voltage to safe levels The MMA welding process can be performed with this machine ...

Page 22: ... the weld pool during the background cycle making it slightly different from a true spray transfer and has some distinct advantages SINGLE PULSE Single pulse mode allows the user to select the consumables type and the machine synergically sets the parameters that are best suited for the welding being performed DUAL PULSE Dual pulse allows more control over the welding parameters but it is still pr...

Page 23: ...o the slot of the feed roller through the guide inlet penetrates into the welding gun feed pipe and then restore the pressure roller component to the original position adjust the pressure handle knob to the optimal position so that the feed roller consistently drives the wire forward Only apply enough pressure to to avoid slippage To much pressure can deform the welding wire causing feeding issues...

Page 24: ...d change to the roller needed Note that the flat key cannot fall off tighten the nut screw Then install the welding wire in the steps of replacing the welding wire Daily considerations Due to vibration the tightening nut may loosen during use check regularly tighten it if it is loose Do not touch the feed roller and gear with your hand when it is working Use in areas not exposed to direct sunlight...

Page 25: ... with a Teflon liner that can be used for all wire types from 0 8 1 2mm 1 Gas Shroud 2 Contact TIP CuCrzr Hardened for Pulse Welding 0 8 0 9 1 0 1 2mm 4 Diffuser 5 Torch head holder 6 Trigger 7 Handle Assembly 8 Cable 3M is the maximum length recommended for pulse MIG welding 9 EURO Connector Assembly ...

Page 26: ...ush pull gun and spool gun ready It uses a 24V supply for the gun Please contact SWS for adapting your gun or to see if suitable We will have 2 models available for purchase soon that will be calibrated with the machine This page will be updated once available ...

Page 27: ...1 0 24 SWITCH PORT PIN OUT PIN FUNCTION 1 Torch Switch 2 Torch Switch 3 Power of inner pull wire torch 4 Power of inner pull wire torch 5 Power of external pull push wire torch 6 Power of external pull push wire torch ...

Page 28: ... SPECIALISED WELDING SYSTEMS WEBSITE WWW SWSWELDING COM AU EMAIL SUPPORT SWSWELDING COM AU TELEPHONE 03 5766 2331 FOR MORE PROFESSIONAL PRODUCTS DELIVERED FAST CHECK OUT WWW SWSWELDING COM AU ...

Reviews: