background image

14 

@2021 Swellpro Technology Co., Limited 

2.


Before every flight in a new area. 

3.


After maintenance. 

4.


The distance from the last calibration area is more than 100M. 

5.


The aircraft is subject to strong magnetic interference. 

6.


The aircraft has been impacted or vibrated violently. 

7.


Then hovering in GPS mode, the aircraft has wobble or large drift. 

8.


The remote control prompts "warning compass error calibrate compass". 


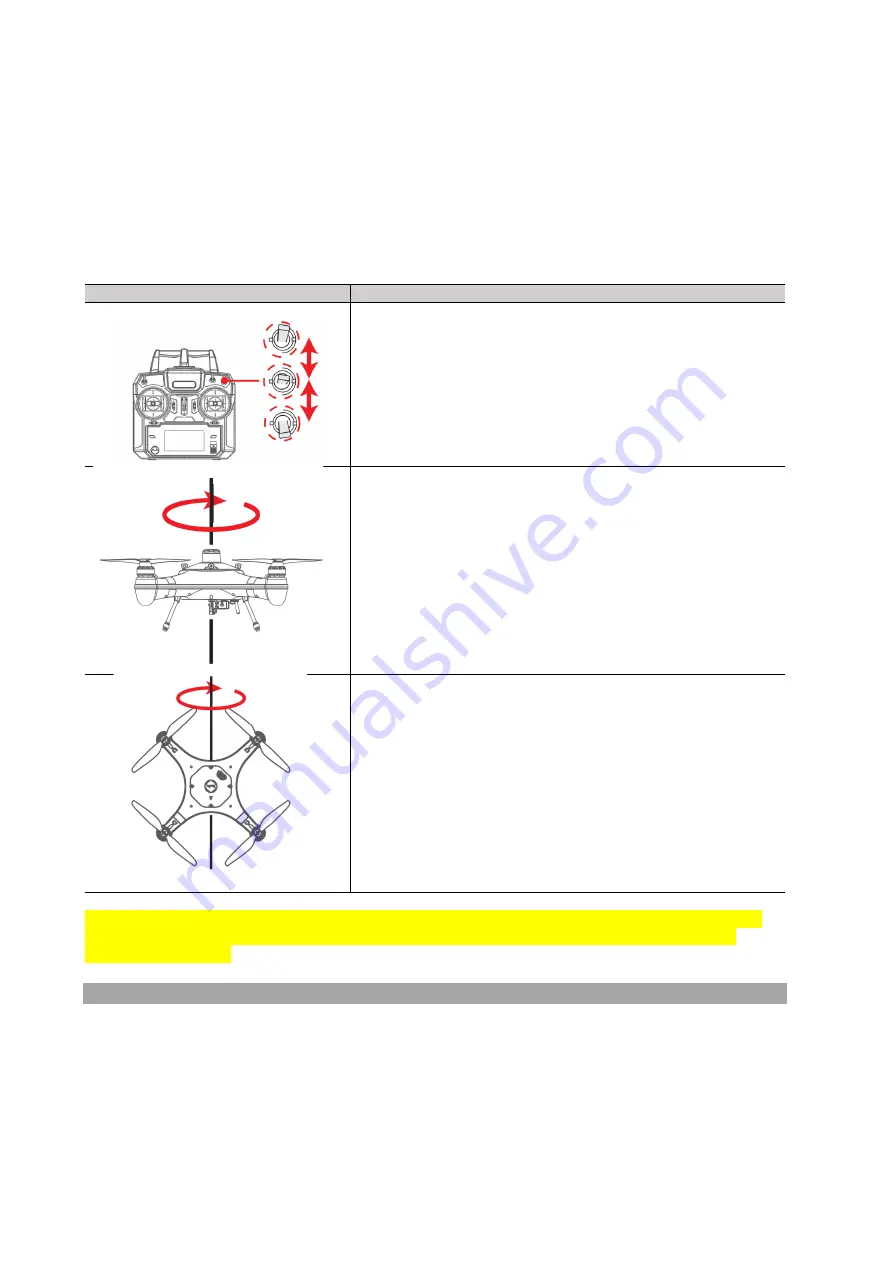
How to calibrate: 


Remote Control Operation 

Description 


1. Place the aircraft horizontally, turn on the remote control and 

the aircraft in turn, and wait for the aircraft to complete the self-

test. Quickly switch the flight mode paddle, when the green light 

of  the  rear  arm  flashes  quickly,  or  the  remote  control  display 

screen  prompts  "compass  calibration  rotate  the  aircraft 

horizontally", the system will enter the calibration state. 


2.  At  this  time,  pick  up  the  aircraft  horizontally,  rotate  it 

clockwise  for  about  2-3  turns  until  the  green  light  of  the  rear 

boom  flashes  slowly,  or  the  remote  control  screen  prompts 

"compass calibration rotate the aircraft vertical", and then enter 

the head to rotate vertically and downward to calibrate. 


3. Turn the nose 

down

 vertically and clockwise for about 2 ~ 3 

turns  until  the  remote  control  displays  "warning  aircraft 

initializing, please wait". Place the aircraft horizontally and keep 

it still for about 30 seconds. When the prompt "warning aircraft 

initializing,  please  wait."  on  the  remote  control  display 

disappears,  the  calibration  is  successful.  Please  restart  the 

aircraft. 


Compass calibration needs to be carried out outdoors. Do not calibrate in strong magnetic field area, 

near large metal objects (ie. Car), wireless, cellular Antenna’s or WIFI or near mobile phones with 

Bluetooth or WIFI on . 


IMU Calibration 


IMU provides the original data of the drone’s attitude sensor in space. Generally, gyroscope sensor, 

acceleration sensor and electronic compass provide 9dof data of spacecraft. IMU does not affect the 

flight, but it can be checked when the aircraft is a bit skewed. 


There are two ways to check IMU: 


Summary of Contents for JCMatthew FD1

Page 1: ...The Fishing Drone FD1 NZ Model User Manual V1 1NZ August 2021...

Page 2: ...nd references Additionally you can click on any topic in the Table of Contents to navigate directly to that topic Video Tutorials Visit and subscribe to the JCMatthew NZ YouTube channel for instructio...

Page 3: ...E 11 REMOTE CONTROL OPERATION 12 JOYSTICK INTJOYSTICKUCTION 12 FLIGHT 13 FLIGHT ENVIRONMENT REQUIREMENTS 13 PRE FLIGHT PREPARATION 13 COMPASS CALIBRATION 14 COMPASS CALIBRATION 14 IMU CALIBRATION 15 S...

Page 4: ...tant membrane protection cover 02 Cover hatch screw 03 Quick release carbon fiber propeller 04 Water resistant motor 05 Flight status indicator 06 Antenna 07 Damping cushion 08 Landing gear 09 GPS cov...

Page 5: ...e 06 Display Screen Display drone flight data 12 Left Hand Joystick Control left right flight Control forward backward Throttle switching method 1 Turn the left and right joystick 04 12 to the lower l...

Page 6: ...the hub until it engages then push the propeller downwards and rotate it 1 8th of a turn in its opposite direction to lock it So a CW clockwise propeller is locked by turning it counterclockwise 3 Ch...

Page 7: ...at the head of FD1 Once the Battery is Connected press and hold for 3 seconds to power on and press and hold again for 3 seconds to power off At the end of the flight please disconnect the battery ot...

Page 8: ...ion that the right joystick is moved If the right joystick is pulled down the drone will holds its altitude and fly straight back toward you for example ATTI Mode In this mode the drone does not provi...

Page 9: ...er of the DRONE has reached 14 6v the low voltage icon will be displayed on the remote control screen and the red indicator light on the forearm of the aircraft will flash twice continuously At this t...

Page 10: ...GPS Strength 06 Battery Voltage of Drone 07 Flight mode G GPS H Headless A ATTI 08 Remote control signal 09 Remote control Battery Voltage 10 Pitch angle 11 Yaw angle 12 Latitude 13 Longitude 14 Fligh...

Page 11: ...Launch AUTO Return Switch Normal Turn off the return function Return Home Turn on the one button return function Flight Modes G Turn on GPS flight mode H Turn on Headless mode A Turn on ATTI mode Remo...

Page 12: ...place without tall buildings A large number of reinforced buildings will affect the ability of the compass to work correctly and will block the GPS signal resulting in poor positioning effect of airc...

Page 13: ...ckly pushed left and right the front and rear arm lights flash alternately or the remote control display screen prompts warning aircraft initialization please wait to indicate that it has entered the...

Page 14: ...3 turns until the green light of the rear boom flashes slowly or the remote control screen prompts compass calibration rotate the aircraft vertical and then enter the head to rotate vertically and do...

Page 15: ...n to exit the self test prompt and complete the self test 2 The left hand throttle Joystick is vertically pulled to the highest position while the right hand Joystick is quickly pushed left and right...

Page 16: ...ONE 5 Place the aircraft on level open ground 6 Confirm that the flight control OSD data display is normal and the battery power is Greater than 16V Remote control battery power Is greater than 7 2V S...

Page 17: ...d keep this joystick position until the drone turns over When the drone turns over the motor stops At this time you can unlock the take off again Start Land on a Boat Esure there is enough space on th...

Page 18: ...be adjusted by hand adjustable angle 0 120 degrees the lens supports wide angle viewing The maximum load is 2kg FD1 with PL2 f payload release supports long distance bait droppoing and the FPV image s...

Page 19: ...load 2 0 KG Satellite GPS GLONSS Flight Control System SwellPro S4 Motor 3510 620KV ESC KMLNPE A 3 3 O Propeller 1242 Working Temperature 10 40 Battery Type 4S 16 8V 6500mAh Lipo Battery Weight 640 g...

Page 20: ...and put it in a safe and open area Maintain a safe distance from the battery until it is completely dry Never use the battery again and dispose of the battery properly as described in the Battery Disp...

Page 21: ...Keep the battery away from metal objects such as watches jewelry and hairpins Never transport a damaged battery or a battery with power level higher than 50 Do discharge the power to 50 or less befor...

Page 22: ...al level By activating the Return Home function the drone will rise to the return altitude 20m and then turn towards the Home Point before starting its return If any obstacles are in the flight path o...

Page 23: ...batteries 5 Flight Safety Please make sure you have a comprehensive understanding of the FD1 and all the necessary measures required to implement a successful return home function in the event of an e...

Page 24: ...e to failure in correctly calibrating the drone as outlined in the manual prior to flight Damage or injuries incurred as a result of the use or installation of any unauthorized third party accessories...

Page 25: ...25 2021 Swellpro Technology Co Limited Other Damage s or injuries that are not SwellPro s or JCMatthew NZ s liability...

Reviews: