


5
20180620 Swegon reserves the right to alter specifications.
WISE
Damper
Use
Use TuneWISE for commissioning. Commissioning must be
performed by qualified and trained WISE service engineers.
Use SuperWISE for settings, reading alarms, etc. refer to
the documentation for
SuperWISE II / SuperWISE II SC
.
Trouble shooting
The product is not shown in the system:
• Make sure that the product is energized. (e.g. diode).
• Make sure that the product is paired.
• Make sure the product is in the right radio network.
The product shows incorrect/no air flow/pressure
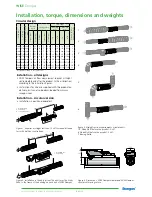
• Make sure that the product is installed according to the
recommended distance to disruptions, see “Installa-
tion”.
• Check that there is air flow/pressure.
• Make sure that the product is correctly oriented in
terms of air direction. The air flow must follow the
instructions on the product.
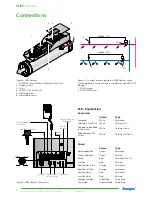
• Check that the measuring tube is mounted correctly,
plus to plus (red), minus to minus (blue).
• Check that the measuring tubes are undamaged.
The product does not regulate the air flow/pressure
• Check that the damper motor has not become
detached from the damper spindle.
• Check that the damper motor works by pressing in
the motor’s release button, turn the damper spindle,
release the release knob and then see whether the
damper motor starts to move.
• Check that the damper motor is connected to the right
input.
The product shows incorrect/no temperature
• Make sure that the temperature sensor does not hang
outside the product.
• Check that the temperature sensor is connected to the
right input.
The product shows incorrect/no VOC
• Make sure that this product is delivered with this type
of sensor, this is evident from the product label where
it states “SMA”.
• Make sure that the VOC sensor does not hang outside
the product.
• Check that the VOC sensor is connected to the right
input.
Cleaning
Ideally the product should be cleaned in connection with
the cleaning of the rest of the ventilation system.
Cleaning of electrical components
• If needed, use a dry cloth to clean the components.
• Never use water, detergent and cleaning solvent or a
vacuum cleaner.
External cleaning
• If necessary use tepid water and a well-wrung cloth.
• Never use detergent and cleaning solvent or a vacuum
cleaner.
Internal cleaning
• When cleaning the ventilation system, the product
must be dismantled if there are no cleaning hatches
close to the product.
• Cleaning equipment such as whisks and the like must
not be fed through the damper.
• If necessary remove dust and other particles that can
be present in the product.
• Never use detergent and cleaning solvent or a vacuum
cleaner.
Service/maintenance
• The product does not require any maintenance, except
for any cleaning when necessary.
• In connection with a service, mandatory ventilation
inspection or cleaning of the ventilation system, check
that the general condition of the products looks ok.
Pay particular attention to the suspension, cables and
that they sit firmly in place.
• It is not permissible to open or repair electrical compo-
nents.
• If you suspect that the product or a component is
defective, please contact Swegon.
• A defective product or component must be replaced by
an original spare part from Swegon.
Materials and surface treatment
All sheet-metal parts are galvanized sheet steel (Z275).
Disposal
Waste must be handled according to local regulations.
Product warranty
The product warranty or service agreement will not be in
effect/will not be extended if: (1) the product is repaired,
modified or changed, unless such repair, modification
or change has been approved by Swegon AB; or (2) the
serial number on the product has been made illegible or
is missing.


