background image

Design and specifications are subject to change without notice.

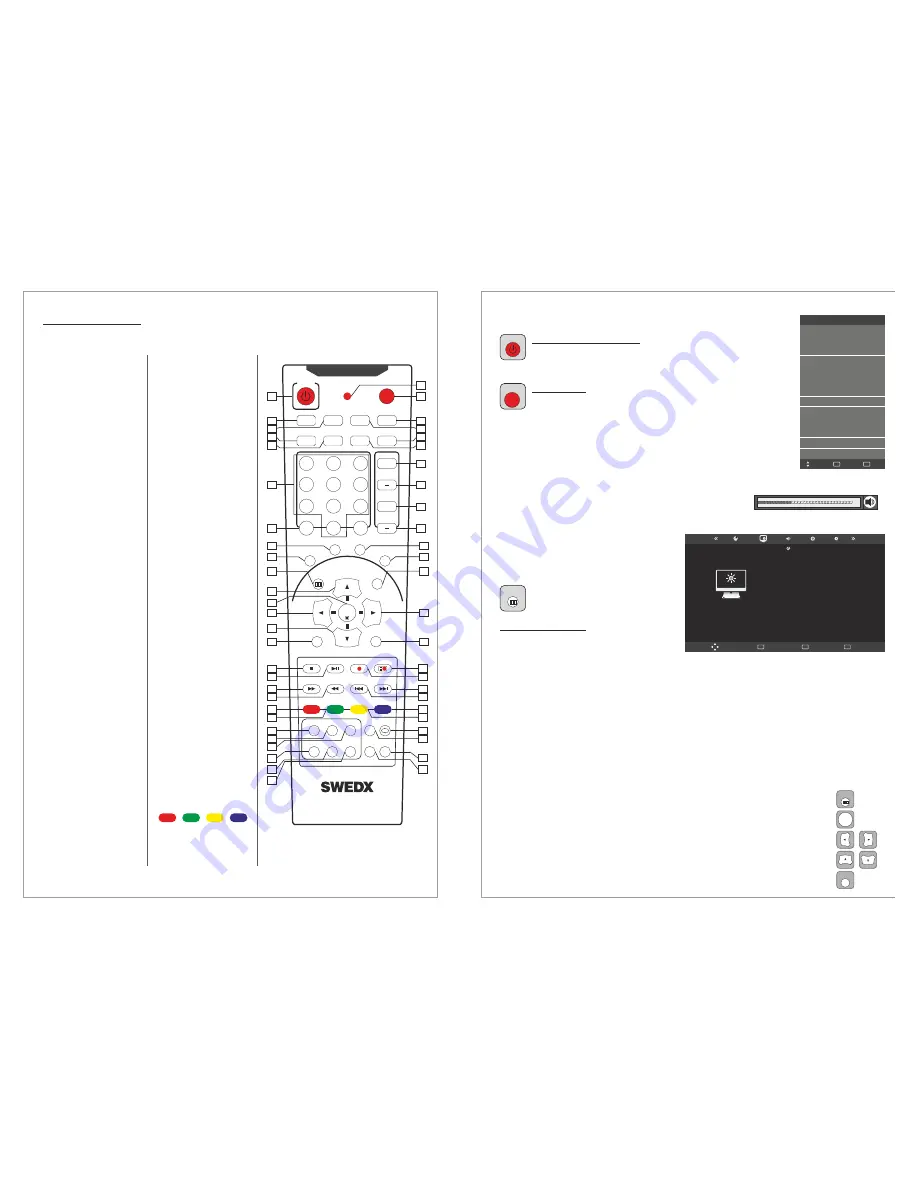
1. On/Off button
2. Turn Off/On TV

speakers

3. Enter sleep mode in

certain chosen time

4. Select audio mode
5. Aspect Ratio selection
6. Number buttons for

direct channel access

7. One/Two-digit channel

selection

8. Shortcut to HDMI

inputs.

9. Shortcut to PC input
10. Menu display. In OSD

sub-menu press to
access previous menu

11. Navigation button
12. Confirm/activate

button

13. Navigation/adjust

button

14. Navigation button

15. Shortcut to

Component

16. Stop recording/playing

and Activate Teletext

17. Start/Pause play,

Start/Paus time shift
and alter Teletext mix

18. Fast forward and

Teletext cancel

19. Fast backward and

Teletext index

20. Fast-text topic

selection in Teletext

UP

LEFT

DOWN

RED

21. Fast-text topic

selection in Teletext

22. List TV-channels
23. Alter TV/Radio

Channels mode

24. Choose Audio

language in DTV

25. EPG (Electronic

Program Guide)

26. Display favorite

channels list

27. Activate/alter subtitles

in USB movieplayer
and DTV

28. Flash when a button

is pressed

GREEN

Remote control buttons

29. Available sources

selection

When the channel list
is displayed, it scrolls
up to previous page in
the list.

Navigation/adjust
button
Shortcut to Scart

43. Display Recorded List

and Hold Teletext

44. Instant Recording and

Teletext size selection

45. Next Title and Reveal

Teletext

46. Previous Title and

Display time in
Teletext

47. Fast-text topic

selection in Teletext

48. Fast-text topic

selection in Teletext

49. Alter Replay mode in

USB mode

50. N/A for this model
51. N/A for this model
52. N/A for this model

Buttons
16,17,18,19,20,21,43,44,
45,46,47,48,49 are used
with the USB Media
Player.

RIGHT

Blue

Yellow

30. Display additional

information

31. Picture freeze
32. Alter sound mode
33. Alter picture mode
34. Volume increase
35. Volume decrease
36. Next channel. When

the channel list is
displayed, it scrolls
down to next page in
the list.

37. Previous channel.

38. Shortcut to DTV
39. Shortcut to ATV
40. Exit the OSD
41.

42.

7

POWER

SOURCE

MUTE

SLEEP

STILL

INFO.

DUAL I-II

ARC

PSM

SSM

+

VOL

CH

3

2

1

6

5

4

9

8

7

PRE/CH

PC

HDMI

DTV

ATV

MENU

EXIT

ENTER

Scart

Component

TTX ON

MIX

SIZE

HOLD

CANCEL

INDEX

TIME

REVEAL

RED

GREEN

YELLOW

BLUE

S.SELECT

PIP

POSITION

SIZE

AUDIO

SUB-T

TV/RD

FAV

LIST

EPG

0

-/--

+

1

2
3
4
5

30
31
32
33

29

28

7

8

9

10

11

12
13

14

15

38

39

40

41

42

16

18
19

17

43

45
46

44

20
21

47
48

22
23
24

25

26

27

49
50

51

52

34

35

36

37

6

Main Operations

Turning LCD-TV On And Off

Select Source

Press Power button on the remote control or the On/Off
button on the control buttons. The LCD will turn on and will

be ready to be used.

Press Source button on the remote control. Then you can
see the source list menu shown to the right. Press

Navigation Up/down button on the remote control to select

the source and confirm by pressing Enter.

Volume Control

Press VOL+ / VOL- button on the remote control to adjust the
volume level.
Press MUTE button on the remote control when you need to
mute the sound.

OSD Menu Structure

OSD (On Screen Display) allows users to
control or adjust various features and
settings in accordance with his/her
preferences.

•Press the MENU button on the

remote control to see the main
OSD menu.

Main Menu: Press the MENU button on
the remote control to enter the main OSD
menu.
First, choose Main menu item you need with the

◄ & ►.

To select a Main menu items, just press Enter or Navigation button

on the Remote Control.

Sub Menu: Each menu item has its own sub menu items to set.

Sub Menu items:
A: If there is no value to adjust it means there is a sub menu which you can access by pressing
Enter and modify the menu values.
Select sub-menu item with

buttons on the remote control and press

button to enter

the submenu or change the value.

OSD Menu Operation:

buttons

&

Enter

B: If there is no ► part, the item has adjustable values. Use the ◄ & ► buttons to adjust the
values.
C: If the sub-menu item is grey colored, it means this item is not available in the particular
mode.

▲ ▼

OSD Menu Operation

MENU

ENTER

LEFT

RIGHT

Press

button on the remote control to access the OSD Menu. Pressing the

same button again will move you backward in the OSD structure.

Press

button to confirm/select.

Use

&

buttons to navigate or change the parameters of the current

sub-menu.

Use

&

buttons to navigate in the OSD Menu.

Press          button to exit the OSD Menu.

UP

DOWN

EXIT

MENU

ENTER

EXIT

8

DVB-T

DVB-C

SAT (DVB-S/S2)

ATV

SCART

YPBPR

PC

HDMI1

HDMI2

Input Source

Menu

MENU

Quit

EXIT

Move

PICTURE

Move

Menu

MENU

OK

OK

Exit

EXIT

Picture Mode

Contrast

Brightness

Color

Sharpness

Tint

Standard

50

50

50

50

50

HDMI3

AV

USB 1

USB 2

SOURCE

POWER

MENU

Notvalible

for T/X12

Design and specifications are subject to change without notice.

Summary of Contents for XP-xxT12

Page 1: ...EDX TV Table SWEDX TV Stand ﻣﻬﻧ ﻟ ﺔ ﺳ ﻬﻧﻣﺎ Wall mount Tilt Wall mount Retractable Wooden Wall mount SWEDX shelves SWEDX Soundbar SWEDX Matrix Screens SWEDX offers a wide range of accessories for LCD LCD TVs with professional design and functionality Design and specifications are subject to change without notice ...

Page 2: ...n thunder rainy days especially with lightening please unplug the power and antenna cables Do not step on the power cable or tangle them together Avoid overload of the exterior electric outlet to prevent fire hazard of electric shock Clean the TV with dry and soft cloth lf your TV is broken do not repair it by yourself but contact the maintenance personnel lf the remote control is left unused for ...

Page 3: ...signal used by the user signal source with output is recommended progressive WARNING TO REDUCE THE RISK OF FIRE OR ELECTRIC SHOCK DO NOT EXPOSE THIS APPARATUS TO RAIN OR MOISTURE WARNING RISK OF ELECTRIC SHOCK DO NOT OPEN CAUTION TO REDUCE THE RISK OF ELECTRIC SHOCK DO NOT REMOVE COVER OR BACK REFER SERVICING TO QUALIFIED SERVICE PERSONNEL Design and specifications are subject to change without no...

Page 4: ...SUB T TV RD FAV LIST EPG 0 1 2 3 4 5 30 31 32 33 29 28 7 8 9 10 11 12 13 14 15 38 39 40 41 42 16 18 19 17 43 45 46 44 20 21 47 48 22 23 24 25 26 27 49 50 51 52 34 35 36 37 6 Main Operations Turning LCD TV On And Off Select Source Press Power button on the remote control or the On Off button on the control buttons The LCD will turn on and will be ready to be used Press Source button on the remote c...

Page 5: ... Channel Menu Press Enter or Move down with the down arrow Choose DVB C Manual Tuning Navigate right or left to choose the Frequency Press Enter to start manual search Menu Channel Dish Setup In the you can setup the built in satellite receiver You can scan the listed satellites frequencies edit them and add new satellite You can also setup additional equipments such as DiSEq and motor Dish Setup ...

Page 6: ...h Setup Menu Press Menu Choose Channel Menu Press Enter or Move down with the down arrow Choose Dish Setup and press Enter Choose the desired satellite and press Right 2 times to move to the LNB window Choose corresponding motor model to your motor and set the parameters for it such as limits positions Dish Setup Satellite HOTBIRD 6 7 ATRA 1H ASTRA 2A SIRIUS 5 NILESAT 101 EUTELSAT W3A EUTELST W1 B...

Page 7: ... auto Time to start the recording Time to end the recording All scheduled recordings will be listed in the recording list Recorded Mode Menu Note You can turn off the LCD after scheduling the recordings The LCD will execute the recording schedule while it is off While recording the LCD s LED power indicator will flash BBC Once 10 Dec 10 27 Select OK Recorded Mode Mode Start Time Minute Hour Date M...

Page 8: ...ve Menu MENU OK OK Exit EXIT Color Temperature Red Green Blue Aspect Ratio Noise Reduction Screen User 50 50 50 Just Scan On SOUND Move Menu MENU OK OK Exit EXIT Sound Mode Treble Bass Balans Auto Volume Surround Sound SPDF Mode Standard 50 50 0 Off SRS TruSurround Auto PCM OFF Design and specifications are subject to change without notice Menu Sound Auto Volume Menu Sound Surround Sound Menu Soun...

Page 9: ... HOLD CANCEL INDEX TIME REVEAL RED GREEN YELLOW BLUE S SELECT PIP POSITION SIZE AUDIO SUB T TV RD FAV LIST EPG 16 18 19 17 43 45 46 44 20 21 47 48 22 23 24 25 26 27 49 50 51 52 17 Design and specifications are subject to change without notice Text TV Teletext Most television stations provide written information services via Teletext The index page of the teletext service gives you information on h...

Page 10: ...nd brightness settings Check the volume Check the volume Check whether the MUTE button has been pressed on the remote control Adjust the color settings Check that the broadcast system selected is correct Try to identify the electrical appliance that is affecting the set and move it further away Plug your set into a different mains socket Check the direction location and connections of your aerial ...

Page 11: ...nnecting point and some other small changes which are out of SWEDX control and don t make any effect for the product functionality If the product fails within the manufacturer s DOA period a replacement product will be offered In many cases your TV may not need repair Before you contact us please consult the troubleshooting section in your user s manual or SWEDX s FAQ web pages at http www swedx c...

Page 12: ...Design and specifications are subject to change without notice 19 www swedx com SV88T8 SWEDX TV Table ...

Reviews: