


Users Manual Area Scan Cameras SVSGigE
Page 13
Users Manual –svs11002 and svs16000
© SVS-VISTEK GmbH
3.3.1
Network address assignment
The main components of a network address are the IP (Internet Protocol) address and
the network mask. The usually applied network mask “255.255.255.0” for small
networks up to 254 PCs represents a 32 Bit long bit mask where the first 24 bits are
set to 1 and the last 8 bits are set to 0. This network mask instructs the network
hardware to let those devices exchange information with each other where the first 24
bits of the IP addresses match for all devices.
Thus the variable range of addresses is made from all possible combinations of the
last 8 bits for which the network mask is set to 0. Exceptions are the first address 0
and the last address 255 which have special meanings for network management
functions. All other 254 combinations are usually free for assigning them to network
devices.
For a peer-to-peer connection of a GigE camera to a PC a network address assignment
based on LLA (Local Link Address) is recommended. This involves a network mask
“255.255.0.0” as well as a fixed first part “169.254.xxx.xxx” of the network address
range. A GigE camera will fall back to LLA soon after recognizing that no DHCP server
is available and that no fixed network address was assigned to the camera.
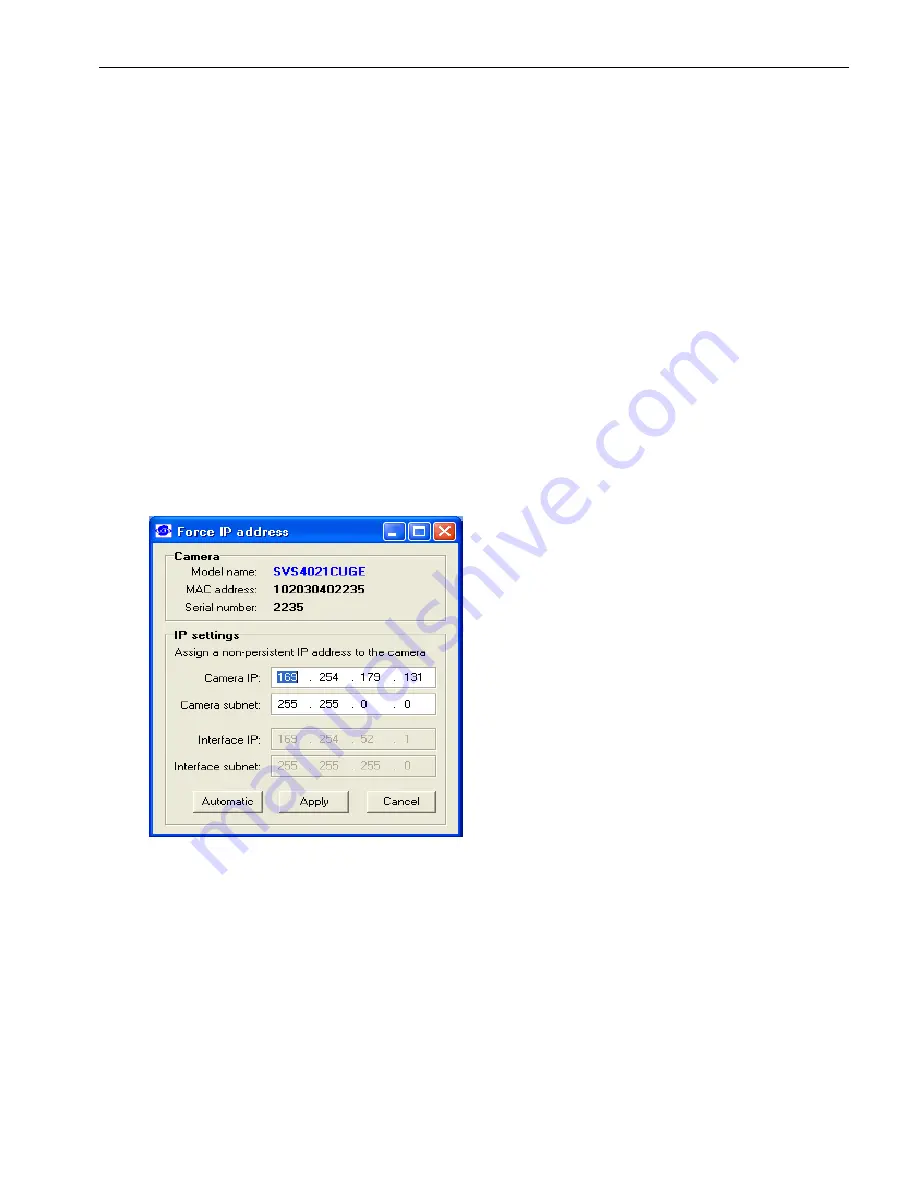
In case a camera can not be reached by the SVCapture application a dialog will appear
that allows for adjusting a camera’s network parameters. The simplest way is to click
on “Automatic” which will provide to a search for a free IP address and to assigning it
to the camera given that the interface IP could be determined properly.
That dialog can also be brought up when right clicking on an entry in the discover
dialog and subsequently selecting “Force IP address” in the context menu. However,
when adjusting the PC network settings to LLA the camera must not get assigned a
fixed network address
NOTE: The network settings performed in the “Force IP address” dialog are
only valid until the next shutdown and restart of a camera. For
permanently changing a camera’s network settings the “Network
settings” dialog can be used instead. That dialog can also be opened
in the context menu which is displayed when right-clicking on an
entry in the discover dialog.


