background image

Rev. 2018 / www.svb.de / Copyright SVB-Spezialversand Bremen

 7

3. Display Operation

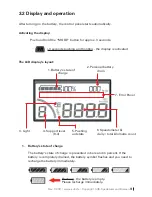
The display that is attached to the handlebar is one of the most important 
operation elements of your eBikes. It offers the following options: 

• 

Display of the battery‘s state of charge 

• 

Switching between the electric support levels (0-4 levels)

• 

Speedometer (current, average and maximum speed)

• 

Trip display (trip distance and total distance)

• 

Duration of the current trip

• 

Battery drain (approximate) of a single trip

• 

Error display

• 

Display and setting parameters (only to be used by the manufacturer or 
the service workshop)

MODE button

ARROW buttons

measurements in mm

Summary of Contents for Seatec Blizzard Pro

Page 1: ...USER MANUAL www svb24 com Rev 2018 Electric Bike with 4 level support and pushing aid 20...

Page 2: ...g the display attached to the handlebar you can quickly switch between the different modes Modus Display Description ZERO 0 No electric support all display functions are available ECO 1 Efficient elec...

Page 3: ...Bike The electric drive was developed specifically for people who want to combine simple operation compact design and high performance Even with health impairments you don t have to miss out on the mo...

Page 4: ...at you familiarise yourself with your new bicycle without making use of the motor support and to get used to functions like the brakes and gear change This SEATEC Electric Bike is a bicycle with pedal...

Page 5: ...and 4 6 bar According to road traffic regulations every bicycle is to be equipped with lights This user manual does not share the properties of repair installation and setting instructions If you want...

Page 6: ...eck the correct fit of all quick release fastener clamping levers Activation First check if the battery is locked see Chapter 1 Activate the main switch on the battery see ill 1 This will simultaneous...

Page 7: ...The battery s current state of charge is displayed on the display on the handlebar and can also be seen on the battery itself You can find more information on this topic in the following chapters It i...

Page 8: ...ons Display of the battery s state of charge Switching between the electric support levels 0 4 levels Speedometer current average and maximum speed Trip display trip distance and total distance Durati...

Page 9: ...panel s plug connections while the battery is turned on Avoid jolts or collision Always secure your bike from falling over Do not remove the protection film from the display The film protects the disp...

Page 10: ...tate of charge The battery s state of charge is presented in bars and in percent If the battery is completely drained the battery symbol flashes and you need to recharge the battery immediately 3 seco...

Page 11: ...s turned on or off Please note As you turn on the battery the light is turned on automatically You can turn the light on and off manually by pushing and holding the up arrow button for more than 3 sec...

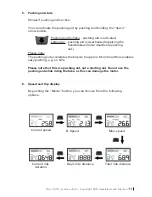
Page 12: ...ushing e g on hills Please note that this is a pushing aid not a starting aid Do not use the pushing aid while riding the bike as this can damage the motor 6 Speed and trip display By pushing the Mode...

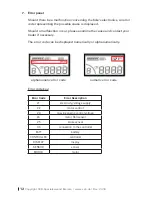
Page 13: ...xamine the cause and contact your trader if necessary The error code can be displayed numerically or alphanumerically Error code key Error Code Error Description 21 electricity voltage supply 22 motor...

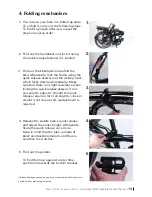
Page 14: ...rwards lock the frame using the quick release skewer and the locking lever which locks down automatically Make sure that there is a slight resistance when locking the quick release skewer if not you n...

Page 15: ...3 Charge the battery 4 After charging place the battery back in the bracket and lock the battery bracket Charge the battery after every use Only use the provided charger when charging the battery Idea...

Page 16: ...you should handle the batteries with great care Inappropriate use damages the batteries and poses risks We are not accountable for any damages caused by wrong handling The battery s guarantee spans 6...

Page 17: ...harge do not fully charge Maintenance storage and transport Storage Over extended periods of time lithium batteries should be stored not fully but halfway charged Procedure Charge the empty lithium ba...

Page 18: ...re information from your airline Batteries with more than 8 gramme of lithium count as big Depending on the battery s performance watt hours it is possible to conclude the amount of lithium 100 Wh equ...

Page 19: ...Do not use the battery if you notice corrosion smells or excessive heat Never use water or other liquids to cool an overly heated battery or to put it out during a fire Do not use damaged or deformed...

Page 20: ...provide sufficient ventilation to prevent corrosion damage Chain motor and electric parts should be examined and maintained regularly For the protection of cables electric plugs and electric contacts...

Page 21: ...20 Copyright SVB Spezialversand Bremen www svb de Rev 2018 Notes...

Page 22: ...Rev 2018 www svb de Copyright SVB Spezialversand Bremen 21 www svb24 com...

Reviews: