ENGINE 3-6
ENGINE INSTALLATION
Install the engine in the reverse order of engine removal.
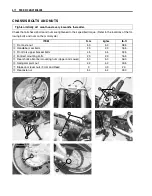
• Install the engine mounting bolts and nuts as shown in the fol-
lowing illustration.
• Tighten the engine mounting nuts to the specified torque.
NOTE:
The engine mounting nuts are self-locking. Once the nuts have
been removed, they are no longer of any use.
"
Engine mounting nut: 31 N·m (3.1 kgf-m, 22.5 lb-ft)
• Install the engine sprocket
1
with the drive chain.
• Install the snap ring
2
.
• Install the carburetor.
NOTE:
Install the clamp as shown in the illustration.
LH
RH
The removed snap ring must be replaced with a new
one.
The drive chain joint clip should be attached in the
way that the slit end will face opposite to the direction
of travel.
Air cleaner box
Upper
RH
LH

