4
ENGLISH
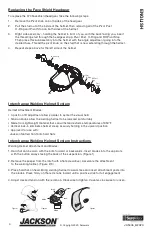
Replacing the Face Shield Headgear
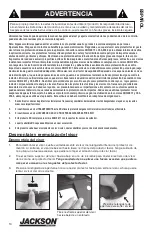
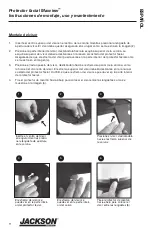
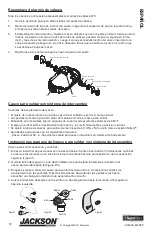
To replace the 370 Faceshield headgear, take the following steps:
1.
Remove the Pivot knob on both sides of the headgear.
2.
Pull the stud out of the inside of the helmet, then removing all of the Pivot Post,
O-Ring and Pivot Stop on both sides of the helmet.
3.
Right side assembly – holding the helmet in front of you, with the back facing you, insert
the threading stud through the headgear strap, Pivot Post, O-Ring and RH Pivot Stop.
Then place this sub assembly into the helmet with the angle adjustment going into the
desired hole. Thread the pivot knob on the stud that is now extending through the helmet.
4.
Repeat steps above for the left side of the helmet.
20
695
01-70-405-0-01
S
u
ita
b
le f
o
r u
se w
ith
:
• W
H
10 H
S
L-
1, H
S
L-
2, H
S
L-
10
0, a
nd H
alo X
• W
H
30 P
ro
fe
ss
io
na
l A
D
F
• W
H
40 P
ro
fe
ss
io
na
l, N
itr
o & S
m
arT
IG
er A
D
F
• W
H
50 M
as
te
r 3
-N
-1
, E
xe
cu
tiv
e 3
-N
-1
, a
nd B
O
S
S 3
-N
-1 A
D
F
• W
H
6
0 N
ex
G
en a
nd T
ru
eS
ig
ht D
ig
ita
l A
D
F
• W
H
70 B
H
3
A
N
S
I Z
87
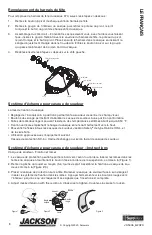
LH Pivot Stop
RH Pivot
Stop
Pivot Post
O-Ring
Pivot
Knob
Base
Stud
Replacing the Headgear
To replace the 370 Headgear, take the following steps:
• Remove the Pivot Knob on both sides of the headgear.
• Pull the stud out of the inside of the helmet, then removing
all of the Pivot Post, O-Ring and Pivot Stop on both sides
of the helmet.
• Right side assembly—Holding the helmet in front of you, with
the back facing you, insert the threaded stud through the
headgear strap, Pivot Post, O-ring and RH Pivot Stop.
Then place this sub-assembly into the helmet with the angle
adjustment going into the desired hole. Thread the Pivot Knob
on the stud that is now extending through the helmet.
• Repeat steps above for the left side of helmet.
Reemplazo del arnés de cabeza
Siga los pasos a continuación para reemplazar el arnés de
cabeza 370:
• Quite la perilla de pivote en ambos lados del arnés de cabeza.
• Retire el perno de la parte interior del casco, luego retire el
pasador de pivote, la junta tórica y el tope del pivote en ambos
lados del casco.
• Ensamblaje del lado derecho—Sujete el casco delante suyo
con la parte posterior frente a usted. Inserte el pasador roscado
a través del arnés de cabeza, pasador de pivote, la junta tórica
y tope de pivote RH.
Luego, coloque este arnés dentro del casco insertando la
correa de ajuste de ángulo en el orificio deseado. Enrosque la
perilla de pivote en el perno que se extiende a través del casco.
• Repita los pasos anteriores para el lado izquierdo del casco.
Remplacement du harnais
Pour remplacer le harnais du casque 370, suivre les étapes
ci-dessous :
• Enlevez le bouton à pivot se trouvant de chaque
côté du harnais.
• Retirez le goujon de l’intérieur du casque, puis retirez le poteau
de pivot, le joint torique et le butoir des deux côtés du casque.
• Assemblage du côté droit—Tenez le casque devant vous de
façon à voir l’arrière du casque. Insérez le goujon fileté dans la
courroie du harnais, puis faites de même avec le poteau de
pivot, le joint torique et le butoir à droite.
Placez ensuite le harnais dans le casque en insérant la sangle
d’ajustement d’angle dans le trou désiré. Enfilez le bouton à pivot
sur le goujon qui passe maintenant de bord en bord du casque.
• Répétez ensuite les étapes ci-dessus pour le côté gauche.
37
0F F
ac
e Sh
iel
d R
ep
lac
em
en
t H
ea
dg
ea
r
Ha
rn
ais d
e r
em
pl
ac
em
en
t p
ou
r
éc
ra
n f
ac
iau
x d
e c
as
qu
e 3
70
F
•
Ov
er
si
ze
d r
at
ch
et w
ith s
of
t r
ub
be
r g
rip a
llo
w
s f
or e
as
y a
dj
us
tm
en
t w
he
n w
ea
rin
g g
lo
ve
s
• C
om
fo
rt C
ra
dl
e p
iv
ot
in
g h
ea
dp
ad t
ha
t c
on
fo
rm
s t
o y
ou
r h
ea
d f
or t
he h
ig
he
st
de
gr
ee o
f c
om
fo
rt
• T
hr
ee
-p
os
iti
on s
lid
er a
dj
us
ts d
is
ta
nc
e o
f t
he l
en
s f
ro
m y
ou
r e
ye
s f
or p
re
ci
se v
is
io
n
• V
er
tic
al
lo
ck
-in
e
lim
ina
te
s he
lm
et
c
re
ep
ing
• R
ep
la
ce
ab
le s
w
ea
tb
an
d p
ar
t #
32
18
7
•
Le c
liq
ue
t s
ur
di
m
en
si
on
né à p
ris
e d
ou
ce e
n c
ao
ut
ch
ou
c p
er
m
et u
n a
ju
st
em
en
t f
ac
ile
lo
rs
qu
e v
ou
s p
or
te
z d
es g
an
ts
• L
e c
ou
ss
in
et p
iv
ot
an
t d
u b
er
ce
au s
’a
ju
st
e à v
ot
re t
êt
e p
ou
r o
ffr
ir u
n c
on
fo
rt s
up
ér
ie
ur
• L
e c
ur
se
ur à t
ro
is p
os
iti
on
s p
er
m
et d
’a
ju
st
er l
a d
is
ta
nc
e e
nt
re l
a l
en
til
le e
t v
os y
eu
x
po
ur
o
pt
im
is
er
la
v
isi
on
• L
a fi
xa
tio
n v
er
tic
al
e e
m
pê
ch
e l
e fl
ua
ge d
u c
as
qu
e
• B
an
de
au
an
tis
ud
or
ip
are
re
m
pl
aç
ab
le
n
o 3
21
87
M
ad
e i
n V
iet
na
m / F
ab
riq
ué a
u V
iet
na
m /
He
cho
e
n V
ietna
m
USA:
SureWerx USA Inc.,
Elgin, IL, USA 60123
surewerx.com/usa
Europe:
Balder d.o.o. Teslova ulica 30,
SI-1000 Ljubljana, Slovenia
balder.eu
Canada:
SureWerx, 49 Schooner St.,
Coquitlam, BC V3K 0B3
surewerx.com
E
W
AR
NI
NG:
Can
cer
an
d R
ep
rod
uct
ive
H
arm
—
ww
w.P
65
W
ar
nin
gs.
ca.g
ov
F
AV
ER
TIS
SEME
NT
:
Can
cer
et T
rou
bles
d
e l’ap
pare
il re
pro
du
cte
ur—
ww
w.P
65
W
ar
nin
gs.
ca.g
ov
S
A
DV
ER
TENC
IA
:
Cán
cer
y Dañ
o R
ep
rod
uct
ivo
—
ww
w.P
65
W
ar
nin
gs.
ca.g
ov
6
2
6
0
5
3
6
1
0
6
8
5
EWP0
58
-1
3"
x
11
.2
5"
Pr
in
t S
id
e V
iew
12 p
t S
BS
11
.2
5"
4"
4"
3.25
"
1.1
25
"
.1
87
5"
.1
87
5"
3"
JA5446_6/2020
© Copyright 2020, Surewerx
Interchange Welding Helmet System Instructions
Welding Helmet Attachment and Blades:
1. Hard hat can be worn with the brim forward or backwards. Insert blades into the cap slots
with the button always facing the back of the suspension. (Figure 1)
2. Remove the keeper from the latch with a flat screwdriver. Assemble the attachment
to the welding helmet. (Figure 2/3)
3. Place hard hat on head. Bring welding helmet towards face and insert attachment posts into
the blades. Press firmly on the red knobs inward until a positive click for full engagement.
4. Adjust desired tension with the red knob. Clockwise to tighten. Counter-clockwise to loosen.
keeper
latch
button
knob
blade
Figure 3
Figure 2
Figure 1
Interchange Welding Helmet System
Helmet Attachment Blades:
• 4-position tilt adjustment allows welder to center the visual field
• Tension knobs allow the welding helmet to be lowered comfortably
• Made from lightweight material that can withstand extreme temperatures of 350°F
• Vertical lock-in eliminates helmet creep securely holding in the upward position
• Approved for use with:
Jackson Slotted front brim hard hats


